Welcome to Moda Fabrics!
Dec 1: Country Winter
Dec 1: Country Winter
Published:
Nov 30 2018 - 23:00

![]()
Hello! It’s Amanda of Pieced Just Sew and I am excited to be kicking off this year’s Countdown to Christmas! This year’s blocks will be made with a variety of red prints, solid red, and solid white and each block can be made as both a 12” block and a 6” block. Be sure to check back each day between now and Christmas for a brand new block!
Today’s block may look familiar. It is the block from my recent Country Summer quilt tutorial. However, in the spirit of this time of year, I have renamed it Country Winter! So dig into your stash, pick a couple of your favorite red prints, and let’s get started!
This block finishes at 6" or 12" square.
![]()
1 red fat quarter (or 2 if you want to make each block different)
1 white fat quarter
| 6" Block | 12" Block |
|---|---|
| From white fabric, cut (1) 3-1/2” square, (4) 3” squares, (1) 2-1/2"square | From white fabric, cut (1) 5-1/2” square, (4) 5” squares, (1) 4-1/2"square |
| From red fabric, cut (1) 3-1/2” square, (2) 3” squares | From red fabric, cut (1) 5-1/2” square, (2) 5” squares |
![]()
The method of making each size block is exactly the same. The only difference is the size of the pieces. All of the instructions below will list the 12” block pieces first, with the 6” block pieces in parenthesis.
Making the half square triangles:
Draw a diagonal line from corner to corner on the 5” (3”) background squares (note: you will only use half of the 5” (3”) background squares for this step, but go ahead and draw the line on all of them). Pair each square with a 5” (3”) print square, right sides together. Sew 1/4” away from the line on both sides. Cut apart on the center lines and press towards the print fabric to create half square triangles (HST). You will have four HSTs of each print. Trim each to 4-1/2” (2-1/2”).

Making the quarter square triangles:
The portion of the block with the small triangles may not look like traditional quarter square triangles, but they are constructed in a very similar way. Draw a diagonal line from corner to corner on the 5-1/2” (3-1/2”) background squares. Pair each square with a 5-1/2” (3-1/2”) print square, right sides together. Sew 1/4” away from the line on both sides. Cut apart on the center lines and press towards the print fabric to create half square triangles (HST). You will have two HSTs of each print.
Next, pair each HST that you just created with the remaining 5” (3”) background squares (if you have not already drawn diagonal lines on the background squares, do so now). You can trim your HSTs down to 5” (3”) if you prefer, but it is not necessary. Center the smaller background square over the larger HST, keeping the points on two sides of the background square lined up with the seam of the HST, as shown below. Make sure your drawn line is perpendicular to the seam on the bottom piece. The only difference from traditional quarter square triangles is that your top piece is a solid square rather than another HST.
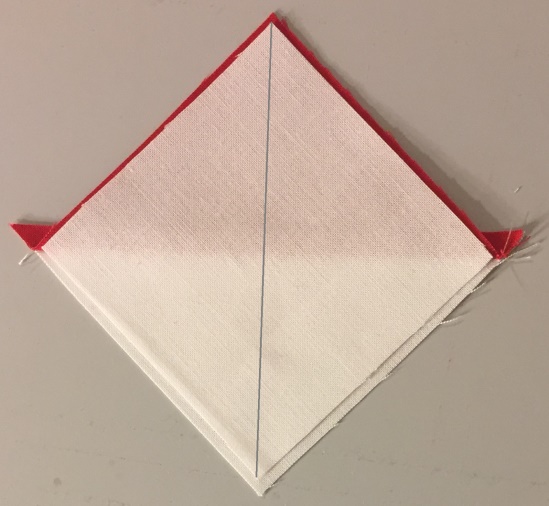
Make sure your drawn line on the solid square crosses the seam line of the HST (rather than being parallel). Sew 1/4” away from the line on both sides. Cut apart on the center lines and press towards the print fabric to create quarter square triangles (QST). You will have four QSTs of each print. Trim each to 4-1/2” (2-1/2”). Be careful when trimming to avoid cutting off the points of the print fabric.

You may notice that the blocks are not exactly the same. When you cut your squares apart on the center line, you have one with a diagonal seam going in one direction and one with the seam going the opposite direction. Because three-fourths of the block is background, the blocks will look identical in the final block regardless of which way the final diagonal seam is going.
Assembling the block:
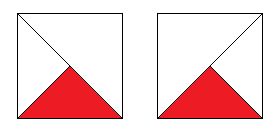
Gather all the pieces with the same print (4 HSTs and 4 QSTs) and a 4-1/2” (2-1/2”) background square. Arrange the segments as shown below. Don’t worry about the direction of that last diagonal seam in the QSTs. It does not matter which direction that seam is going in the block, as long as the print quarter of the segment if facing towards the center of the block. Sew the segments in three rows of three, pressing in the direction shown in the diagram. Sew the three rows together, pressing towards the middle row.

![]()
This block finishes at 6" or 12" square.

Thank you for joining me today! If you make this block and share it on Instagram, please tag me! (@piecedjustsew). I would love to see yours! Be sure to check back here tomorrow for the next Countdown to Christmas block by another Moda Bake Shop chef!
Amanda Wilbert
{blog: Pieced Just Sew}
{instagram: @piecedjustsew}
{shop: Pattern shop}
![]()
Posted in:
Comments