Welcome to Moda Fabrics!
Sudoku Quilt
Sudoku Quilt
Published:
Mar 11 2015 - 23:00
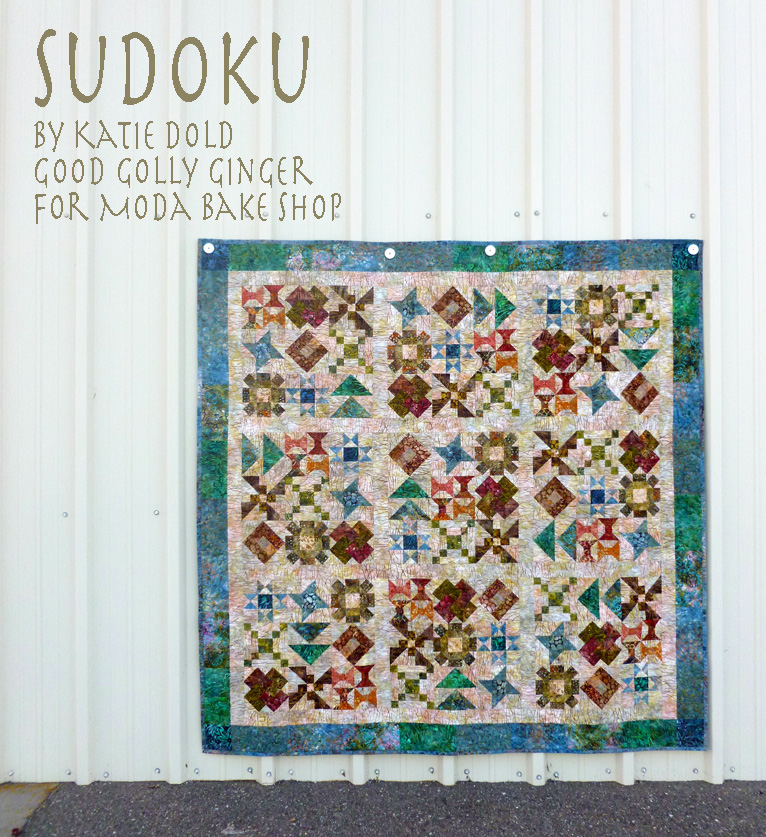

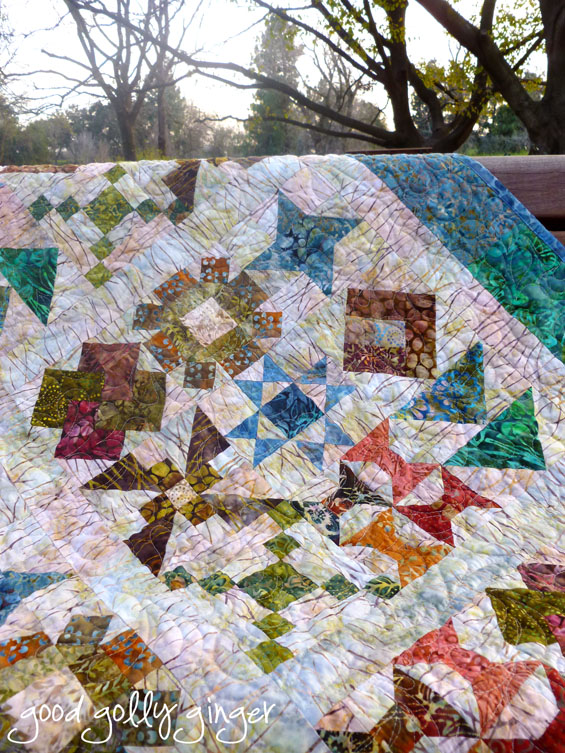
Hello new Bake Shop friends! My name is Katie, and I blog at Good Golly Ginger. I’m happy to share my first quilt here on the Moda Bake Shop. I created the Sudoku quilt for my Aunt who is a retired math teacher and fellow quilter. Sudoku is a number game, a puzzle in the form of a grid of nine squares that are each subdivided into another grid of nine squares. The rules of the game can be found here. Instead of using numbers for this game of Sudoku, I chose to use traditional quilt blocks to complete my grid. I used Edyta Sitar’s new batik line, Sticks and Stones. This fabric is such a joy to work with. Any quilty math lover is sure to love this quilt.
![]()
1 Fat Quarter Bundle in Sticks and Stones Batiks (or 25 fat quarters)
3-1/2 Yards Background Fabric of Sticks and Stones Batiks Sticks in Sand (42219 90)
For The Border:
- 1/4 Yard of Sticks and Stones Batiks Stones in River Blue (42219 27)
- 1/4 Yard of Sticks and Stones Batiks Lotus in River Blue (42219 78)
- 1/4 Yard of Sticks and Stones Batiks Dogwood in River Blue (42219 86)
- 1/4 Yard of Sticks and Stones Batiks Iris in Aqua (42219 82)
2-1/2 Yards of 108” Sticks and Stones Batiks Stones in River Blue (11100 27) for the backing and binding
![]()
Notes:
- Use a scant quarter inch seam allowance and press seams open, unless otherwise noted.
- Each subdivided block is 6-1/2” unfinished.
- Each grid of nine blocks is 18-1/2” unfinished.
- Terminology: HST - Half Square Triangle, QST - Quarter Square Triangle
Block 1: Wagon Wheel
 Diagram 1
Cut For Each Wagon Wheel Block:
a. Daisy Bark (42219 72)
- (4) 1-7/8” squares
- (4) 1-1/2” x 2-1/2” rectangles
b. Moss Algae (42219 77)
- (2) 1-7/8” squares, cross cut once on the diagonal
- (4) 1-1/2” x 2-1/2” rectangles
c. Day Lily Sand (42219 76)
- (1) 2-1/2” square
d. Sticks Sand (42219 90)
- (6) 1-7/8” squares, cross cut once on the diagonal
Wagon Wheel Block Assembly:
- Stitch one fabric a 1-1/2” x 2-1/2” rectangle to one fabric b 1-1/2” x 2-1/2” rectangle. Press. Make four units.
- Arrange and stitch three fabric d triangles and one fabric b triangle to the corners of one fabric a 1-7/8” square. See Diagram 2. Press and trim to 2-1/2” square. Repeat and Make 4 units.
- Arrange the units made in steps 1 and 2 and the remaining fabric c 2-1/2” square as shown in Diagram 2. Stitch units together and press.
- Repeat steps 1-3 to make nine wagon wheel blocks.
 Diagram 2
Block 2: 6-Grid Chain
 Diagram 3
Cut For Each 6-Grid Chain Block:
a. Shrub Algae (42219 81)
- (6) 1-1/2” squares
b. Rocks Algae (42219 80)
- (6) 1-1/2” squares
c. Sticks Sand (42219 90)
- (4) 1-1/2” x 2-1/2” rectangles
- (4) 1-1/2” x 4-1/2” rectangles
6-Grid Chain Block Assembly:
- Stitch one fabric a square to one fabric b square and press. Make two units.
- Arrange the two units made above as shown in Diagram 4. Stitch together to make one 4-patch unit and press.
- Stitch two fabric c 1-1/2” x 2-1/2” rectangles to the top and bottom of the 4-patch unit made above. Press.
- Stich one fabric a square and one fabric b square to each end of one fabric c 1-1/2” x 2-1/2” rectangle. Repeat to make 2 units. Arrange and stitch as shown in Diagram 4. Press.
- Stitch two fabric c 1-1/2” x 4-1/2” rectangles to each end of the unit made above. Press.
- Stich one fabric a square and one fabric b square to each end of one fabric c 1-1/2” x 4-1/2” rectangle. Repeat to make 2 units. Arrange and stitch as shown in Diagram 4. Press.
- Repeat steps 1-6 to make nine 6-Grid Chain blocks.
 Diagram 4
Block 3: Card Trick
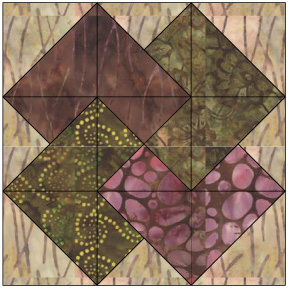 Diagram 5
Cut For Each Card Trick Block:
a. Sticks Redwood (42219 57)
- (1) 2-7/8” square, cross cut once on the diagonal
- (1) 3-1/4” square, cross cut twice on the diagonal (use 2 triangles only)
b. Lotus Olive (42219 85)
- (1) 2-7/8” square, cross cut once on the diagonal
- (1) 3-1/4” square, cross cut twice on the diagonal (use 2 triangles only)
c. Raindrop Olive (42219 79)
- (1) 2-7/8” square, cross cut once on the diagonal
- (1) 3-1/4” square, cross cut twice on the diagonal (use 2 triangles only)
d. Stones Redwood (42219 22)
- (1) 2-7/8” square, cross cut once on the diagonal
- (1) 3-1/4” square, cross cut twice on the diagonal (use 2 triangles only)
e. Sticks Sand (42219 90)
- (2) 2-7/8” squares, cross cut once on the diagonal
- (1) 3-1/4” square, cross cut twice on the diagonal
Card Trick Block Assembly:
- Arrange the center of the card trick block with one 3-1/4” triangle from fabrics a, b, c, and d as shown in Diagram 6. Stitch the triangles together to make the block center and press. Trim to 2-1/2” square.
- Stitch the remaining 3-1/4” triangles of fabrics a, b, c, and d to one 3-1/4” triangle of fabric e. Refer to Diagram 6 for the layout. Press.
- Stitch the corresponding 2-7/8” triangle to the units made above. Refer to Diagram 6 for the layout. Press. Trim each to 2-1/2” square.
- Make 4 HST units using the remaining 2-7/8” triangles of fabrics a, b, c, and d to the remaining 2-7/8” triangles of fabric e. Press and trim each to 2-1/2” square.
- Arrange the HST units and the QST unit as shown in Diagram 6. Stitch units together and press.
- Repeat steps 1-5 to make nine card trick blocks.
 Diagram 6
Block 4: Propeller
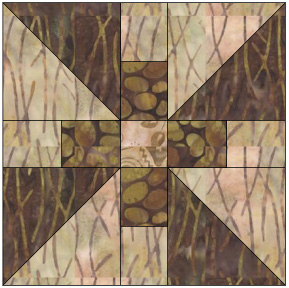 Diagram 7
Cut For Each Propeller Block:
a. Sticks Bark (42219 68)
- (2) 3-3/8” squares, cross cut once on the diagonal
b. Stones Bark (42219 34)
- (4) 1-1/2” x 1-3/4” rectangles
c. Day Lily Sand (42216 76)
- (1) 1-1/2” square
d. Sticks Sand (42219 90)
- (2) 3-3/8” squares, cross cut once on the diagonal
- (4) 1-1/2” x 1-3/4” rectangles
Propeller Block Assembly:
- Stitch one fabric a triangle to one fabric d triangle to make one HST unit. Press. Trim to 3” square.
- Repeat step 1 to make four HST units total.
- Stitch one fabric b rectangle to one fabric d rectangle. Press.
- Repeat step 3 to make four units.
- Arrange and stitch together the HSTs, rectangles, and remaining fabric c square as shown in Diagram 8. Press.
- Repeat steps 1-5 to make nine propeller blocks.
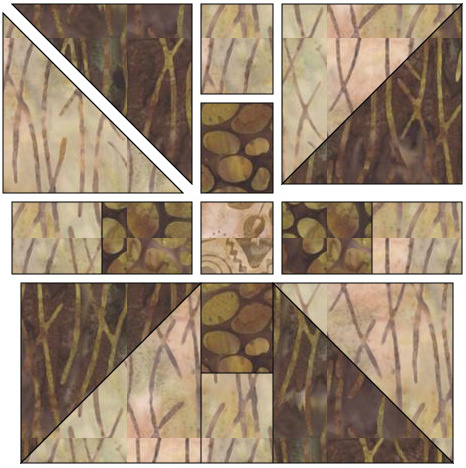 Diagram 8
Block 5: Spool
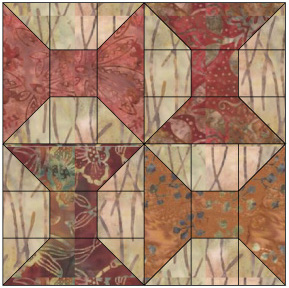 Diagram 9
Cut For Each Spool Block:
a. Fern Salmon (42219 69)
- (2) 1-1/2” x 3-1/2” rectangles
- (1) 1-1/2” square
b. Shrub Salmon (42219 70)
- (2) 1-1/2” x 3-1/2” rectangles
- (1) 1-1/2” square
c. Morning Glory Rust (42219 71)
- (2) 1-1/2” x 3-1/2” rectangles
- (1) 1-1/2” square
d. Ivy Rust (42219 74)
- (2) 1-1/2” x 3-1/2” rectangles
- (1) 1-1/2” square
e. Sticks Sand (42219 90)
- (24) 1-1/2” squares
Spool Block Assembly:
- Place (2) 1-1/2” squares of fabric e on each end of one fabric a rectangle. Draw diagonal lines on each square as shown below (dashed line, Diagram 10). Stitch on the drawn lines, and trim 1/4” from the stitched line (red line, Diagram 10). Press seams. Repeat with remaining fabric a rectangle. This makes the top and bottom of one spool.
- Repeat step 1 with fabrics b, c, and d.
- Assemble the center of the spool by stitching (2) 1-1/2” fabric e squares to each end of the 1-1/2” fabric a square. Press.
- Repeat step 3 with fabrics b, c, and d.
- Stitch the spool top and bottom to each matching spool center, making four spools.
- Arrange and stitch the spools as shown in Diagram 9 to make one complete spool block.
- Repeat steps 1-6 to make nine spool blocks.
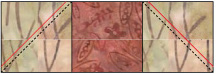 Diagram 10
Block 6: Friendship Star
 Diagram 11
Cut For Each Friendship Star Block:
a. Dogwood River Blue (42219 86)
- (2) 2-7/8” squares, cross cut once on the diagonal
b. Stones Navy (42219 24)
- (1) 2-1/2” square
c. Sticks Sand (42219 90)
- (2) 2-7/8” squares, cross cut once on the diagonal
- (4) 2-1/2” squares
Friendship Star Block Assembly:
- Make four HST units using triangles from fabric a and fabric c. Press and trim each HST unit to 2-1/2” square.
- Assemble and stitch the friendship star block as shown in Diagram 12. Press.
- Repeat steps 1 and 2 to make nine friendship star blocks.
 Diagram 12
Block 7: Tilted Log Cabin
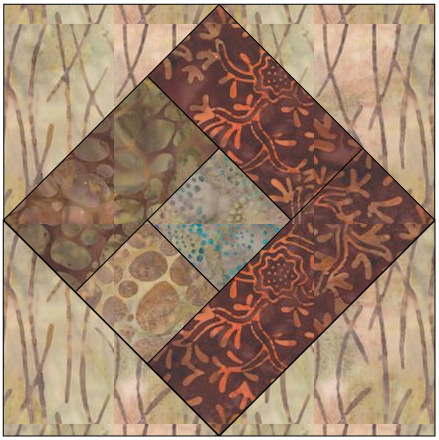 Diagram 13
Cut For Each Tilted Log Cabin Block:
a. Raindrop Milkweed (42219 75)
- (1) 1-7/8” square
b. Stones Milkweed (42219 178)
- (1) 1-7/8” square
c. Stones Pinecone (42219 28)
- (1) 1-7/8” x 3-3/8” rectangle
d. Dogwood Redwood (42219 72)
- (1) 1-7/8” x 3-3/8” rectangle
- (1) 1-7/8” x 4-3/4” rectangle
e. Sticks Sand (42219 90)
- (2) 3-7/8” squares, cross cut once on the diagonal
Tilted Log Cabin Block Assembly:
- Stitch one fabric a square to one fabric b square and press.
- Stitch one fabric c rectangle to the unit made above and press.
- Stitch one fabric d 1-7/8” x 3-3/8” rectangle to the unit made above and press.
- Stitch one fabric d 1-7/8” x 4-3/4” rectangle to the unit made above and press.
- Stitch on fabric e triangle to each of the four corners of the unit made above. Press. Trim to 6-1/2” square.
- Repeat steps 1-5 to make nine tilted log cabin blocks.
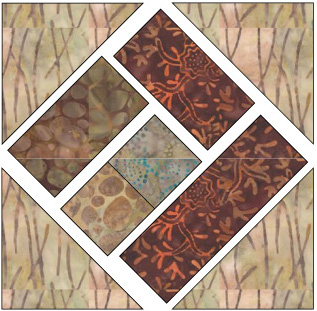 Diagram 14
Block 8: Flying Geese
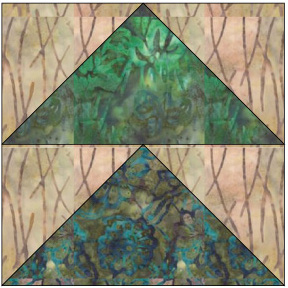 Diagram 15
Cut For Each Flying Geese Block:
a. Iris Aqua (42219 82)
- (1) 7-1/4” squares, cross cut twice on the diagonal (use 1 triangle only)
b. Lotus River Blue (42219 78)
- (1) 7-1/4” squares, cross cut twice on the diagonal (use 1 triangle only)
c. Sticks Sand (42219 90)
- (2) 3-7/8” squares, cross cut once on the diagonal
Flying Geese Block Assembly:
- Stitch two fabric c triangles to each side of one fabric a triangle. Press.
- Stitch two fabric c triangles to each side of one fabric b triangle. Press.
- Arrange and stitch the two flying geese units together as shown in Diagram 16. Press.
- Repeat steps 1-3 to make nine flying geese blocks.
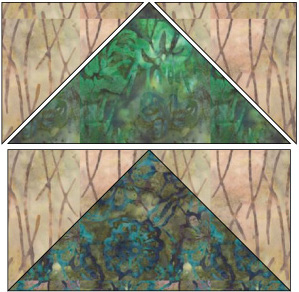 Diagram 16
Block 9: Ohio Star
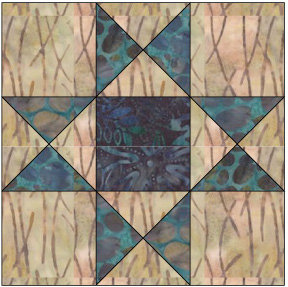 Diagram 17
Cut For Each Ohio Star Block:
a. Stones River Blue (42219 27)
- (2) 3-1/4” squares, cross cut twice on the diagonal
b. Riverbed Navy (42219 84)
- (1) 2-1/2” square
c. Sticks Sand (42219 90)
- (2) 3-1/4” squares, cross cut twice on the diagonal
- (4) 2-1/2” squares
Ohio Star Block Assembly:
- Stitch one fabric a triangle to one fabric c triangle and press. Repeat. Arrange and stitch these units together as shown in Diagram 18. Press. Repeat to make four QST units.
- Arrange the QST units and remaining squares as shown in Diagram 2. Stitch and press.
- Repeat steps 1 and 2 to make nine Ohio Star blocks.
 Diagram 18
Assemble The Quilt:
- Assemble and stitch the 6-1/2” blocks together as shown in Diagram 19. The final blocks should measure 18-1/2” square.
- Cut and attach (2) Sticks Sand (42219 90) 2-1/2” x 18-1/2” strips of sashing between blocks of row one. Press seams toward the sashing. Repeat with each row.
- Cut and attach (2) Sticks Sand (42219 90) 2-1/2” x 58-1/2” strips of sashing between rows. Press seams toward the sashing.
- Stitch the rows together. Press seams toward the sashing.
- Cut and attach (2) Sticks Sand (42219 90) 2-1/2” x 58-1/2” strips of sashing to each end of the quilt top. Press seams toward the sashing.
- Cut and attach (2) Sticks Sand (42219 90) 2-1/2” x 62-1/2” strips of sashing to the top and bottom of the quilt top. Press seams toward the sashing.
 Diagram 19
Make The Border:
- Using the 1/4-yard cuts of Iris Aqua (42219 82), Lotus River Blue (42219 78), Stones River Blue (42219 27), and Dogwood River Blue (42219 86), cut (8) 4-1/4” x 8-1/4” rectangles from each fabric.
- Arrange the rectangles in the following order: Iris Aqua (42219 82), Lotus River Blue (42219 78), Stones River Blue (42219 27), Dogwood River Blue (42219 86), Iris Aqua (42219 82), Lotus River Blue (42219 78), Stones River Blue (42219 27), and Dogwood River Blue (42219 86). Stitch the eight rectangles together and press open. The strip should measure 4-1/4” x 62-1/2”.
- Stitch (2) of the strips made in step 2 to each end of the quilt top. Press seams toward the sashing.
- Cut (4) 4-1/4” squares of Riverbed Navy (42219 84) and stitch one to each end of one remaining strip. Press seams toward the ends. Repeat with remaining strip.
- Stitch strips to the top and bottom of the quilt. Press seams toward sashing.
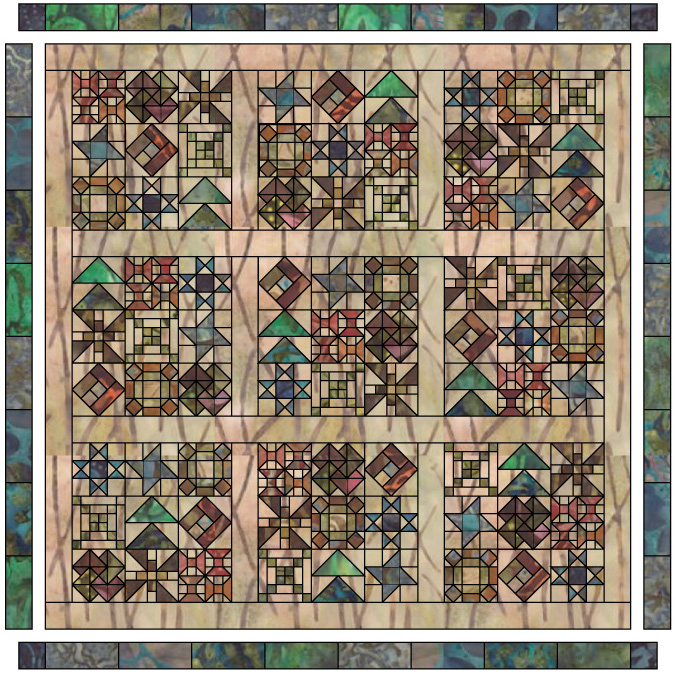 Diagram 20
Finish The Quilt:
- I used 108” Stones River Blue (11100 27) for my quilt backing.
- Quilt as desired. I quilted mine in allover free motion feathered flowers.
- There was plenty fabric leftover from the backing that I used for the quilt binding.
![]()
The finished quilt measures 70” square.
Katie Dold
{Good Golly Ginger}
![]()
Posted in: