Welcome to Moda Fabrics!
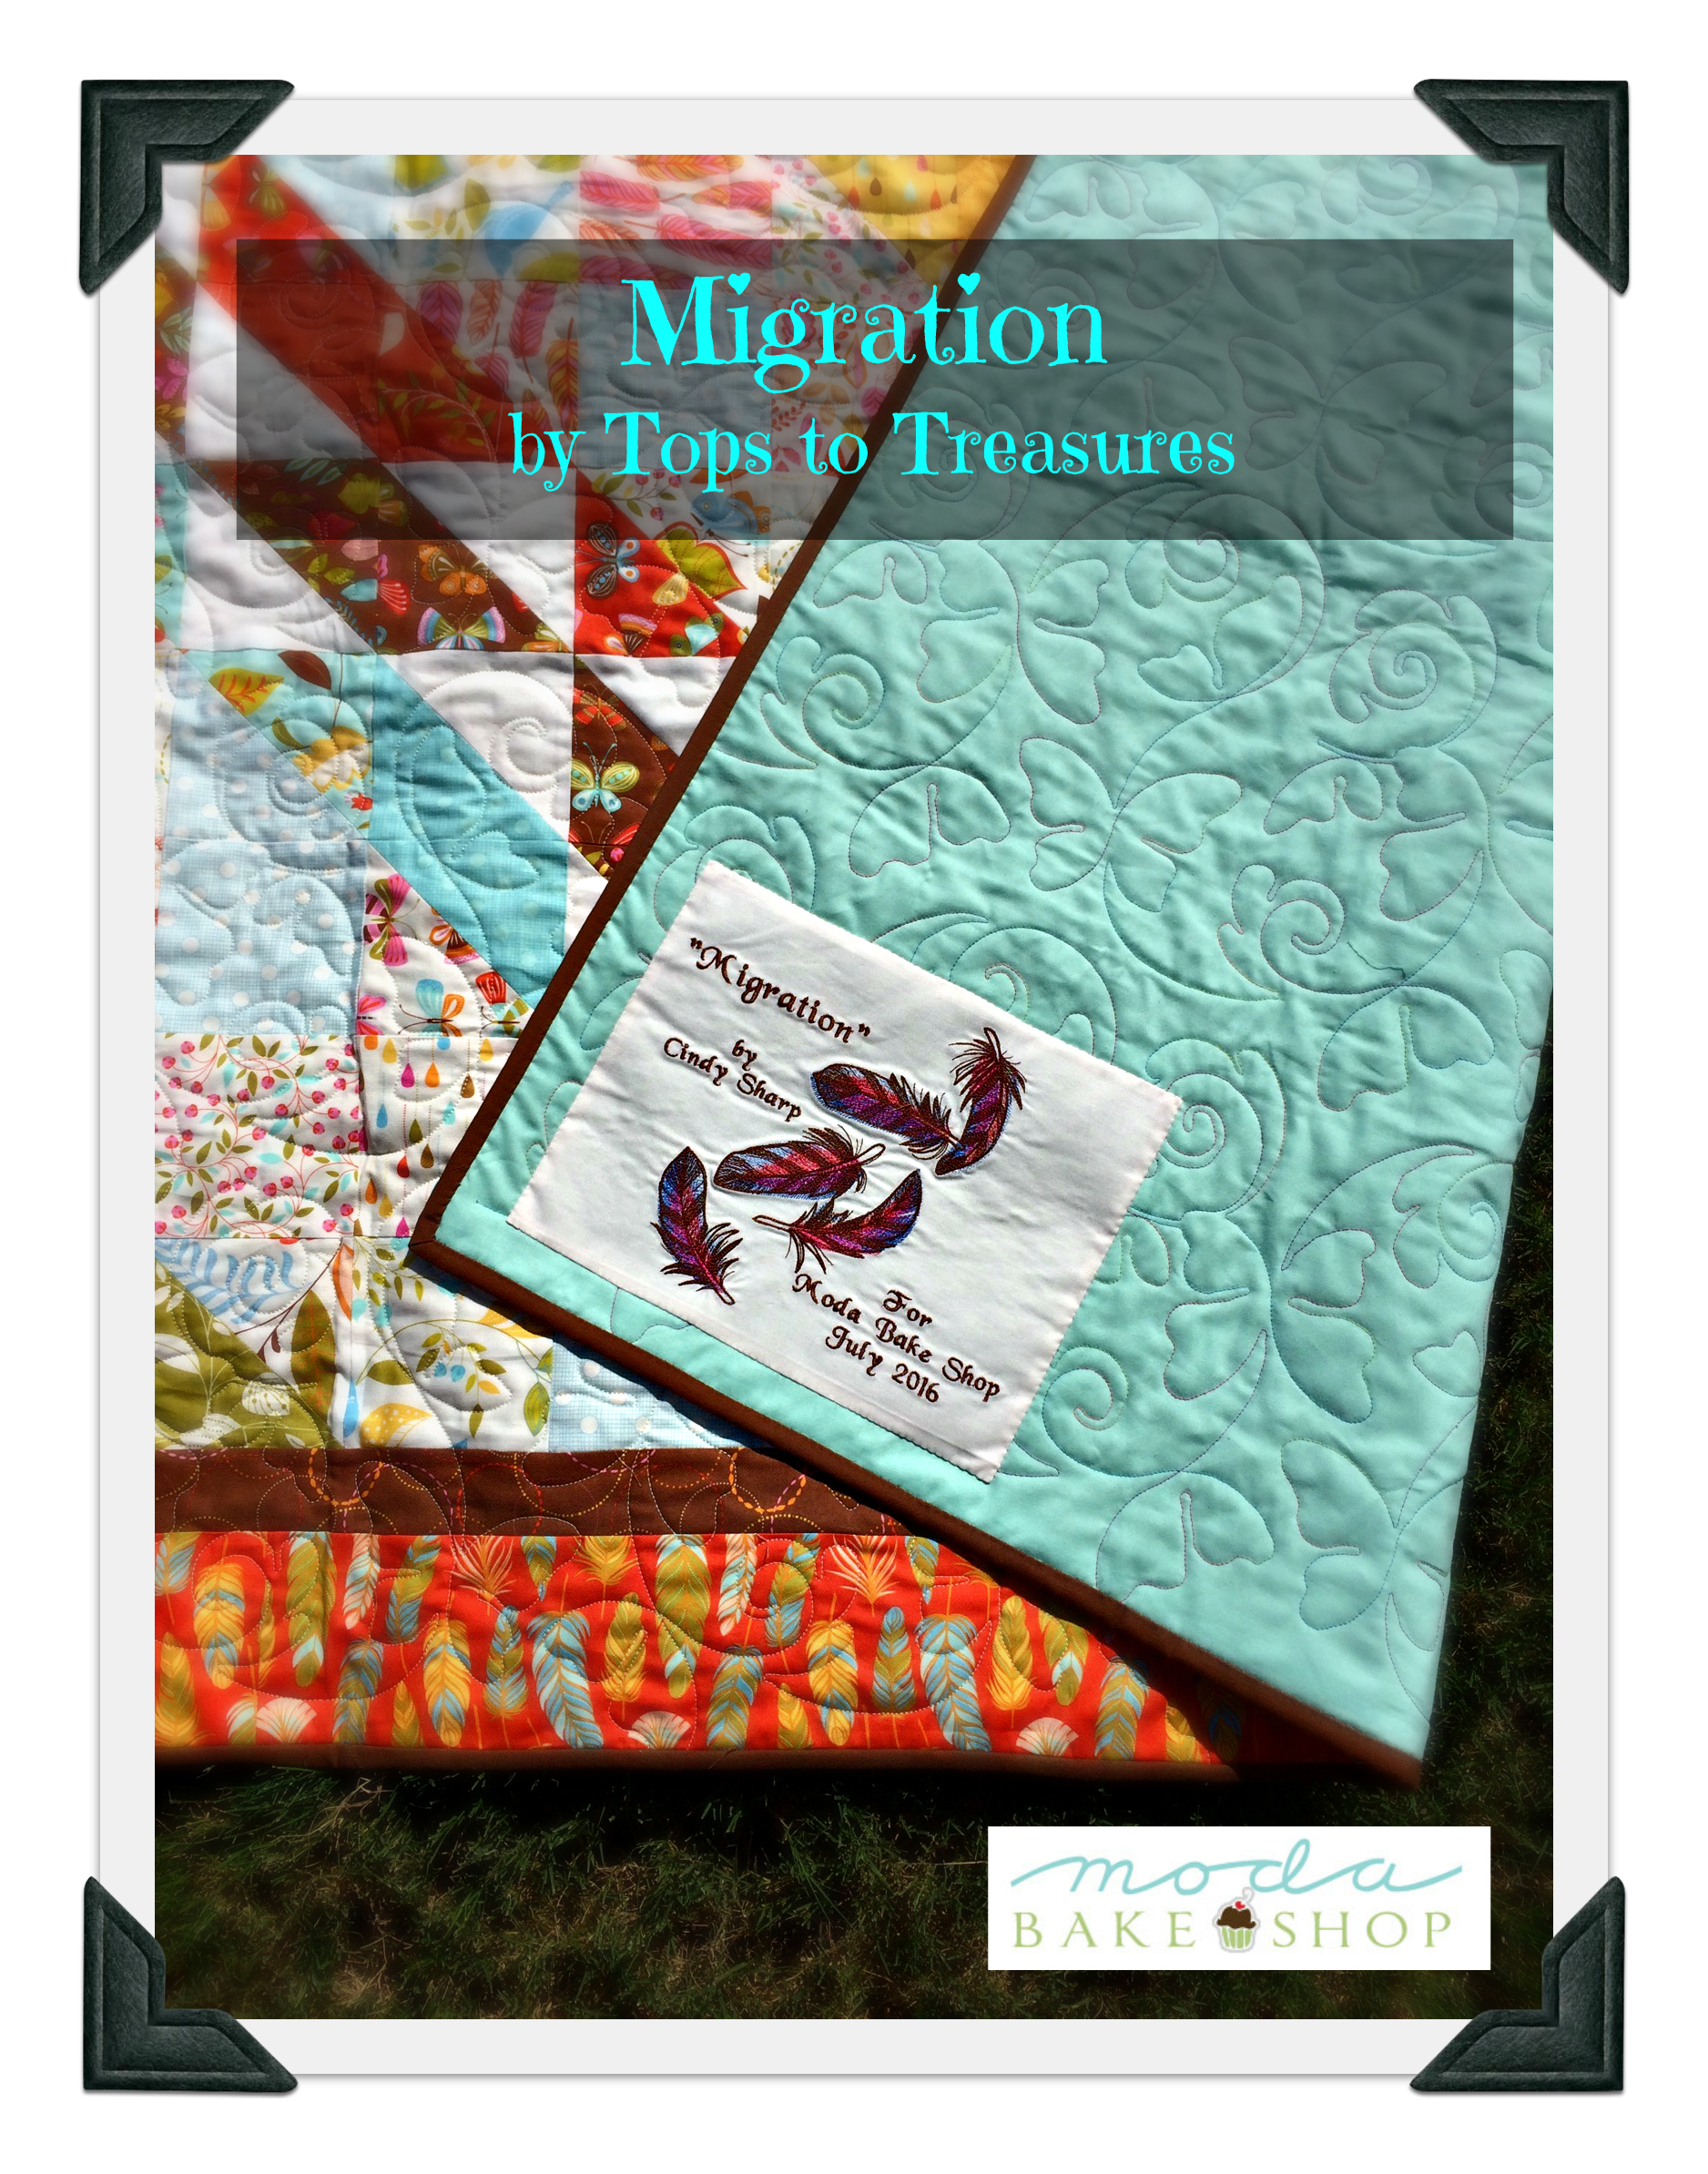
Migration Quilt
Migration Quilt
Published:
Jul 23 2016 - 23:00


Migration is what happens in nature when a species decides to move for the winter, or summer. Where I live we see Cardinals in April and Monarch butterflies in October, both follow a path known only to them, and often erratic to anyone other than them. As I put the sample of this pattern together I was struck by the notion that this happens in our lives as well. I am about to be an empty-nester, my youngest son is headed to college this month. After 24 years of having kids under foot, I am about to have nothing but critters. As unnatural as this feels, it is perfectly normal. That is what is supposed to happen, eventually. (I keep telling myself that.) My path and theirs seems as erratic as that of the butterflies and cardinals. Maybe this quilt is God's way of letting me know that it will all work out in the end. It always does. Gotta love His sense of humor. May this project bring to you and yours the peace that it has brought to me.
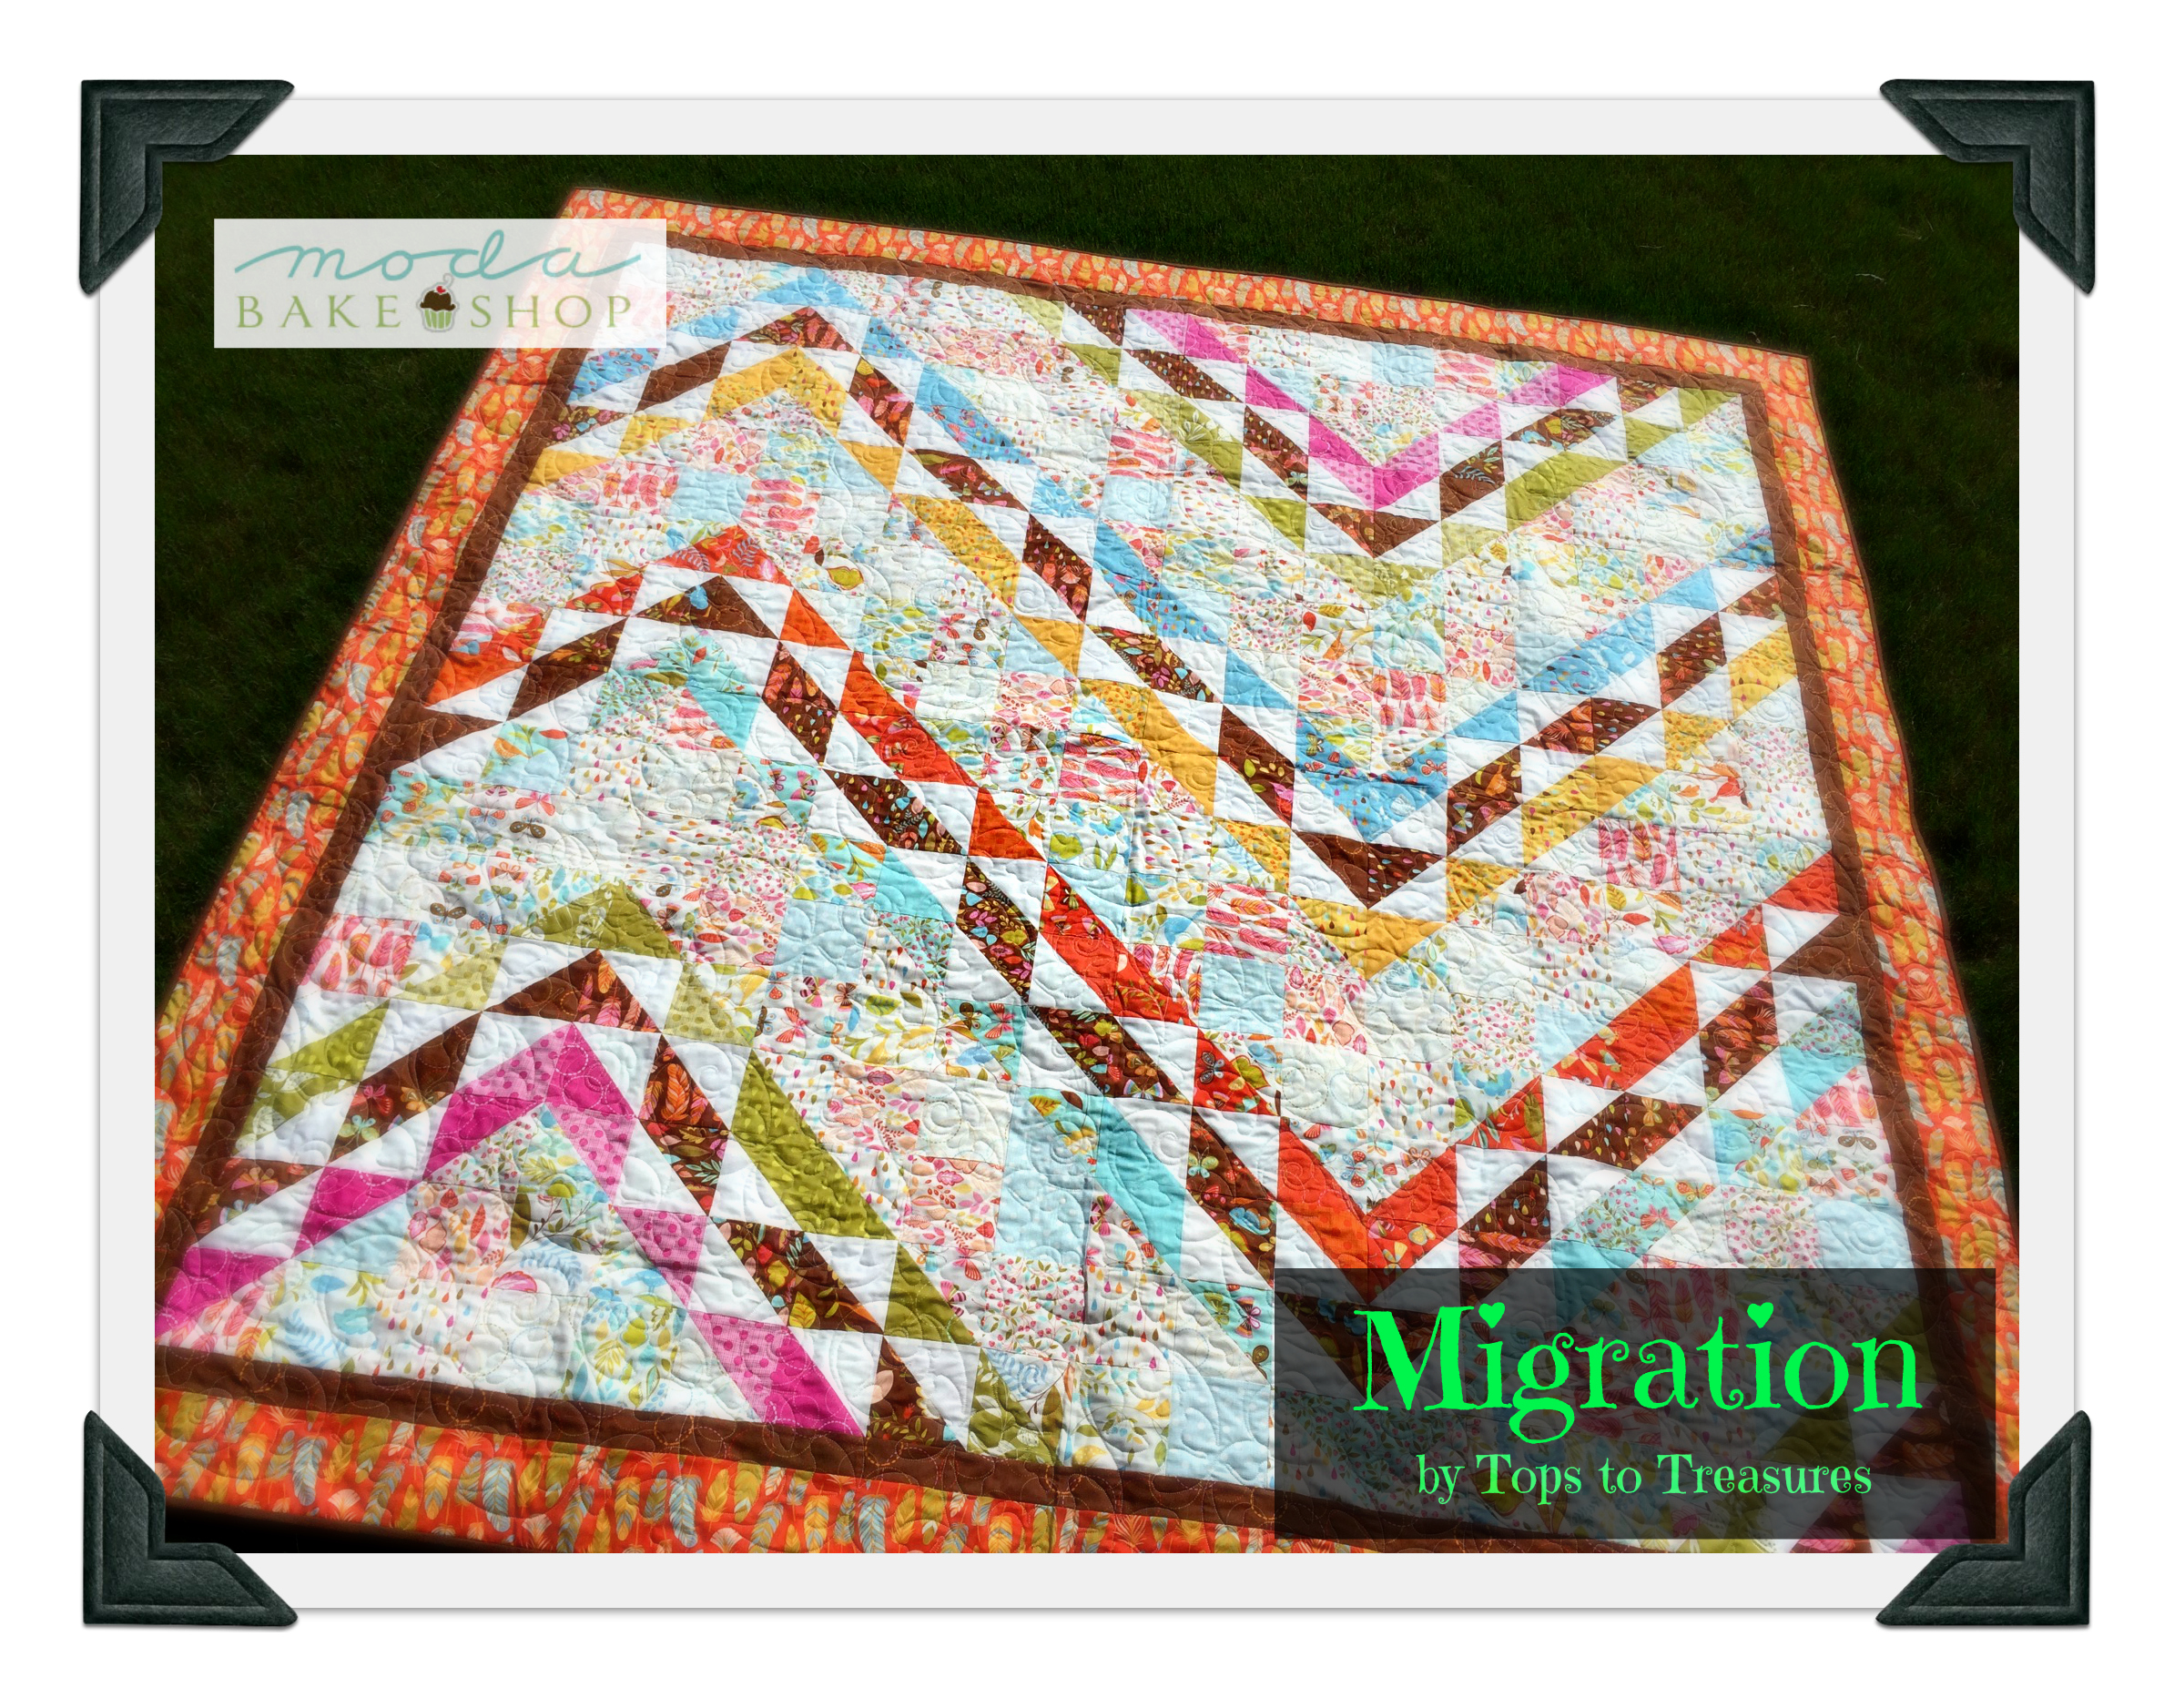
I chose to make this quilt from one block, Birds in the Air, as a nod to the delightful leaves, feathers, and butterflies in Gina Martin's fabric line. Ironically, the selvages of this line are imprinted with the words "if nothing ever changed there would be no butterflies." How awesome is that?!
 Traditional Birds in the Air block
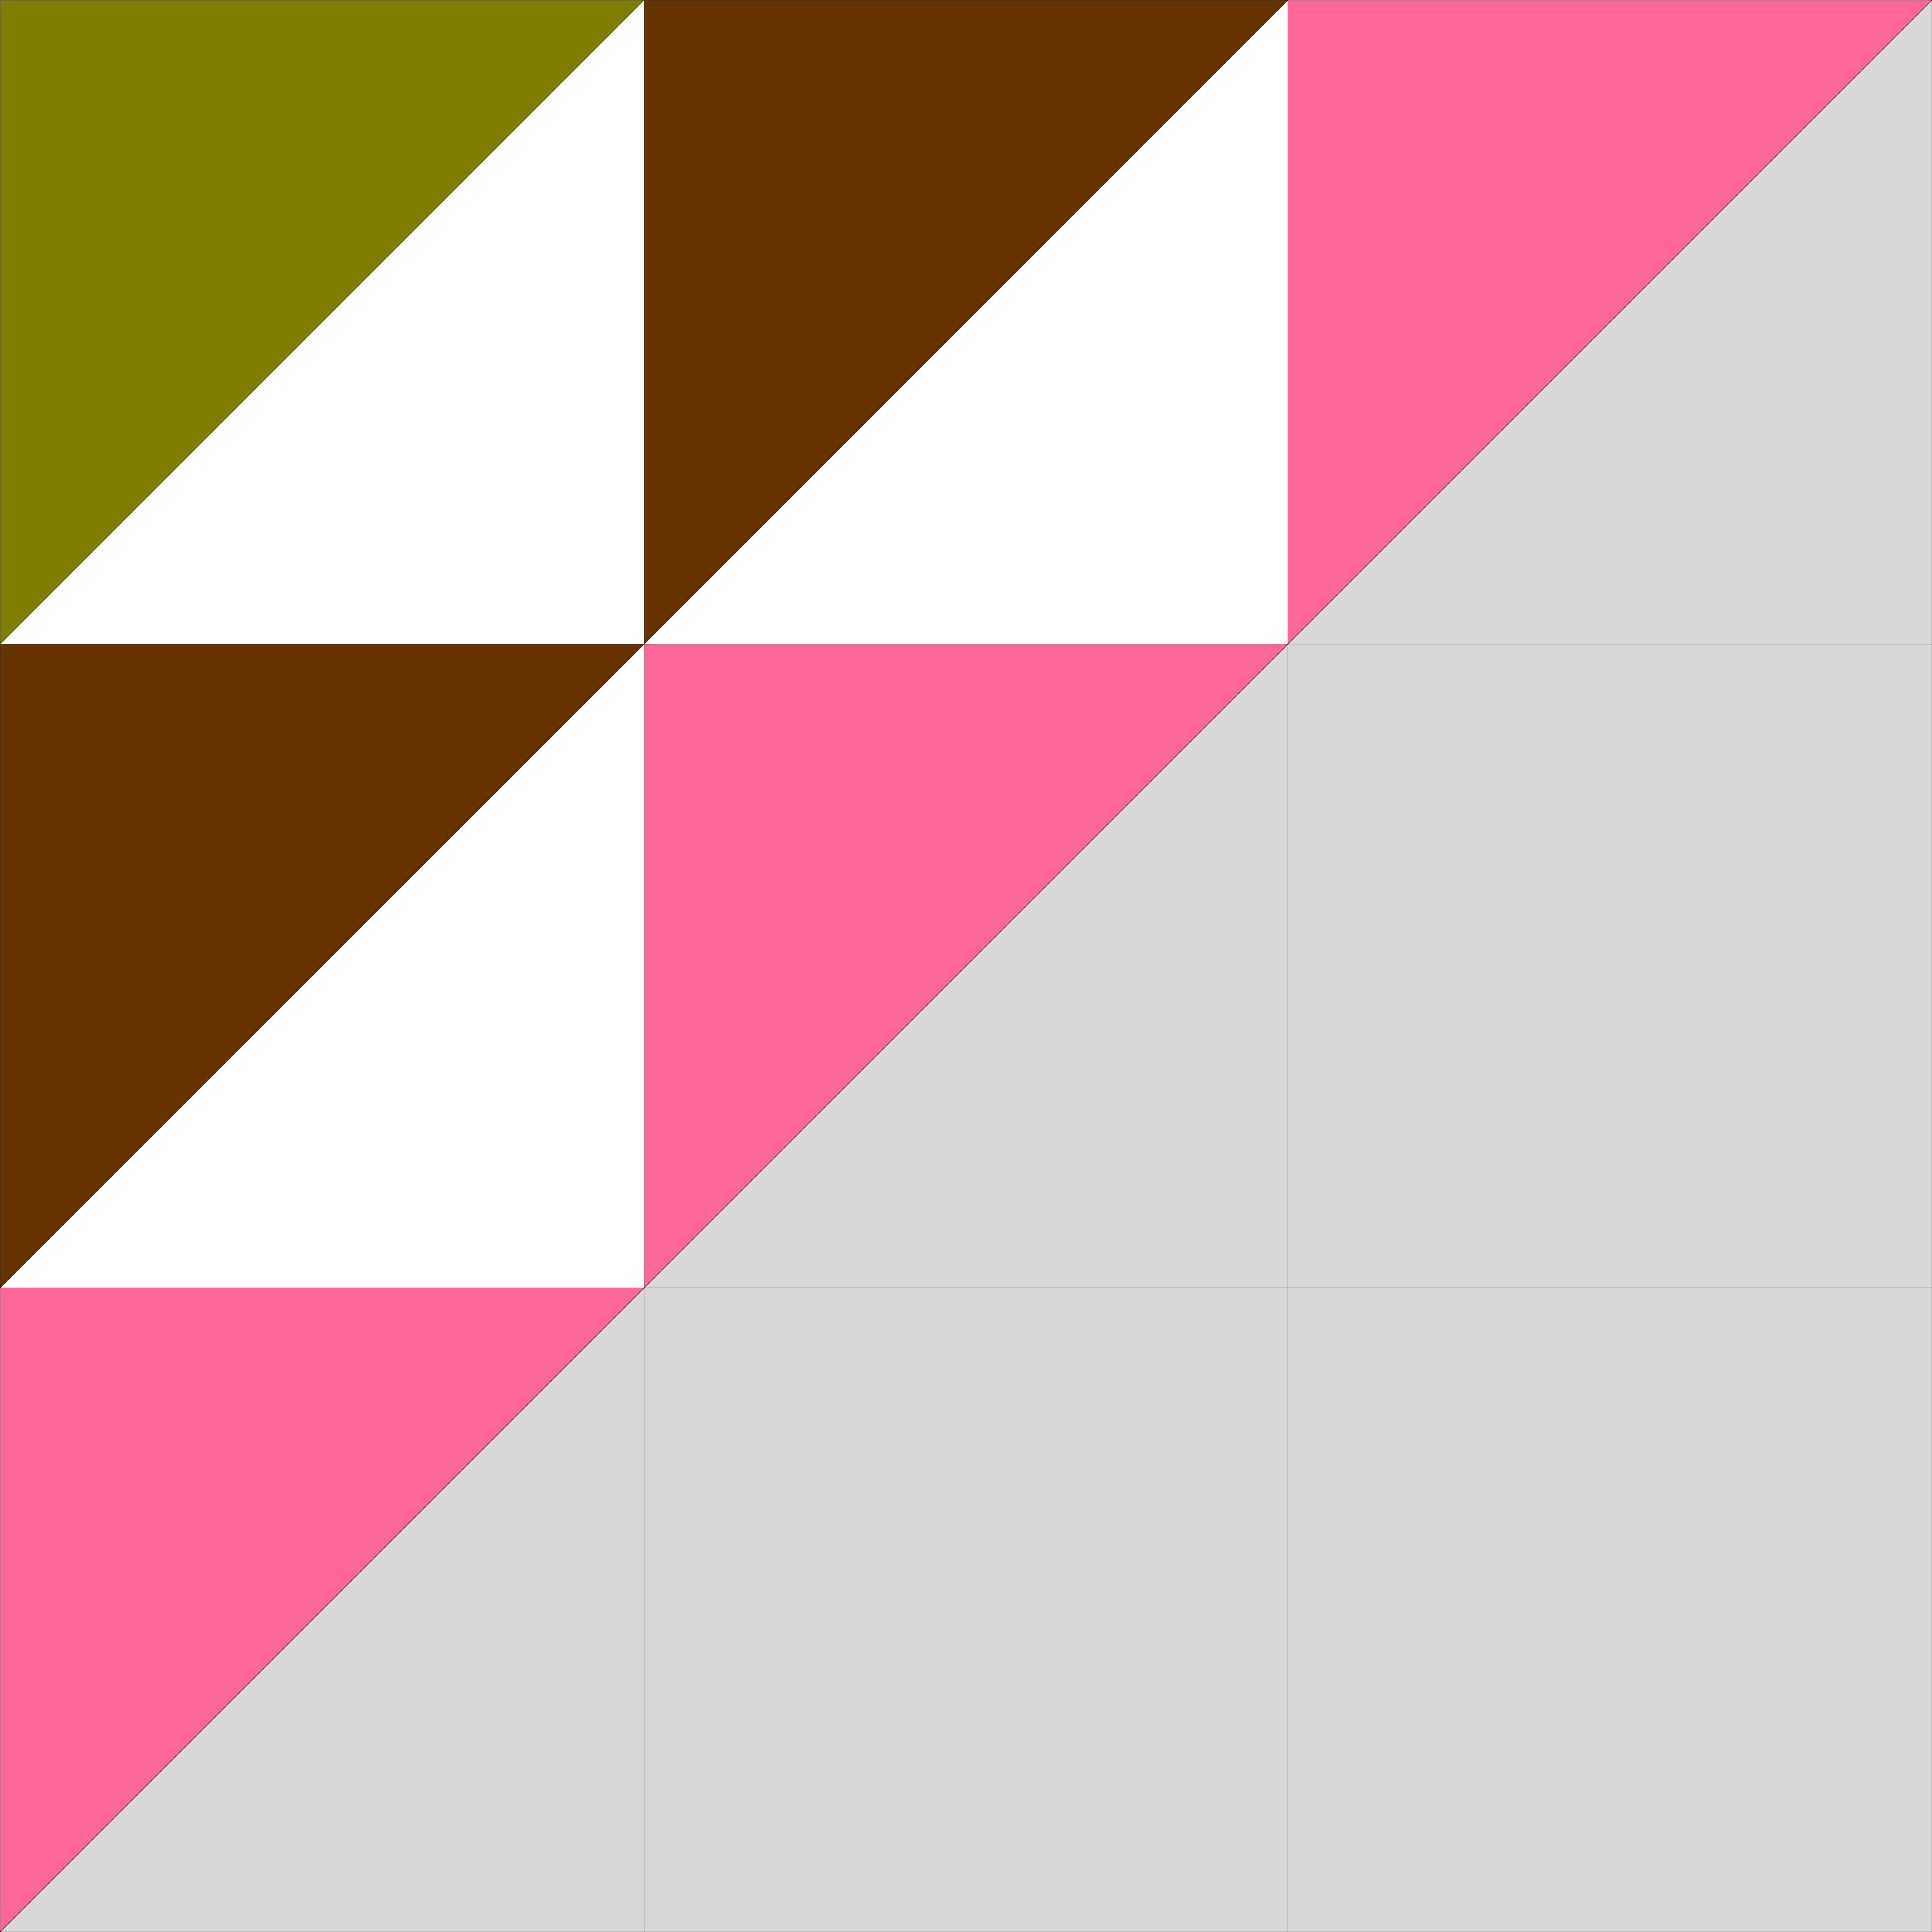
 Modified Birds in the Air block
There are 36, 12" finished blocks in my quilt, all made the same way. However, I have modified the block for ease of construction and to better use the fabric available in a fat quarter. The new block is made completely of squares and half square triangles. It should be doable for even the most novice quilter. I can not wait to see what fans of Moda Bake Shop come up with. I have created a coloring page to help you along. (You can also find it at the end of the Printer Friendly Version.)
This quilt/project finishes at 83" x 83".
![]()
1 FQ bundle Wing and Leaf by Gina Martin for Moda.
1/2 yards supplemental background fabrics. (I split mine into two cuts of 1/4 yd each. SKU 10064-11, and SKU 10066-11)
3/4 yards for inner border {SKU 10066-19}
1 1/2 yards for outer border {SKU 10063-18}
1 1/4 yards for spiky accents
3/4 yards for binding {SKU 9900 106}
5 1/4 yards for backing {SKU 9900 34}
![]()
Fabric placement is essential for this quilt. It is the grouping of like colors that catches our eyes and makes us want to play in the fabric. Whether it is from yardage or fat quarters the amount of fabric comes out the same. I have listed the total yardage needed (just in case you want to make it from another line). For a scrappier look use a little bit from several fat quarters to make up the yardage needed.
As I was cutting this quilt out it occurred to me that you might be able to make the same quilt from several 5" charm packs (at least 4 plus supplemental yardages), or 10" layer cakes (at least 2 plus supplemental yardages). The problem comes in determining the number of "low volume" pieces in each pack. I used all of these fabric from my Fat Quarter Stack. So, although the fabric is already cut to the right size in a charm pack, and nearly the right size in a layer cake you would need much more supplemental "low volume" fabric than is listed in the ingredients. As written, this recipe will leave you with a nice pile of bright happy fabric with which to make something else.
The first thing you need to do is sort your fat quarter stack into the following bundles:
Brown - you need 3/4 yards
Pink - you need 1/4 yard
Green - you need 1/2 yard
Light Blue - you need 1/4 yard
Orange - you need 1/4 yard
Dark Blue - you need 1/4 yard
Yellow - you need 1/4 yard
"Low Volume" that would be anything that has a white background and a print on it. It reads white "and" - you need 4 yards.
Cutting directions:
From accent fabric {white yardage} cut:
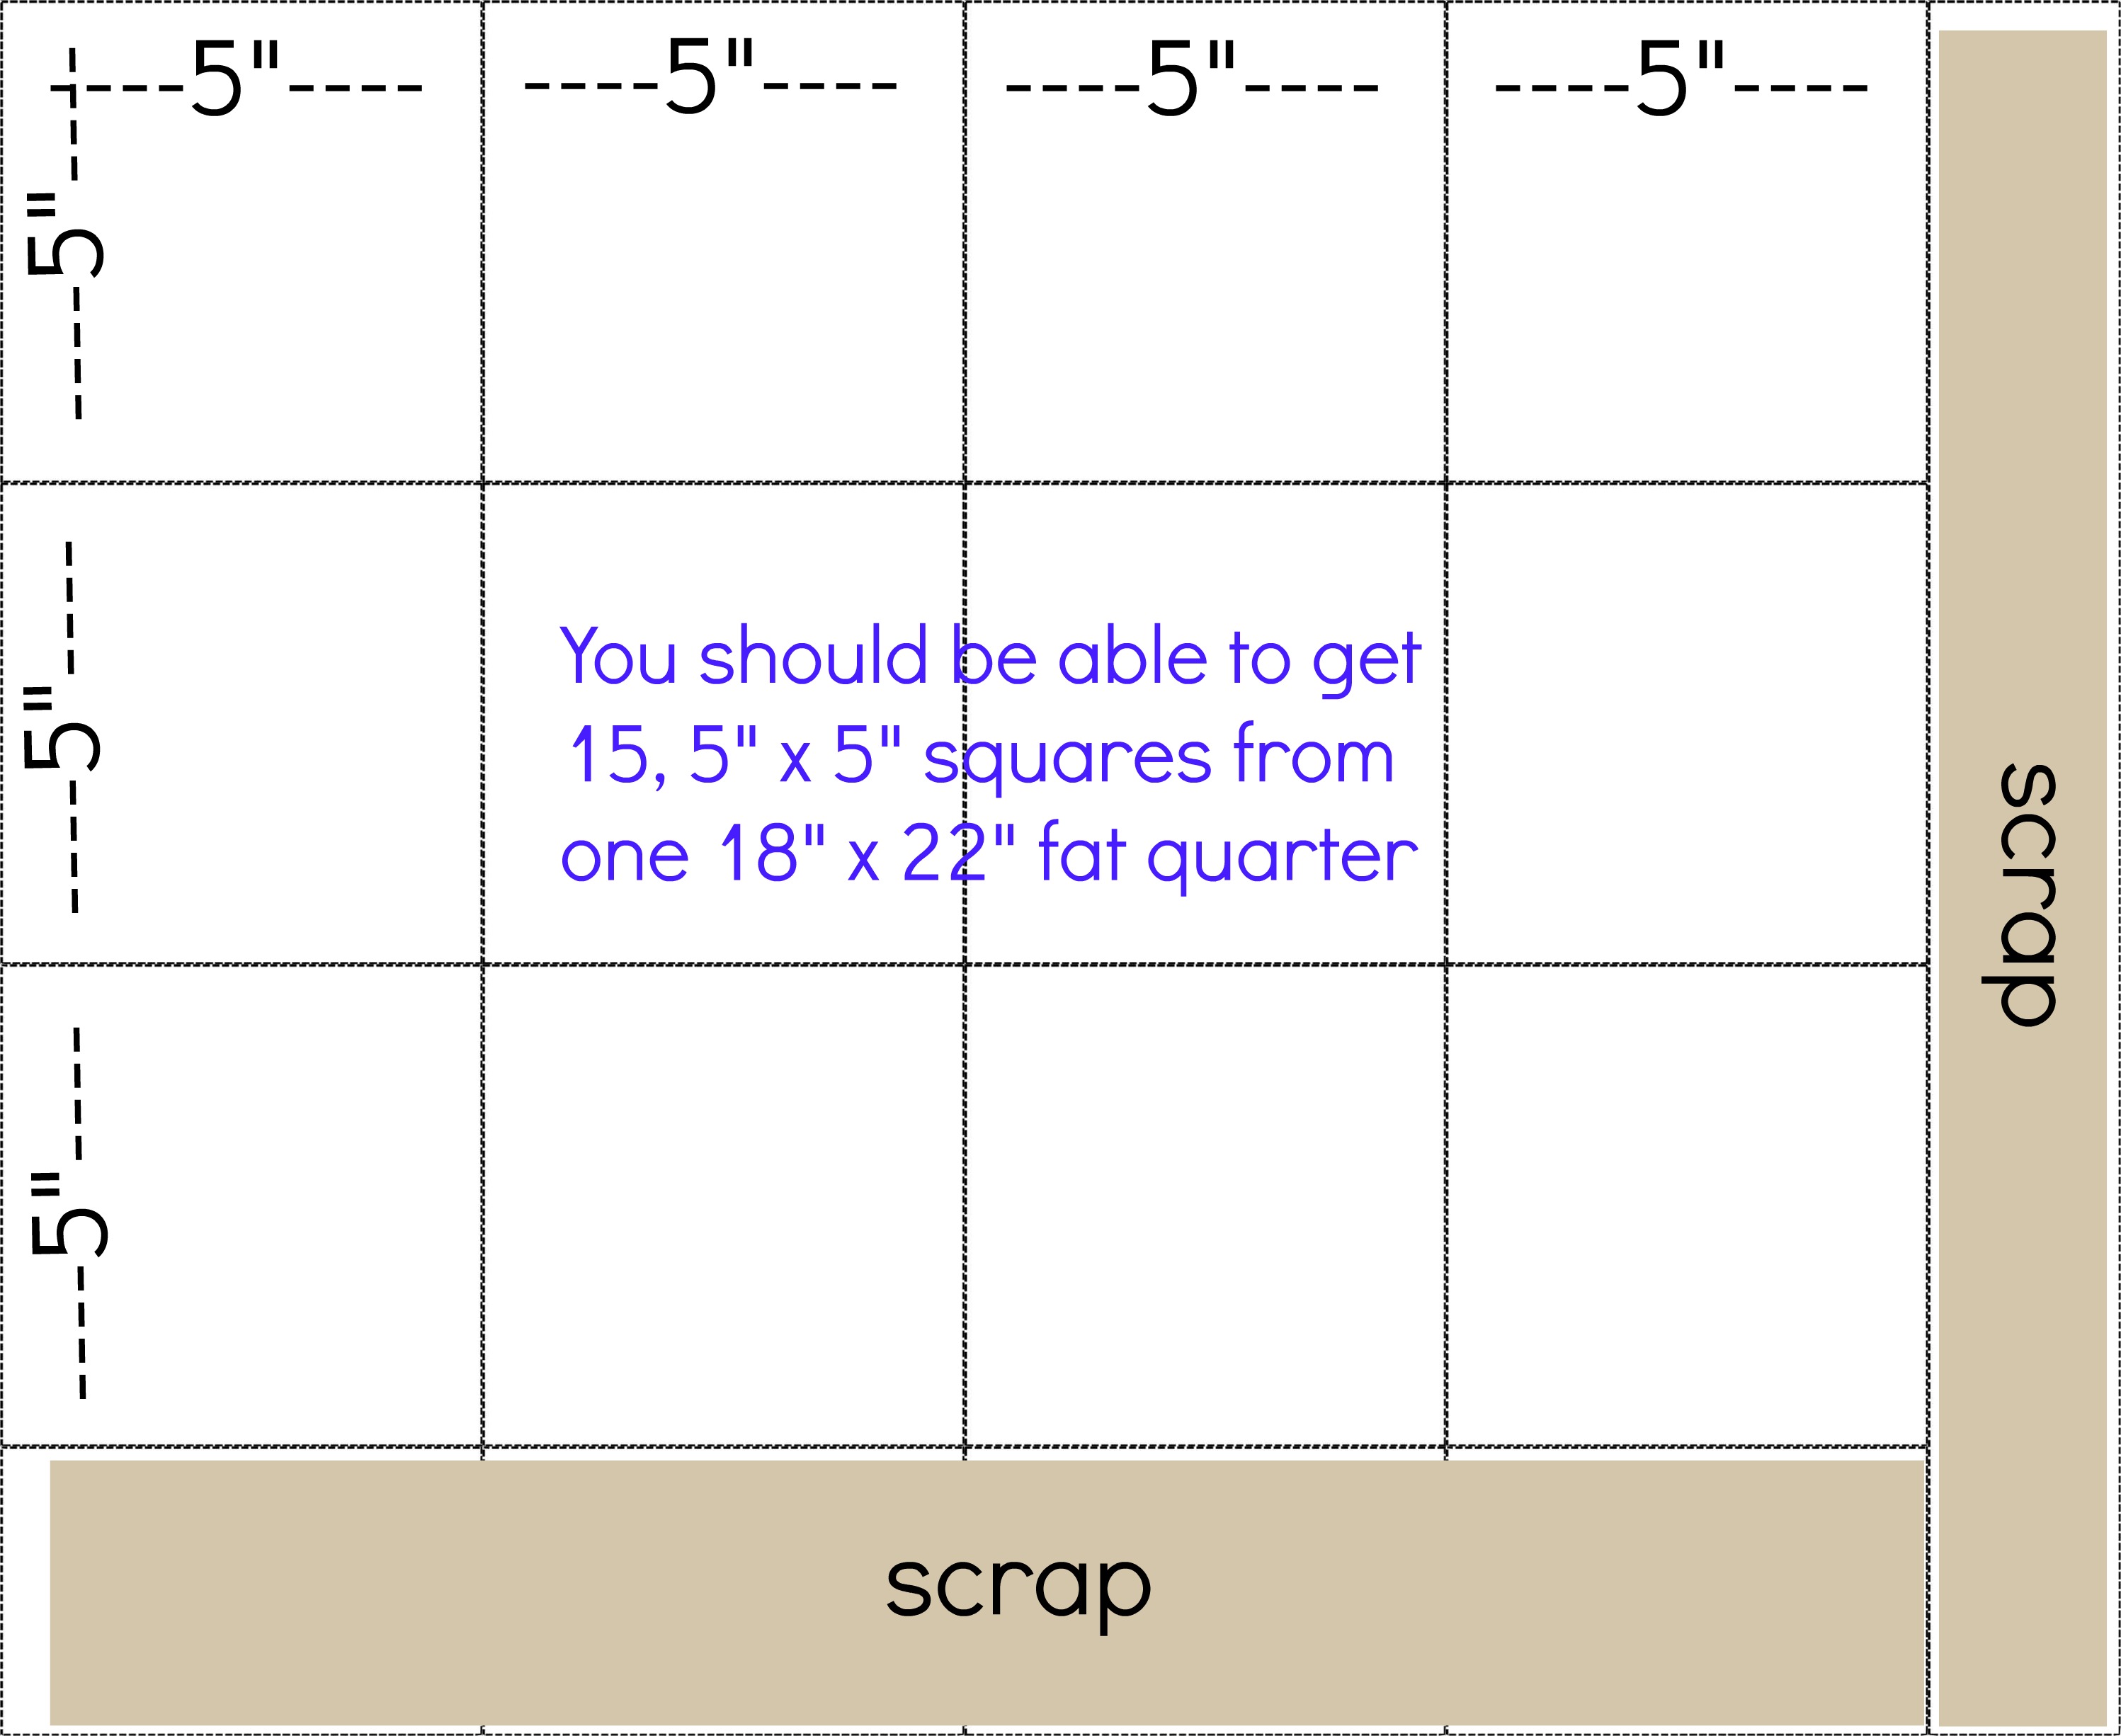
- 54, 5" x 5" squares (This will take 7, 5" x width of fabric strips, sub cut into 8, 5" x 5" squares each...with some left over.)
From browns cut:
- 36, 5" x 5" squares (this takes 12, 5" x 18" strips, sub cut into 3, 5"x 5" squares each.)
From pinks cut:
- 10, 5" x 5" squares
- For a scrappier look cut 2, 5" x 18" strip from each of 2 fat quarters, then sub cut into 10 squares...with some left over.
From greens cut:
- 14, 5" x 5" squares
- For a scrappier look cut 1, 5" x 18" strip from each of 5 fat quarters, then sub cut into 14 squares...with some left over.
From light blues cut:
- 12, 5"x 5" squares
- For a scrappier look cut 1, 5" x 18" strip from each of 4 fat quarters, then sub cut into 12 squares.
From oranges cut:
- 12, 5" x 5" squares
- For a scrappier look cut 1, 5" x 18" strip from each of 4 fat quarters, then sub cut into 12 squares.
From dark blues cut:
- 12, 5" x 5" squares
- For a scrappier look cut 1, 5" x 18" strip from each of 4 fat quarters, then sub cut into 12 squares.
From yellows cut:
- 12, 5" x 5" squares
- For a scrappier look cut 1, 5" x 18" strip from each of 4 fat quarters, then sub cut into 12 squares.
From "low volume" cut:
- If you want to distribute all of the fabrics somewhat evenly between the two types of cuts, cut 2, 5" x 18" strips, and 2, 4 1/2" x 18" strips from each of 8 fat quarters. Cut 1, 5" x 18" strip and 3, 4 1/2" x 18" strip from the remaining 2 fat quarters. Cut the remaining 4 1/2" squares from your supplemental yardage.
- 54, 5" x 5" squares (this takes 18, 5" x 18" strips, sub cut into 3, 5" x 5" squares each.)

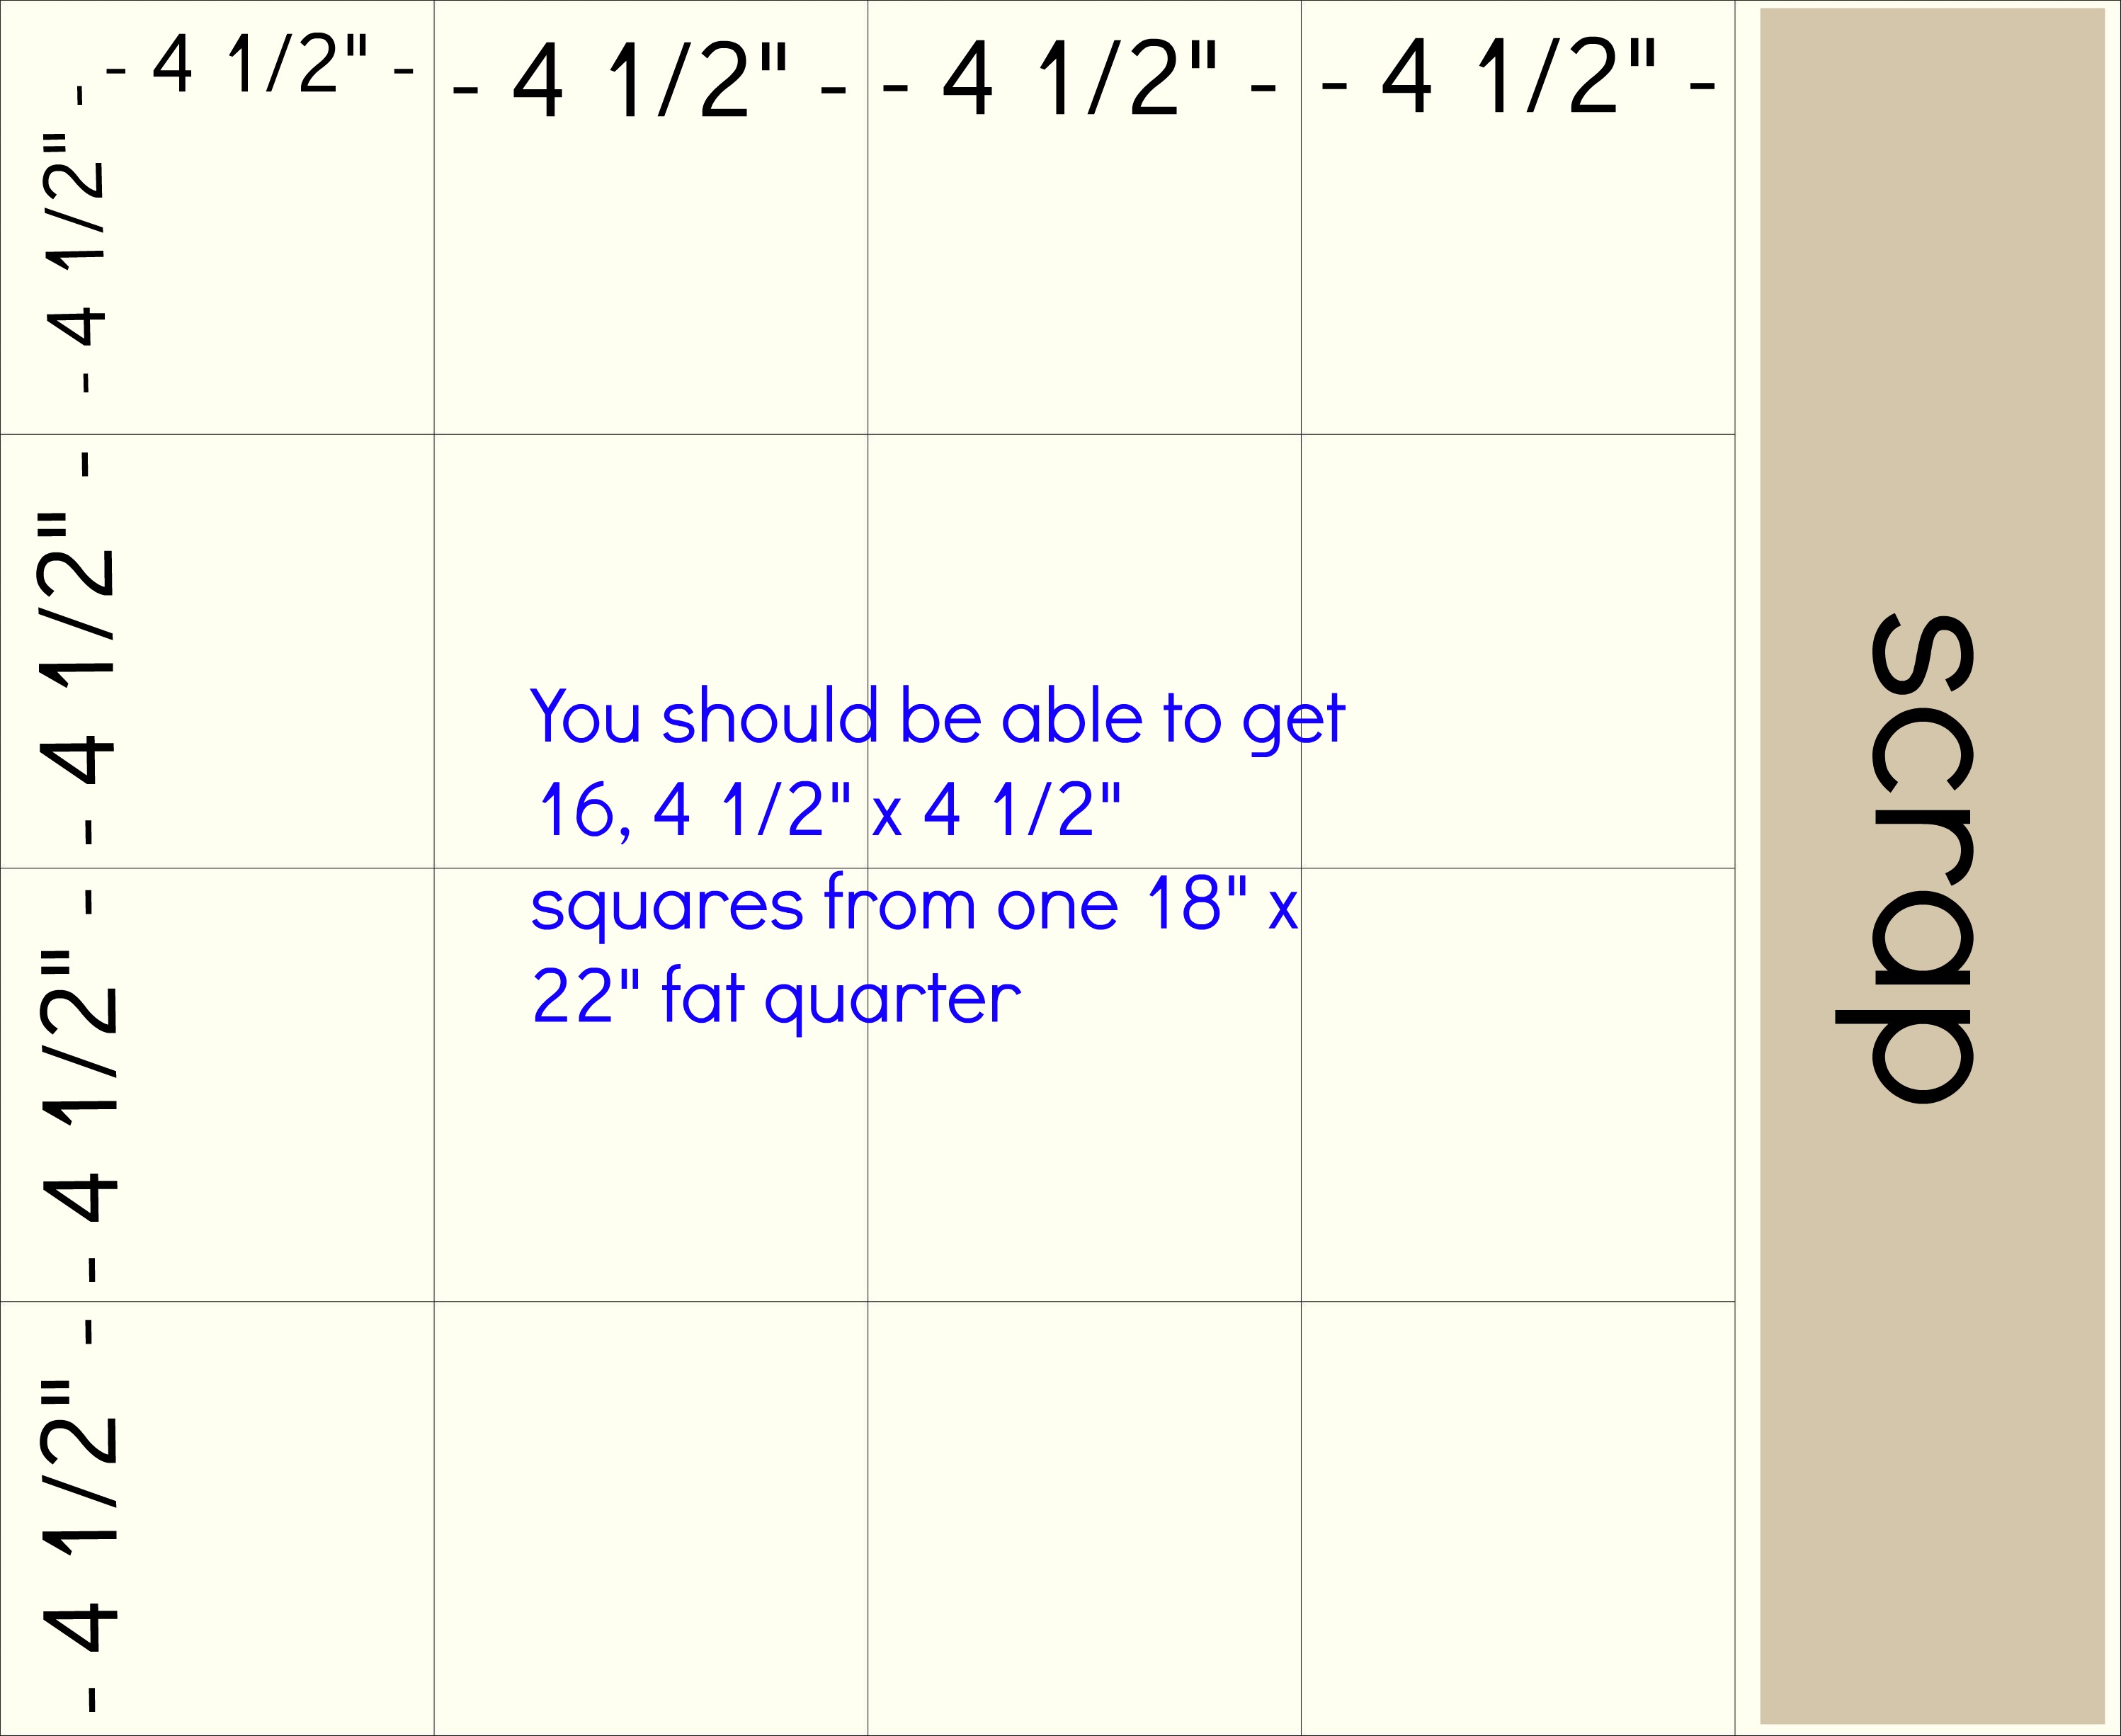
- 108, 4 1/2" x 4 1/2" squares (this takes 27, 4 1/2" x 18" stips, cut into 4, 4 1/2" x 4 1/2" squares each.)
From inner border fabric cut:
- 8, 2" x width of fabric strips
From outer border fabric cut:
- 8, 4 1/2" x width of fabric strips
From binding fabric cut:
- 9, 2 1/2" (or the width you prefer) x width of fabric strips
Sewing Directions:
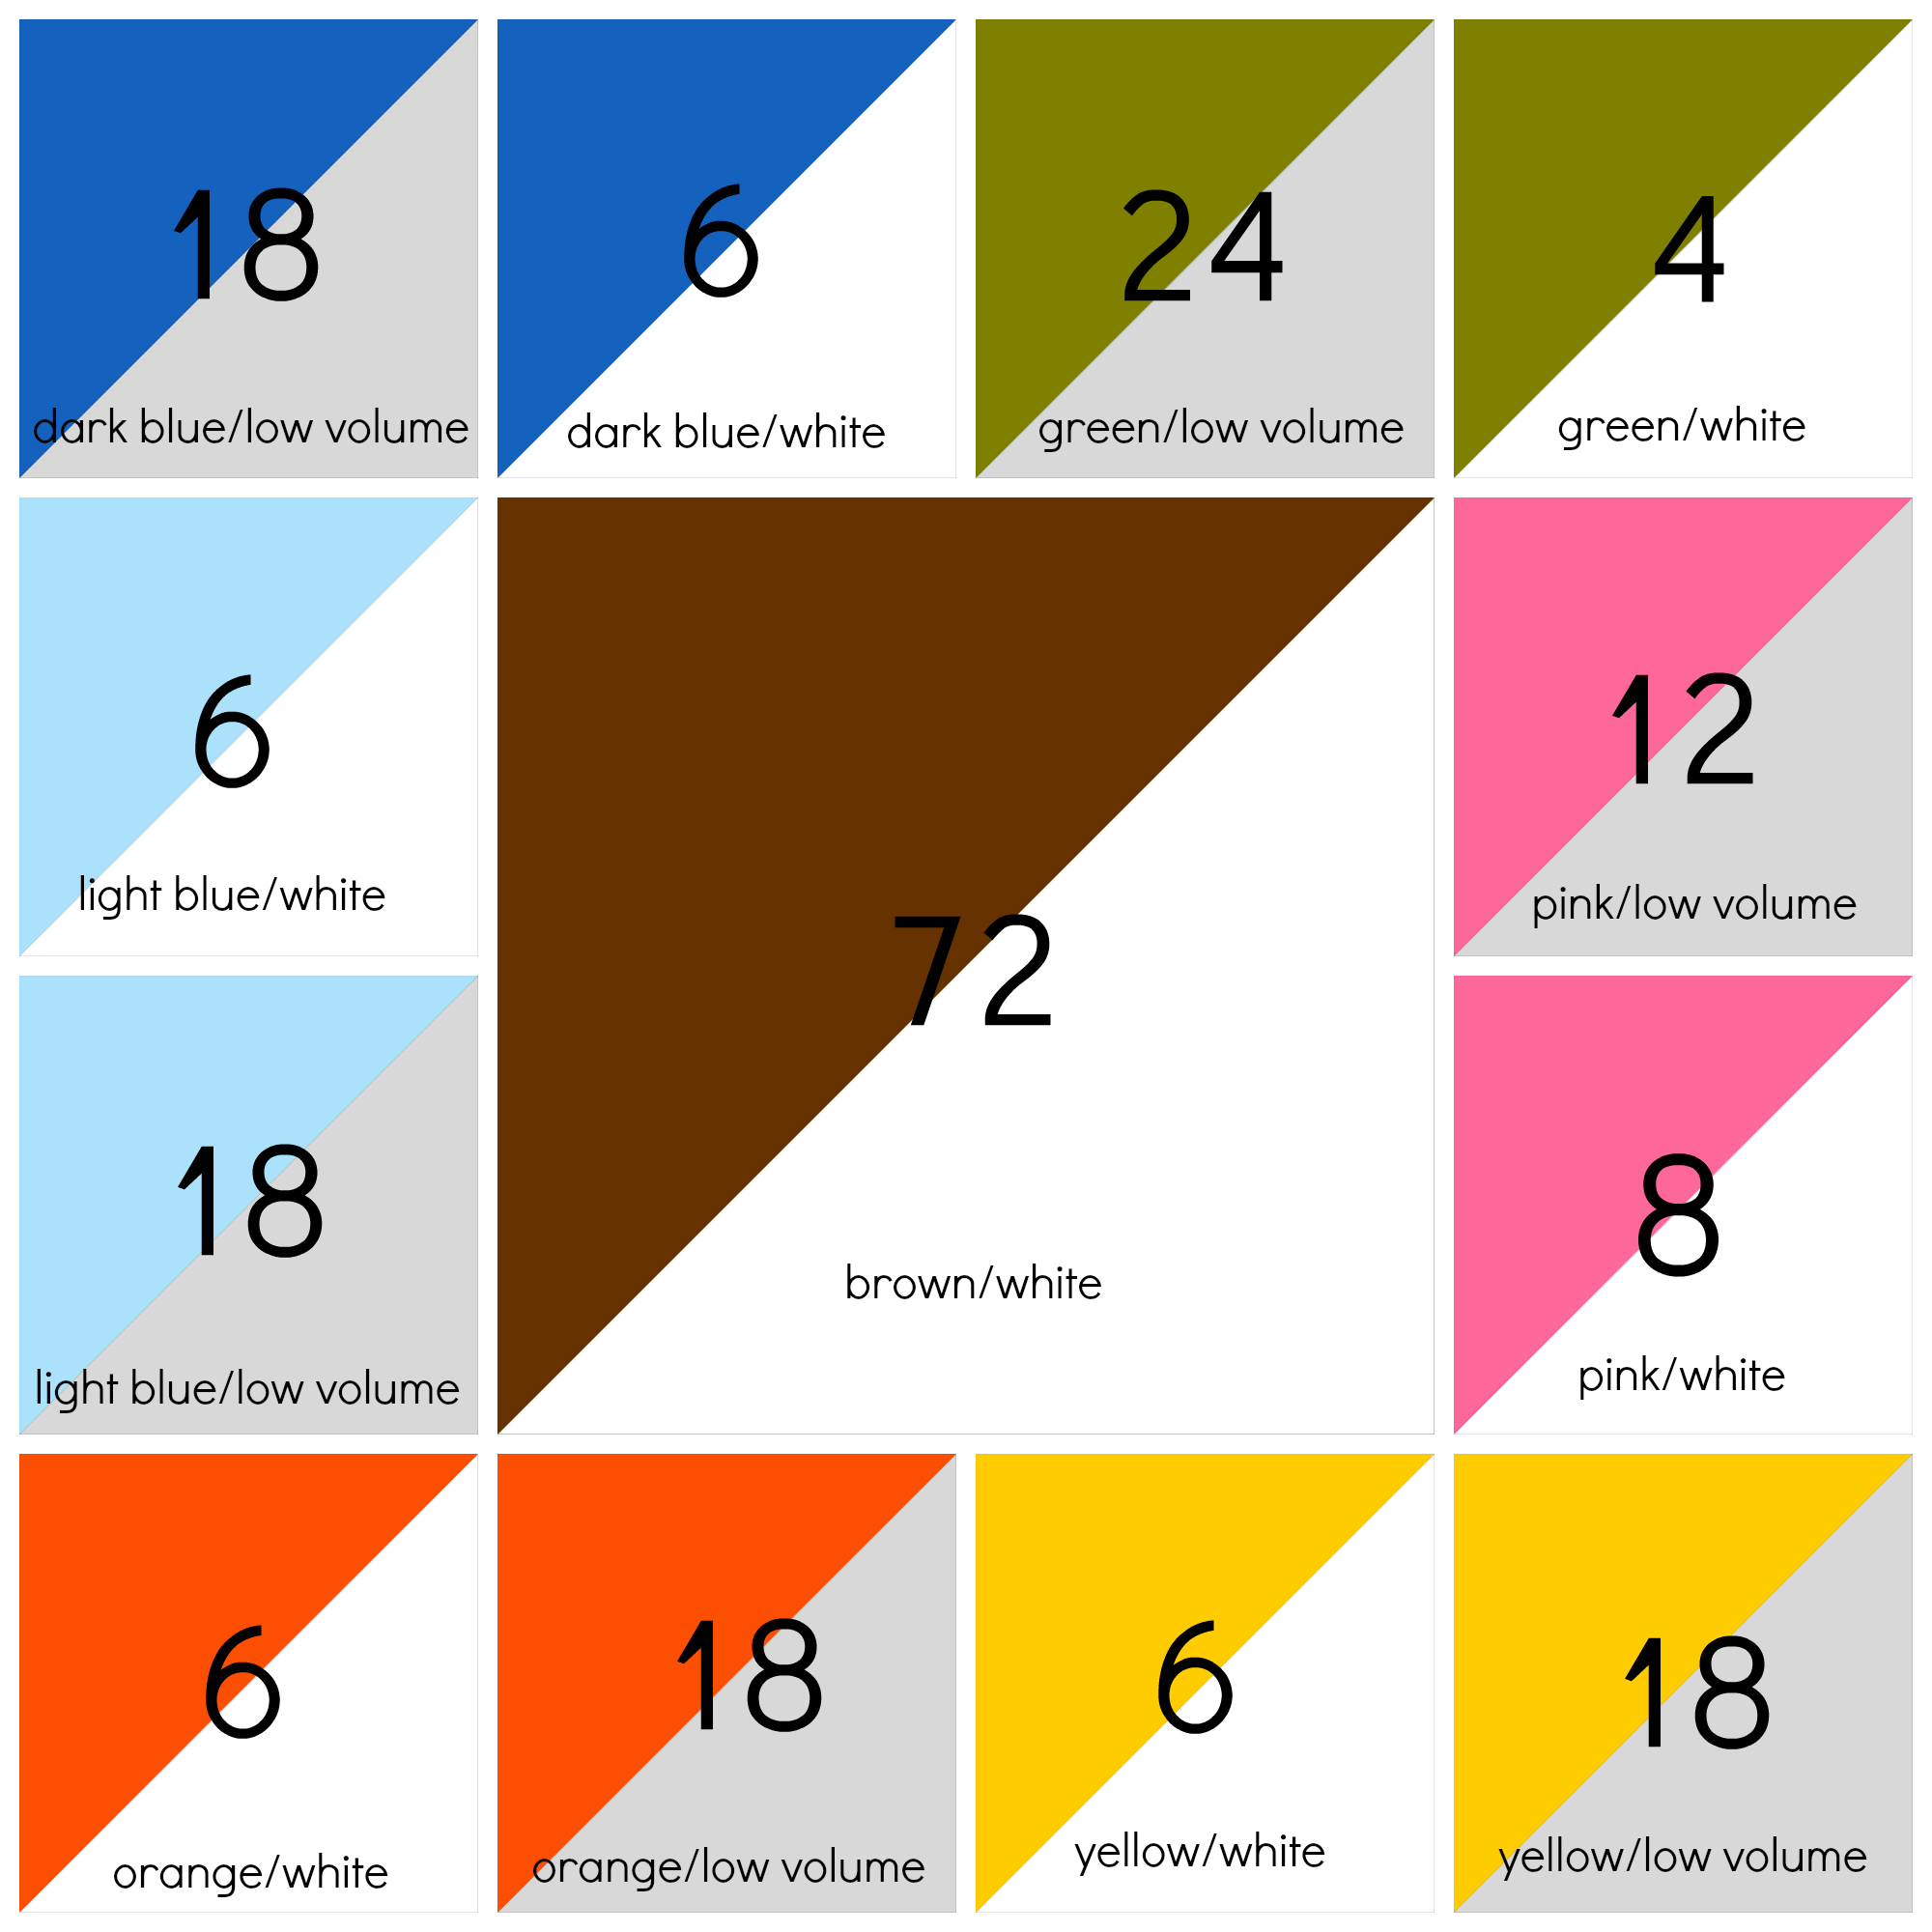
Half square triangles: You are going to need a lot of them. No matter the color, all half square triangles are made the same way. Once you have that down this block is a piece of cake. There are several ways to make them, if you have a favorite method go ahead and use it. The units needed for this quilt are 4 1/2" finished. See the chart below for the number of each color combination you need.
My favorite method for making half square triangles is as follows:
- To make 18, dark blue/low volume half square triangles
- Gather
- 9, 5" squares dark blue fabric
- 9, 5" squares low volume fabric
- Draw a diagonal line on the back of each low volume square
- With right sides together, pair each low volume square with a dark blue square
- Sew, 1/4" on each side of the drawn line.

- Cut on drawn line.
- Iron seam allowances open.
- Trim units to 4 1/2" x 4 1/2"
- You really do need to trim these. The 5" squares are purposefully a tiny bit big for this process. This way you units will be exactly the size you need them to be.
- Each pair of squares makes two half square triangles.
- Gather
- Repeat the process for each color combination.
- 6, Dark blue/white
- Gather
- 3, 5" squares dark blue fabric
- 3, 5" squares white fabric
- Gather
- 24, Green/low volume
- Gather
- 12, 5" squares green fabric
- 12. 5" squares low volume fabric
- Gather
- 4, Green/white
- Gather
- 2, 5" squares green fabric
- 2, 5" squares white fabric
- Gather
- 12, Pink/low volume
- Gather
- 6, 5" squares pink fabric
- 6, 5" squares low volume fabric
- Gather
- 8, Pink/white
- Gather
- 4, 5" squares pink fabric
- 4, 5" squares white fabric
- Gather
- 18, Yellow/low volume
- Gather
- 9, 5" squares yellow fabric
- 9, 5" squares low volume fabric
- Gather
- 6, Yellow/white
- Gather
- 3, 5" squares yellow fabric
- 3, 5" squares white fabric
- Gather
- 18, Orange/low volume
- Gather
- 9, 5" squares orange fabric
- 9, 5" squares low volume fabric
- Gather
- 6, Orange/white
- Gather
- 3, 5" squares orange fabric
- 3, 5" squares white fabric
- Gather
- 18, Light blue/low volume
- Gather
- 9, 5" squares light blue fabric
- 9, 5" squares low volume fabric
- Gather
- 6, Light blue/white
- Gather
- 3, 5" squares light blue fabric
- 3, 5" squares white fabric
- Gather
- 72, Brown/white
- Gather
- 46, 5" squares brown fabric
- 46, 5" squares white fabric
- Gather
- 6, Dark blue/white

Modified Birds in the Air blocks: There are only 36 of them. Doesn't that make you happy after all of those half square triangles?! And there are only 6 different combinations.

The easiest way for me to keep it all straight is to look at the corners and centers of each block. In the illustration above, the larges square has 1 green patch (upper left hand corner) and 3 pink ones (centers). You need four of this combination for the quilt.
- To make 4 "1 green & 3 pinks" blocks
- Gather
- 1 green/white half square triangle
- 2 brown/white half square triangles
- 3 pink/low volume half square triangles
- 3, 4 1/2" squares of low volume fabric
- Arrange patches in front of you so that they look like the picture.
- Make sure that the colors are pointed in the right direction.
- Sew in 3 rows of 3 patches.
- Press seam allowances as indicated in drawing below.
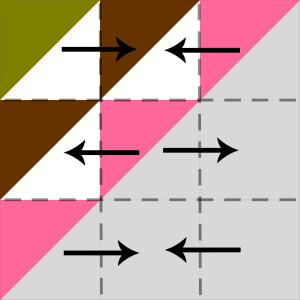
- Sew rows together to make block
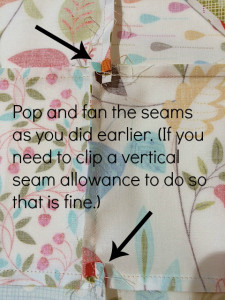
- Pop/fan seam allowance and iron flat.


- Trim block to 12 1/2" x 12 1/2"
- Repeat for desired number of blocks.
- Gather
- Using the process outlined above
- Make 6 "1 yellow & 3 dark blue" blocks
- Make 6 "1 orange & 3 light blue" blocks
- Make 8 "1 pink & 3 green" blocks
- Make 6 "1 light blue & 3 orange" blocks
- Make 6 "1 dark blue & 3 yellow" blocks


Assemble Center of Quilt: It is helpful to use a design wall for this portion of the quilt. A design wall is any surface big enough to hold your blocks all at one time...it will need to be bigger than 75" x 75". You can use a clean floor (watch out for your helpful two and four legged friends. They like to rearrange things.) or a shower curtain (It is okay if it is hanging over a bath tub, just make sure no one is using it first) or a large bed (it works best if the bed is made). If you are lucky enough to have one, a free standing or wall mounted design wall is perfect for this job.
- Gather 36 Modified Birds in the Air blocks.
- Arrange them in a 6 x 6 grid so that they look like the following picture.

- Pay close attention to which way your blocks are pointed.
- Sew into 6 rows of 6 blocks
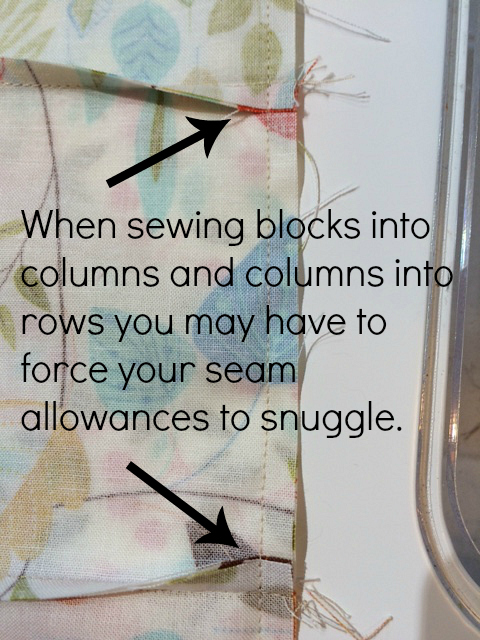
- Because the blocks twist and turn every which a way it will be necessary to force the seam allowances to behave.


- Sew rows together to make center of quilt.


Add Borders:
- Gather:
- 8, 2" x width of fabric strips of inner border fabric
- 8, 4 1/2" x width of fabric strips of outer border fabric
- Sew inner border strips in sets of two along the narrow edge.
- Iron seams open.
- Attache to the sides of your center...left side then right side; top then bottom
- Iron seam allowances towards the border fabric
- Trim excess fabric in the corners making sure that they are square....as in 90 degrees.
- Repeat process with outer border fabric.
Quilt as desired: I used Butter-fly b2b by Anne Bright with parchment thread on the top and King Tut's Cleopatra on the bottom. This way the beautiful fabrics got to shine on the top, and the quilting pattern got to play on the back.
Don't forget to add a label! Someday you might forget why or when you made the quilt. Someday your distant family and friends may wonder who made the quilt. It is always fun to add a special touch that sends a love note to future generations that will be enjoying your hand work.
![]()
This quilt finishes at 83" x 83".
I would love to hear from you, help you with any questions you have about my directions, see a picture of your project. Please feel free to contact me.
Cindy Sharp
{Tops to Treasures}
![]()
Save
Posted in: