Welcome to Moda Fabrics!
Top Spin Quilt
Top Spin Quilt
Published:
Aug 12 2016 - 23:00

Hi Moda Bake Shoppers!!! It's me, Melissa Corry from Happy Quilting and I am super excited to be bringing you another fun filled quilt tutorial today ;) I absolutely fell in love with the super happy prints in Zen Chic's Hello Dot line and knew I had to make something equally happy from it. This simplistic geometric design in the bright colors creates wonderful movement and the amazing low volume prints used in the Scrappy Background just help to add that!!! All in all, this queen size stunner is sure to leave you smiling.
This quilt/project finishes at 96" x 96".
So . . . Let's get to how to make your own Top Spin Quilt!!!! Here is what you will need :
![]()

1 Fat Quarter Bundle of Hey Dot by Zen Chic
6 1/2 yards of assorted background fabrics
9 yards backing fabric
1 yard binding fabric
![]()
STEP 1 - CUTTING
Start by pressing 32 Fat Quarters from your Fat Quarter Bundle (I used all of the bright colors and left out those that had a white background.)
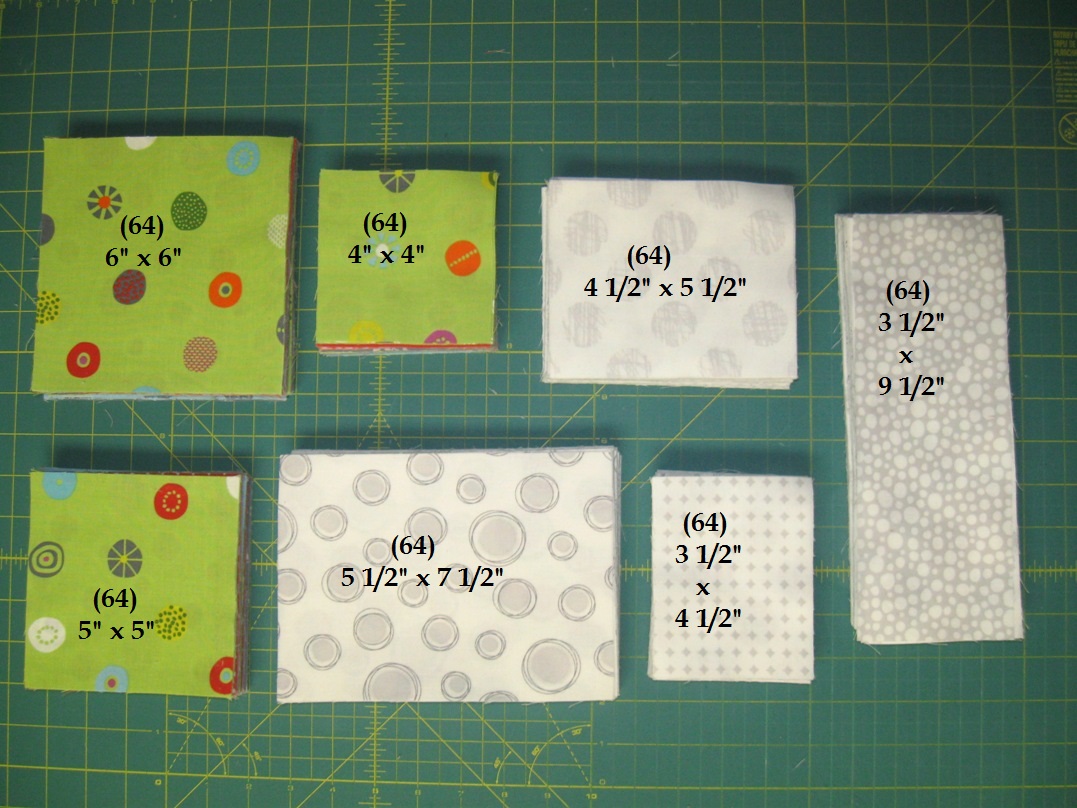
Cut (2) 6" x 6" squares, (2) 5" x 5" squares, and (2) 4" x 4" squares from each of the 32 Fat Quarters.
You will have a total of (64) 6" x 6" squares, (64) 5" x 5" squares, and (64) 4" x 4" squares
From your assorted low volume background yardage cut the following:
(64) 5 1/2" x 7 1/2" rectangles
(64) 4 1/2" x 5 1/2" rectangles
(64) 3 1/2" x 9 1/2" rectangles
(64) 3 1/2" x 4 1/2" rectangles
STEP 2 - HALF SQUARE TRIANGLES
And with all of the cutting done, we are ready to start sewing. We will start with Half Square Triangle Units. Gather 32 squares (that is 1 of each print) from each of your 3 sizes of squares. (So you should have 96 squares at the moment.) Draw a diagonal line on the wrong side of each squares. I like to use a Frixon pen so my lines will erase with heat.

Now, place a marked square with an unmarked square of the same size with right sides together. Stitch a 1/4" seam along either side of the drawn line. You will be doing this for all 32 sets of each of the 3 sizes (96 sets total).

The easiest and quickest way to do this is to chain stitch. So go ahead and pair up all 96 sets. You can pin along either side of the drawn line if you like. Then stitch a 1/4" seam along the left hand side of the line. When you reach the end of one square, don't stop, just feed the next sew of squares into the machine. Continue in this fashion until you have stitched along the left hand side of all 96 sets in the 3 sizes.
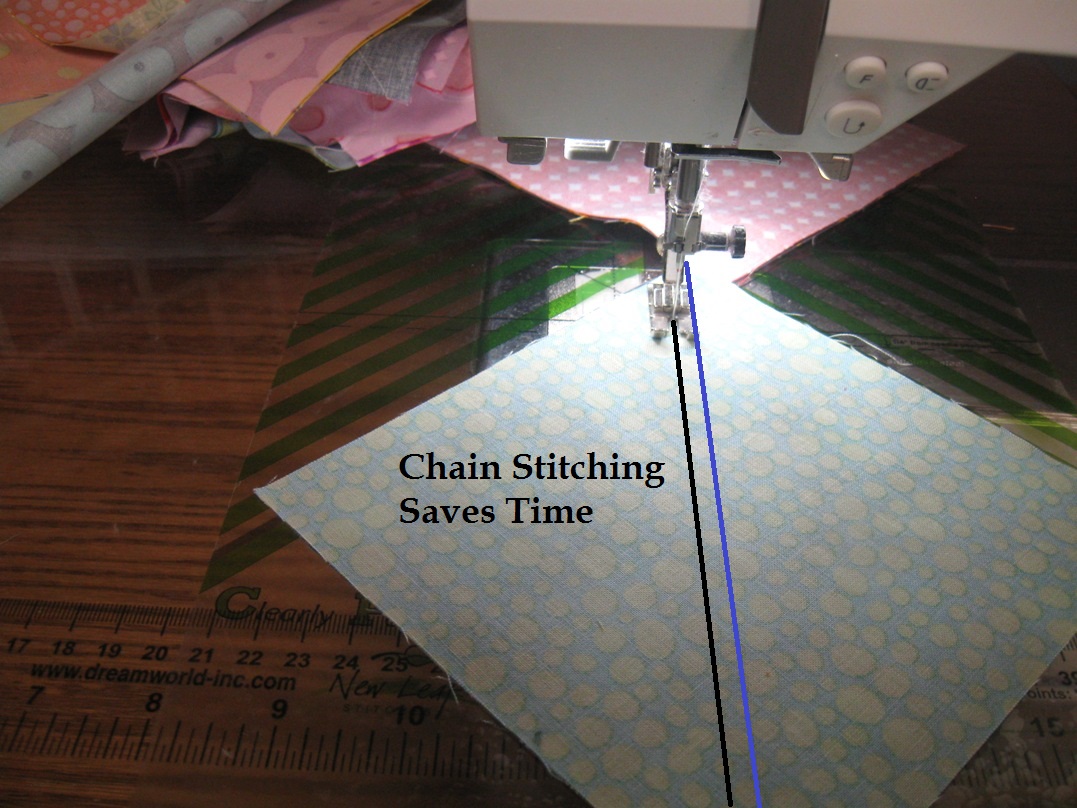
Then clip the threads in between your squares and get ready to do it all over again. Only this time, you are stitching on the right hand side of the drawn line. Again, feed all 96 sets through your machine and then clip the threads between the sets.

Now, align your ruler along the drawn line and cut directly on the line. This creates 2 triangles. Go ahead and cut all 96 sets. And then you can move over to your ironing board. Press your seam allowances on all 192 Half Square Triangle units to one side. I like to press to the darker fabric.

And go ahead and and put your squares into piles of 64 Large squares, 64 Medium squares, and 64 Small squares. And you are all set for some serious trimming. I recommend turning on a favorite movie at this point ;)

Trim your 64 Large Half Square Triangles to 5 1/2" x 5 1/2" square. Trim your 64 Medium Half Square Triangles to 4 1/2" x 4 1/2" square. And finally, trim your 64 Small Half Square Triangles to 3 1/2" x 3 1/2" square. If you are new to trimming Half Square Triangles you can see this little Half Square Triangle Tutorial to help you along. And as you can see, I am a big fan of the Bloc Loc Rulers for trimming ;)
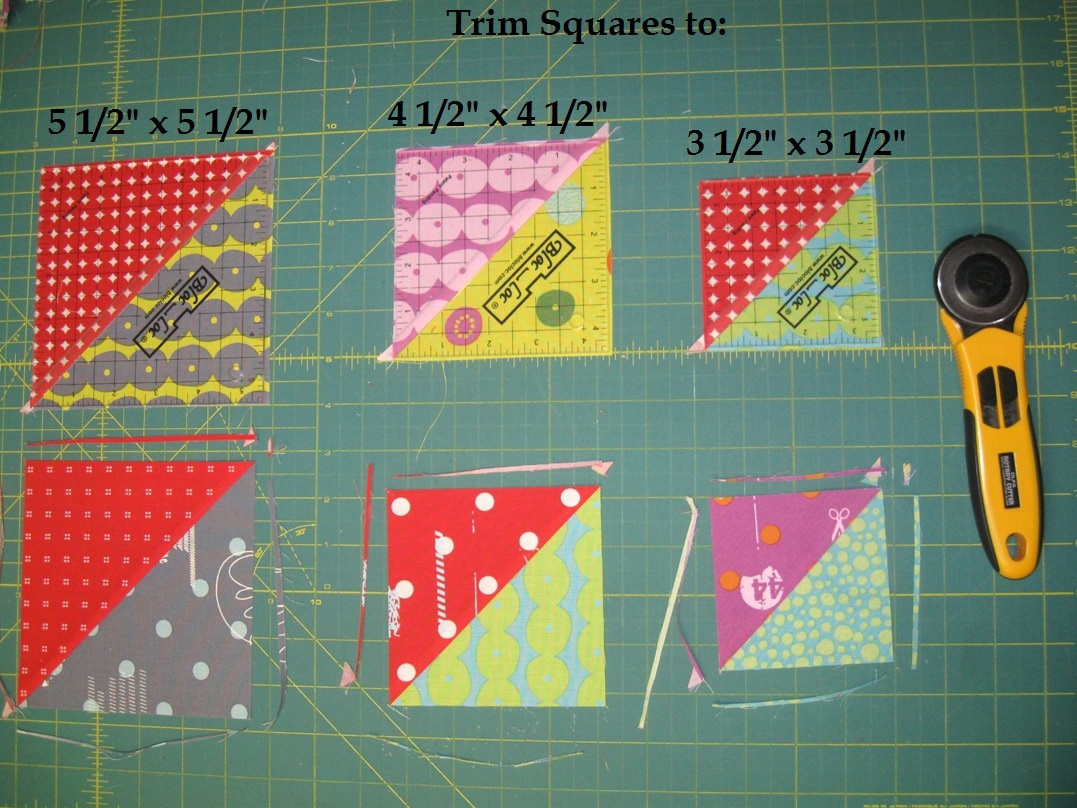
I know, it takes a little while to do all of that trimming, but trust me, it is totally worth it as it allows you to get super pretty points!!! So now you should have 3 piles of 64 Half Square Triangle each trimmed perfectly to the following sizes.

STEP 3 - MAKING THE BLOCK
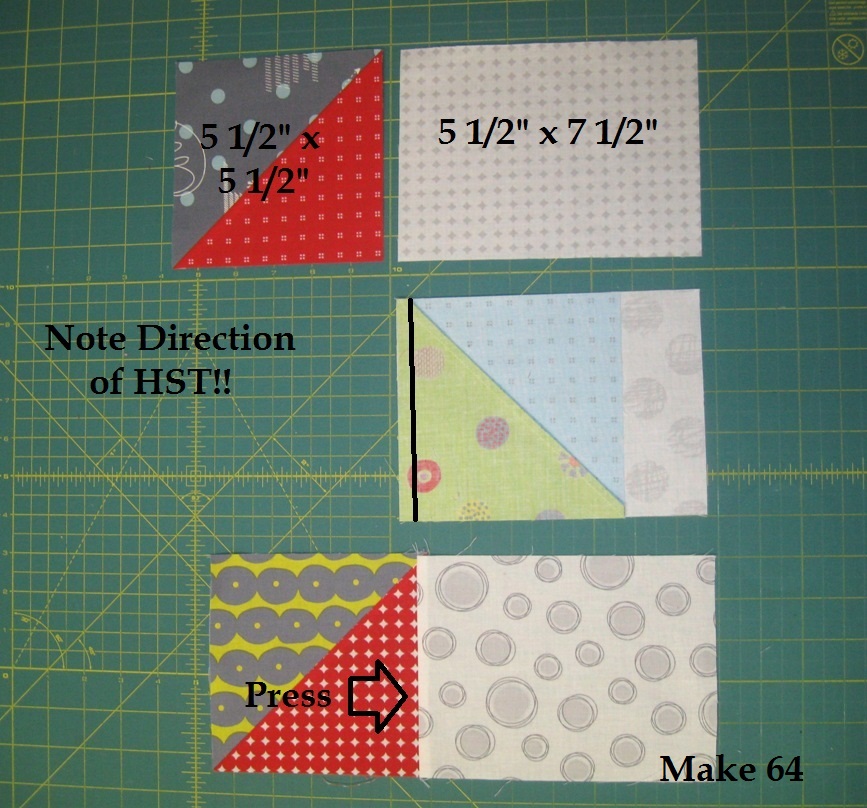
And now we can move on to making the block. There are 3 Rows in this block and we will start with the bottom row. Layout a 5 1/2" x 5 1/2" HST and a 5 1/2" x 7 1/2" background rectangle as shown below. Be Careful to make sure the HST is pointing in the same direction as shown (they are easy to get flipped around). Place the HST onto the rectangle with right sides together and stitch a 1/4" seam along the edge. Press the seam allowance towards the background rectangle. Repeat to make 64 Bottom Rows.
And onto the Top Row. Layout a 3 1/2" x 3 1/2" HST and a 3 1/2" x 9 1/2" background rectangle as shown below. Again, double check the HST placement. Place the HST onto the rectangle with right sides together and stitch a 1/4" seam along the edge. Press the seam allowance towards the background rectangle. Repeat to make 64 Top Rows.

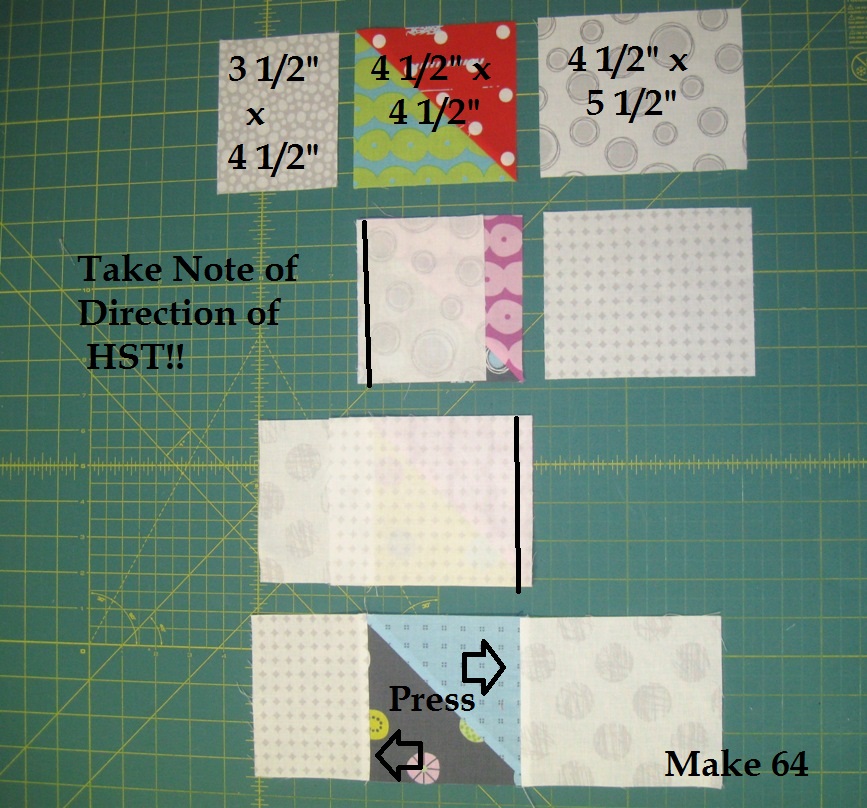
And finally, the Center Row. Layout a 3 1/2" x 4 1/2" background rectangle, a 4 1/2" x 4 1/2" HST and a 4 1/2" x 5 1/2" background rectangle as shown below. Double check that HST. Place the 3 1/2" x 4 1/2" background rectangle onto the HST with right sides together and stitch a 1/4" seam along the edge. Then place the 4 1/2" x 5 1/2" rectangle onto the now sewn together HST with right sides together and stitch a 1/4" seam along the edge. Press the seam allowances outwards toward the background rectangles. Repeat to make 64 Center Rows.
And while you are making the 3 Rows, once again Chain Stitching will save you a whole lot of time. I like to stack up all 64 of my rows and place them next to my machine. Then just keep stitching away until you are done all 64. Then move onto the other 2 rows. You will be done in no time ;)

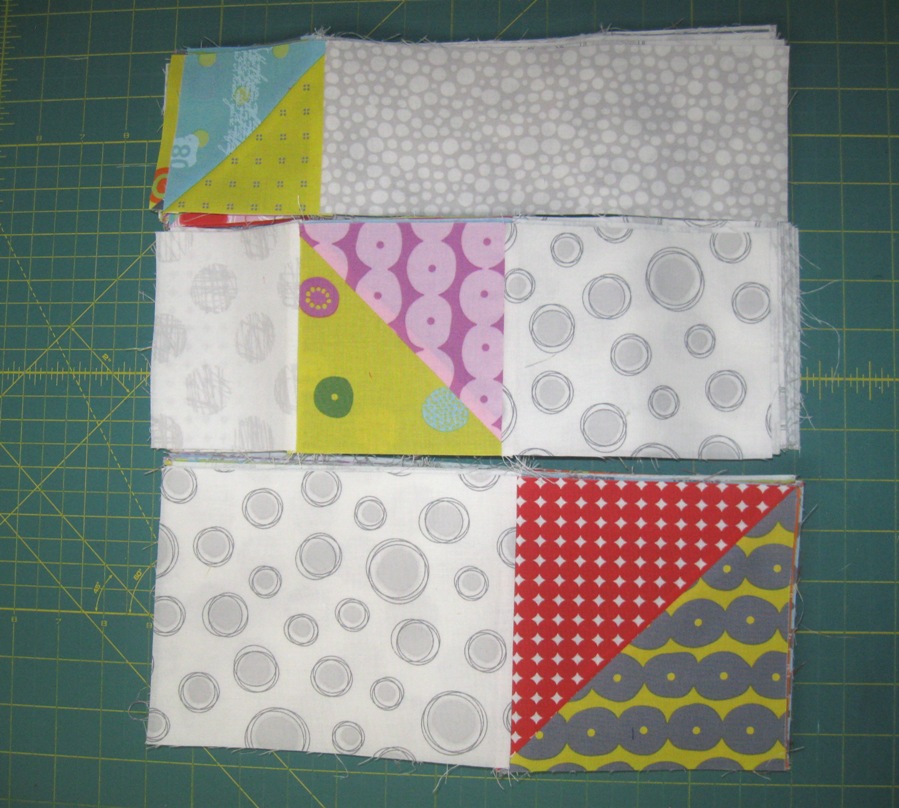
And now, you are ready to sew your rows into a block. Layout your 3 rows as shown below. (Once again, I like to stack all 64 of mine up so I can just chain stitch as I go ;)
Start by sewing the Top and Center Row together. Place the Top Row onto the Center Row with right sides together. Nest (and Pin if you like) the seam together and stitch a 1/4" seam along the edge.
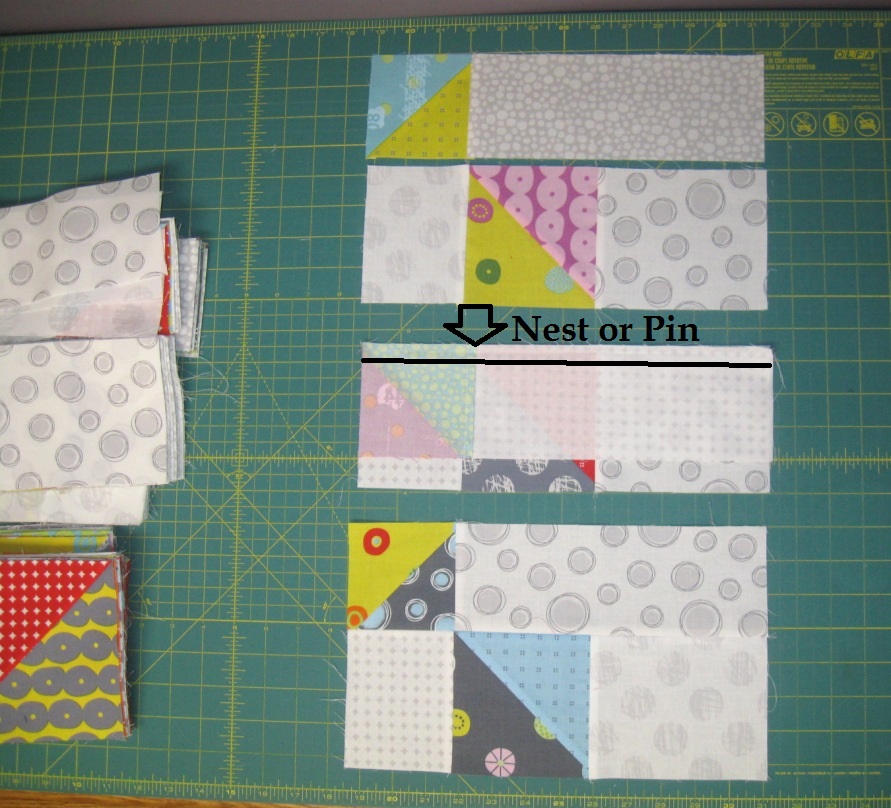
Then place the Bottom Row onto the now sewn together Top and Center Row with right sides together. Nest (and pin if you like) the Rows together and sew a 1/4" seam along the edge. Then press the seam allowances open.
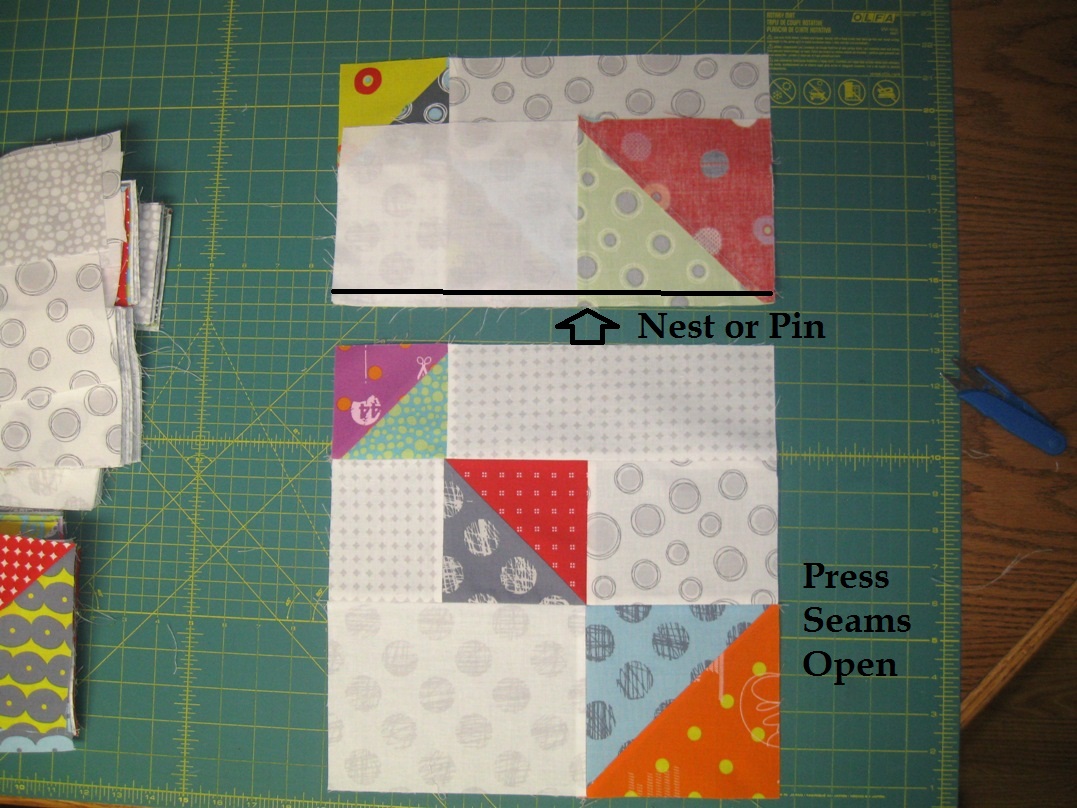
Repeat or Chain Stitch for all 64 Blocks. They should measure 12 1/2" x 12 1/2" unfinished.

STEP 4 - MAKING THE QUILT TOP
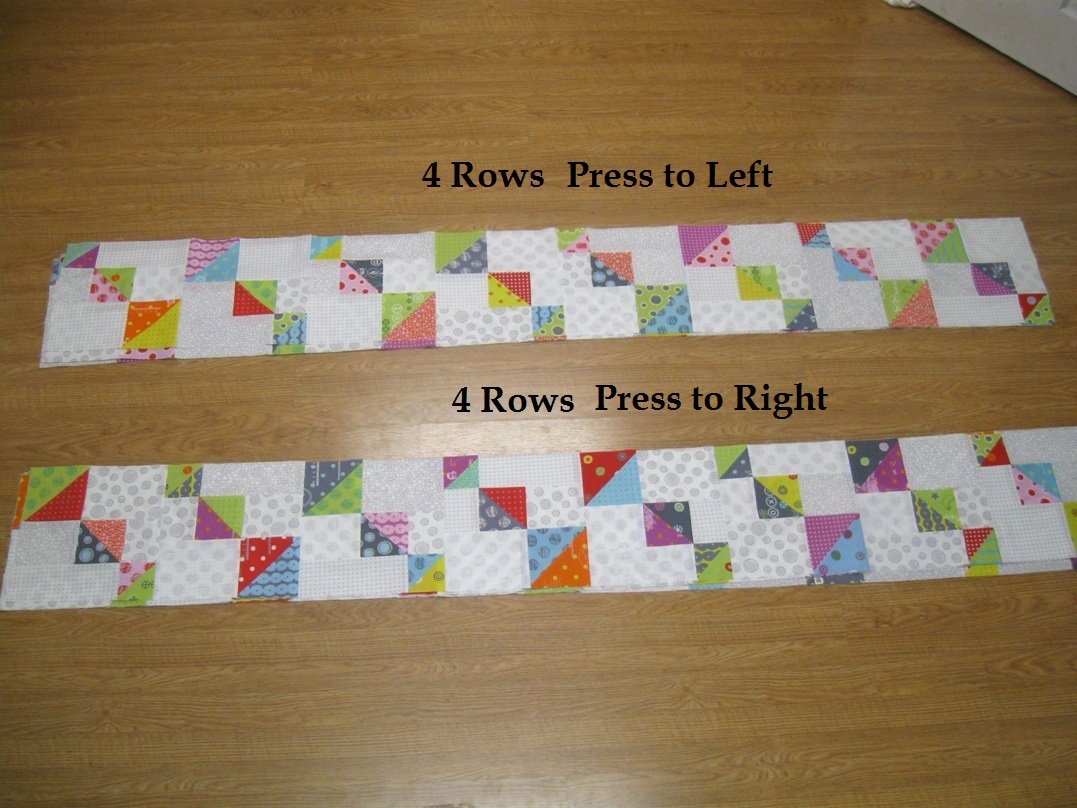
And now, the blocks are ready to be sewing into a quilt top. There are 2 different row layouts in this quilt and 4 rows of each layout. Layout your blocks in the following two layouts, stacking 4 rows on top of each layout.

Now you can sew the rows together. To do this, place the second block onto the first with right sides together and pin if you like. Stitch a 1/4" seam along the edge. (shown in row 2) Now place the Third block onto the now sewn together Blocks 1 and 2 with right sides together and pin if you like. Stitch a 1/4" seam along the edge. (shown in row 3).

Continue in this fashion until you have sewn all the blocks in the row together. Then repeat to sew all 8 rows together, 4 rows each of the 2 different layouts. Press the 4 rows in the first layout to the left and Press the 4 roes in the second layout to the right. This will allow you to nest them later.
And now, all that is left is sewing the rows into a quilt top. (Sorry, my room is a little small for this large quilt, it didn't quite all fit in the picture ;) Layout your rows alternating the two row layouts as shown below.
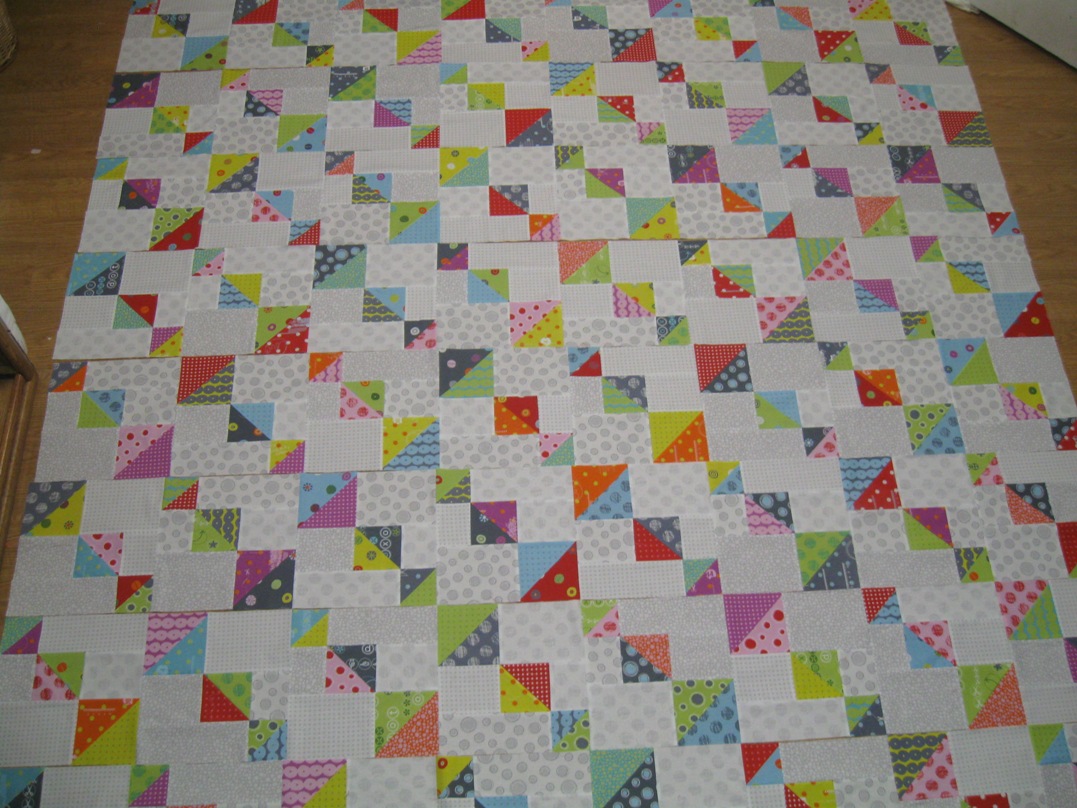
And now it is just like sewing the blocks into rows, only on a much larger scale. Place the first row onto the second row with right sides together. Nest and Pin the seams together. Stitch a 1/4" seam along the edge.

Now, place the third row onto the now sewn together first and second row with right sides together. Nest and Pin the seams together. Stitch a 1/4" seam along the edge.

Continue in this fashion sewing the rows together. I like to sew the first 4 rows together and then start over sewing the last 4 rows together. This just means I have less bulk at the machine to deal with ;) And then all that is left is to place the two halves together with right sides together, nest and pin the seams, and then sew a 1/4" seam along the edge.

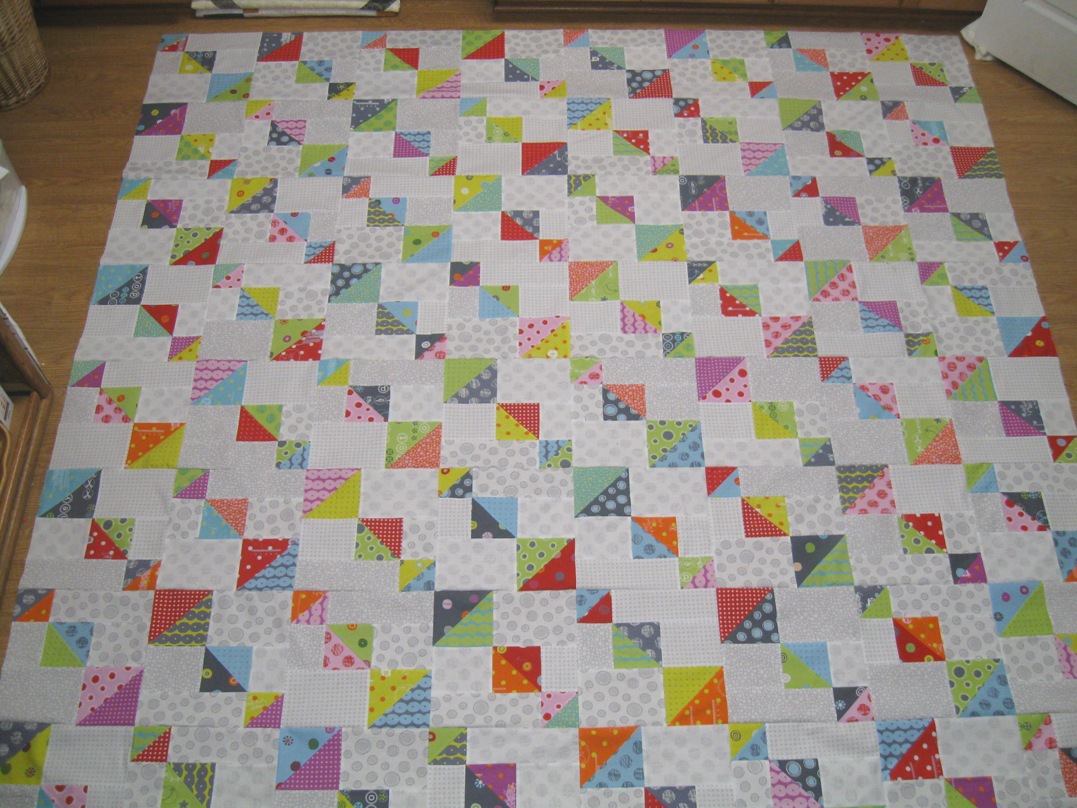
And your quilt top is all sewn together!!! Now just press the seams to one side or open, whichever your prefer, and you quilt top is done!!! Wasn't that so fast and fun!!!
STEP 5 - FINISH THE QUILT
So . . . Let's finish it up ;) Time to Baste It, Quilt It, and Bind It!!! Which is a whole lot in one little sentence. If you are new to quilting, you can see my Finishing Your Quilt Series of video tutorials that will walk you through Basting, Quilting, and Binding step by step ;)

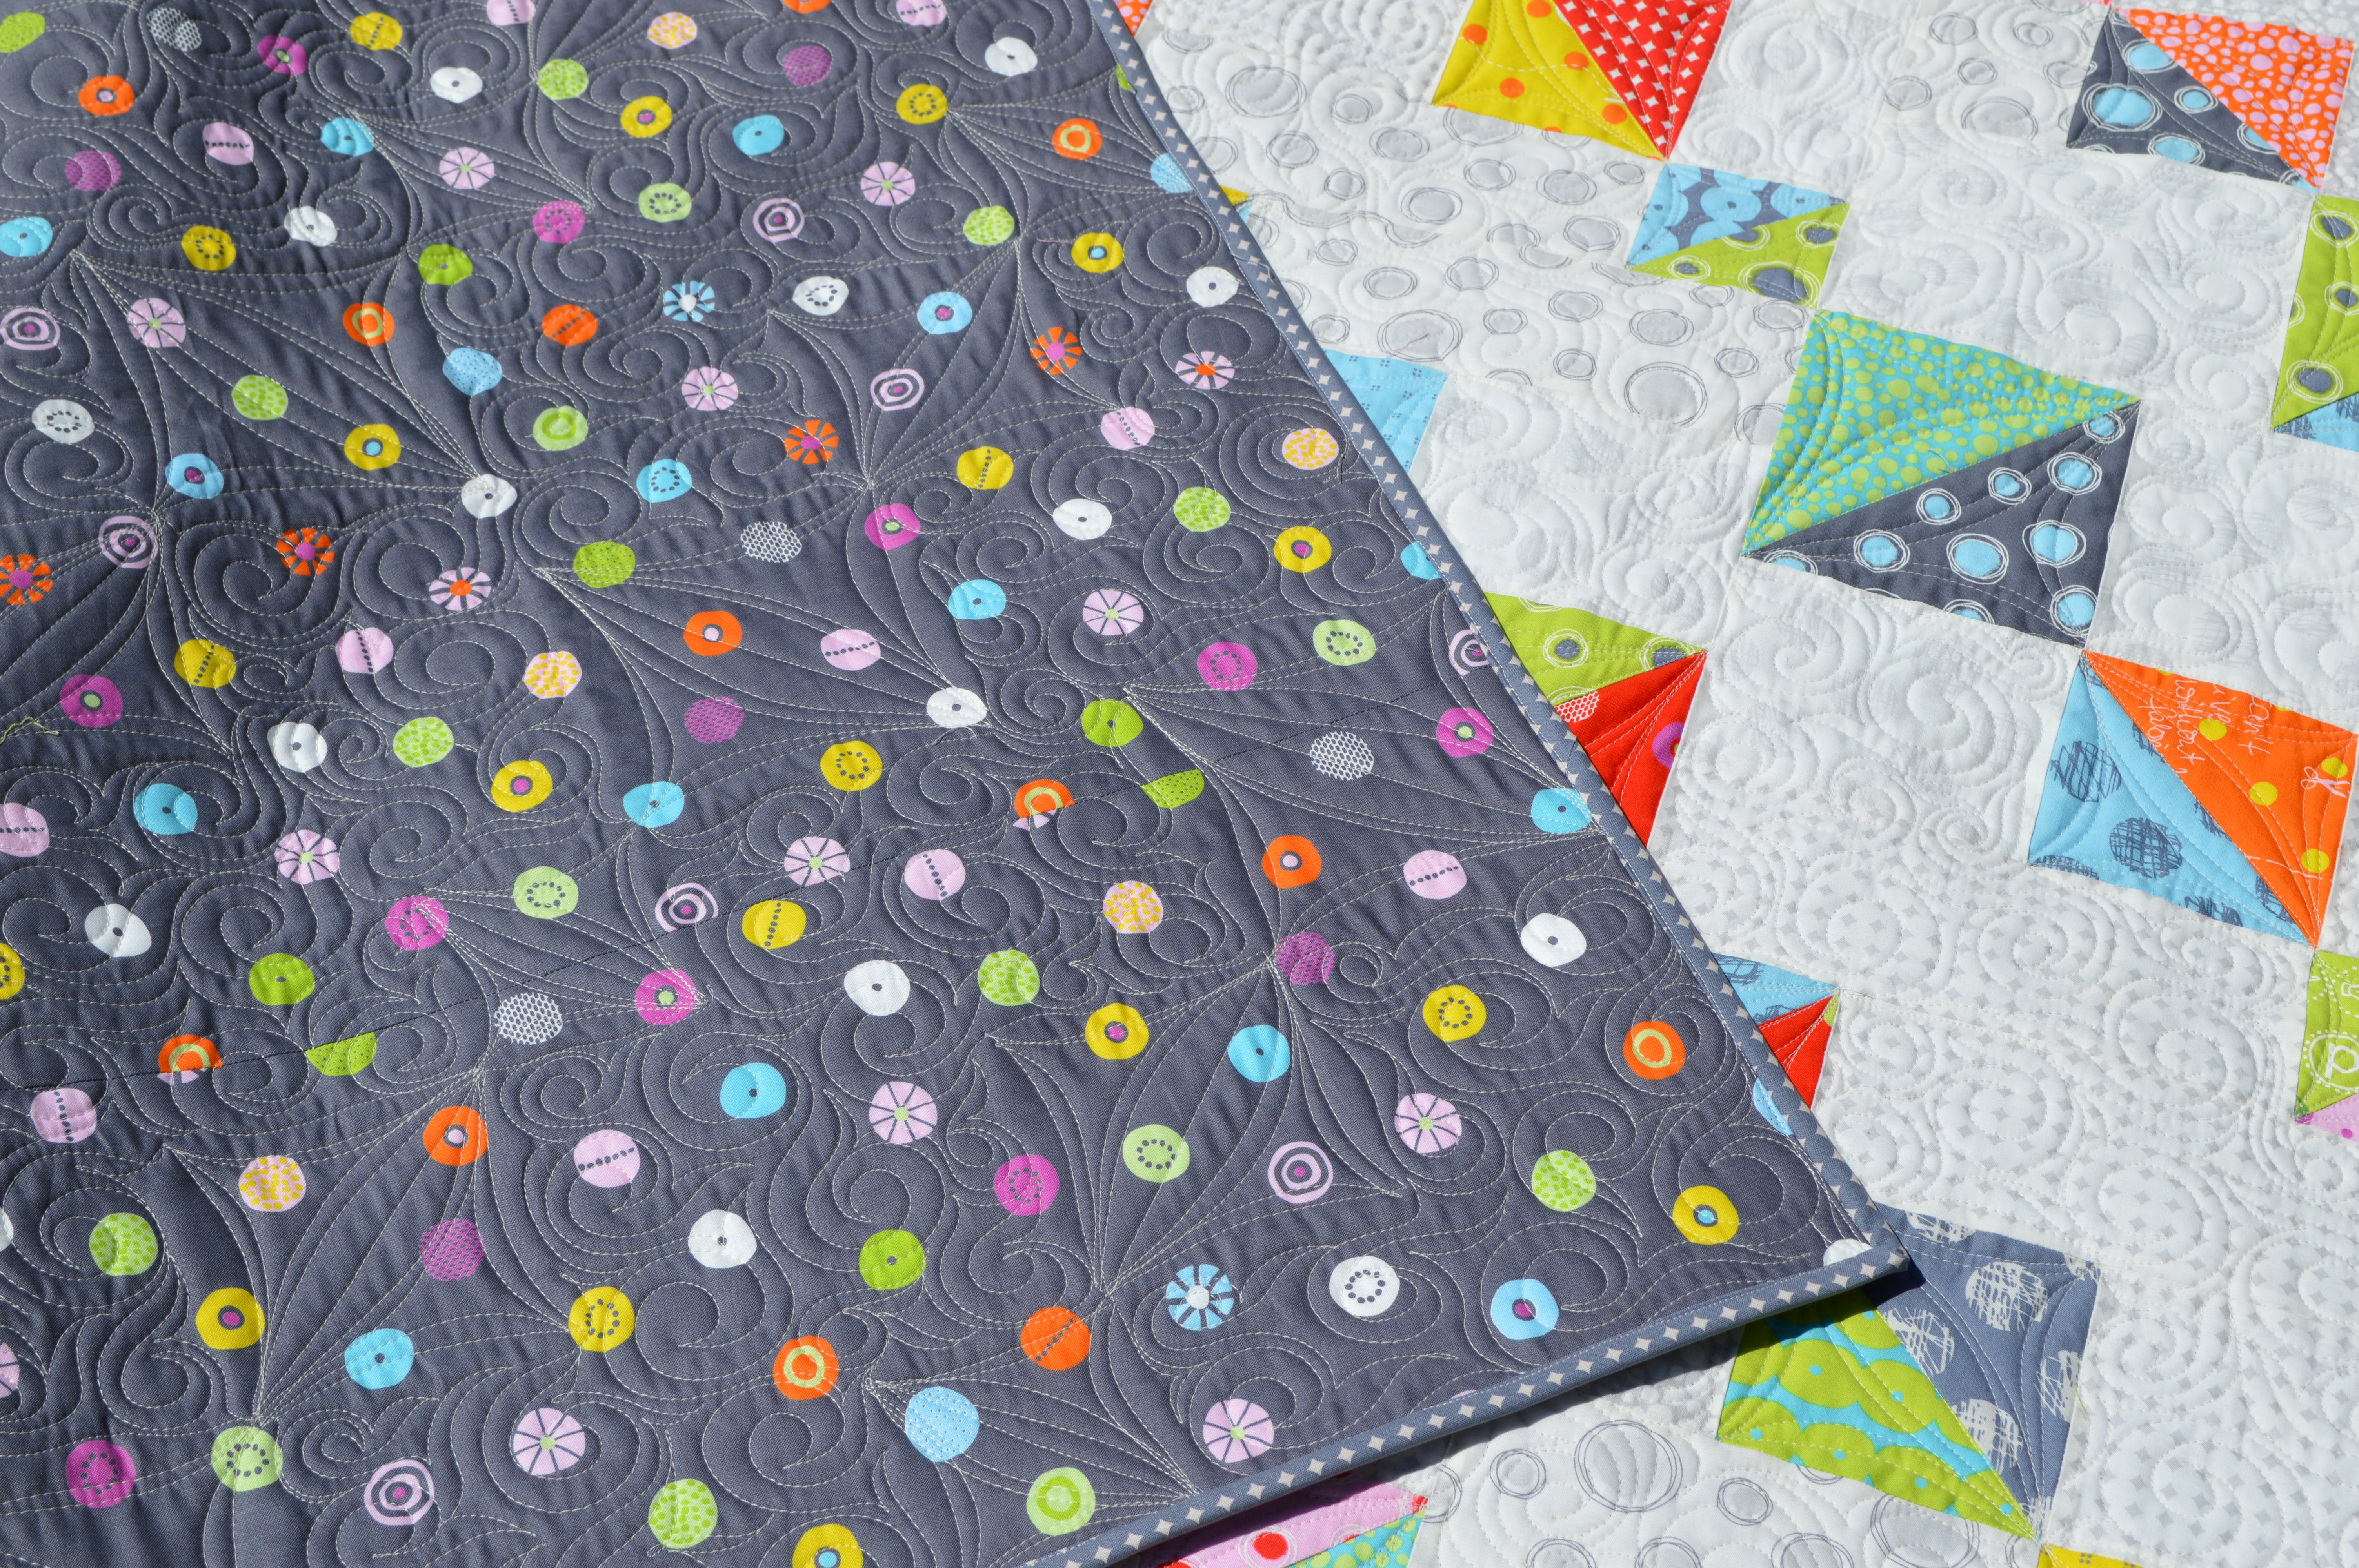
I had a lot of fun quilting up this quilt ;) I quilted my favorite small Swirl and Curl in the Background and double arches in the HST's. You can really see how it stands out on the awesome backing fabric, so fun!!!
Then just cut your Binding Yardage into (10) 2 1/2" x 42" strips to make a binding and bind your quilt. And all that is left is to sit back and snuggle in that wonderful quilty goodness :)
![]()
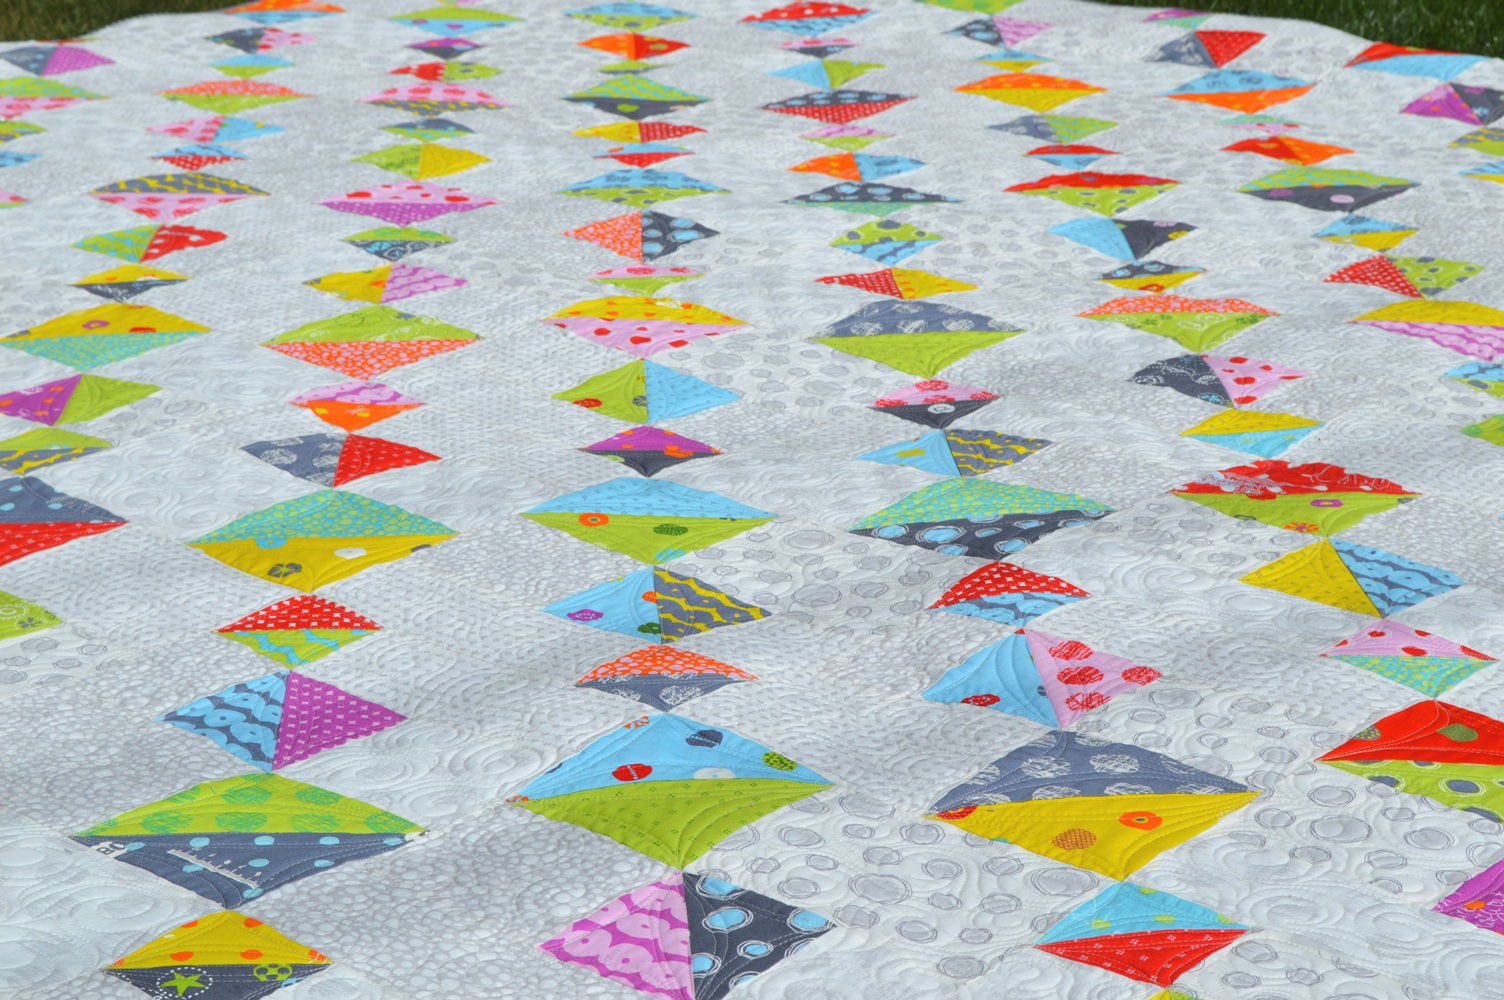
Top Spin finishes at 96" x 96" making it the perfect fit for your queen size bed. And with all of that wonderful movement and happy prints, it is sure to make you smile each time you see it ;)

I hope you have enjoyed this tutorial and find it easy to follow. If you make your own Top Spin Quilt I would love to see it!! You can email me a picture at [email protected] or add it to my flickr group here or post it to social media with the hashtag #happyquiltingwithmc ;) I can't wait to see your Top Spin Quilts!!!

And I would love to have you stop by Happy Quilting sometime for a visit ;) I just love being able to share lots of quilting goodness on a daily basis ;) Wishing you a very Happy Quilting Day!!!
Melissa Corry
www.happyquiltingmelissa.com
![]()
Posted in: