Welcome to Moda Fabrics!
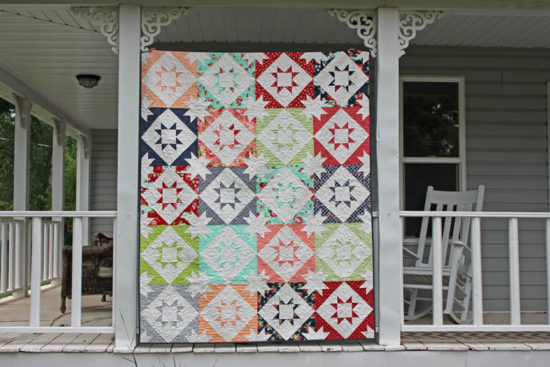
Sky Full of Stars Quilt
Sky Full of Stars Quilt
Published:
Jul 17 2017 - 23:00
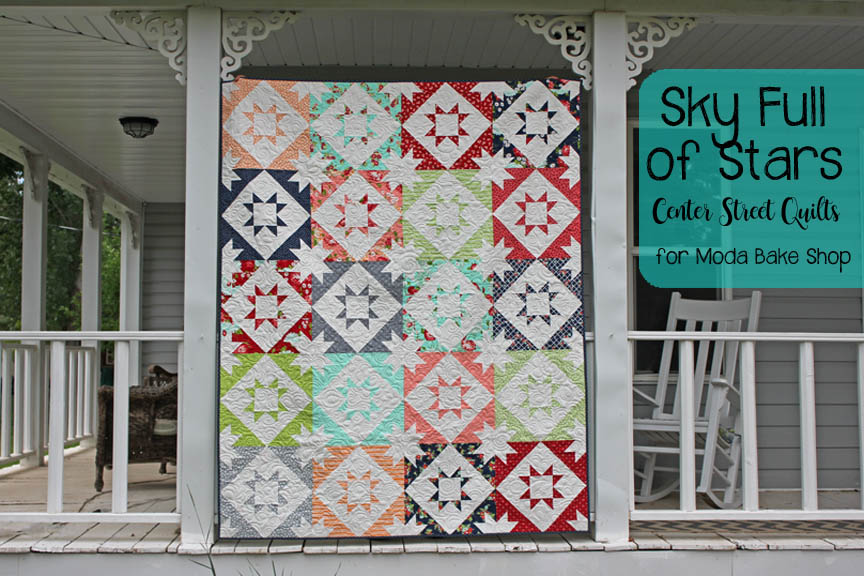

Hi! This is Kristina Brinkerhoff from Center Street Quilts and I am excited to be back on the Moda Bake Shop today sharing my latest tutorial, Sky Full of Stars. This recipe has 16" blocks that are fat-quarter friendly and perfect for showing off a favorite new fabric line (like The Good Life by Bonnie and Camille!).
This quilt finishes at 64" x 80".
![]()

1 Fat Quarter Bundle of The Good Life by Bonnie and Camille
4 yards background fabric {Moda Bella Solid 9900-97}
5 yards backing fabric
2/3 yards binding fabric
![]()
Width of Fabric is abbreviated as WOF
All seams are 1/4”
Cutting instructions:
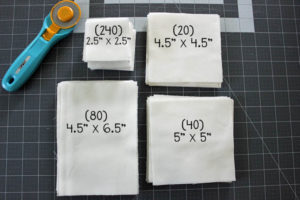
From the background fabic, cut (16) strips 4.5” x WOF.
- Subcut (13) of the strips into (6) 4.5” x 6.5” rectangles per strip for a total of (78) 4.5” x 6.5” rectangles.
- Subcut (1) 4.5” x WOF strip into (2) 4.5” x 6.5” rectangles and (2) 4.5” x 4.5” squares
- Subcut the last (2) 4.5” x WOF into (18) 4.5” x 4.5” squares.
From the background fabric, cut (5) strips 5” x WOF. Subcut the strips into (8) 5” x 5” squares per strip for a total of (40) 5” x 5” squares.
From the background fabric, cut (15) strips 2.5” x WOF. Subcut the strips into (16) 2.5” x 2.5” squares per strip for a total of (240) 2.5” x 2.5” squares.
From the background yardage, you should now have (80) 4.5” x 6.5” rectangles, (20) 4.5” x 4.5” squares, (40) 5” x 5” squares, and (240) 2.5” x 2.5” squares.
Cut each of the 20 fat quarters according to the diagram below, cutting the long vertical cuts (in bold) first. You should have a strip approximately 5” x 21” left over to use on another project.
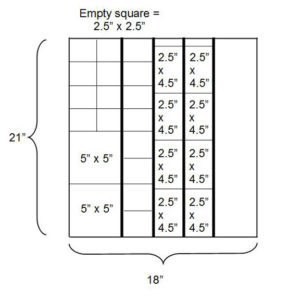
From each fat quarter, there should be:
- (2) 5” x 5” squares
- (16) 2.5” x 2.5” squares, and
- (8) 2.5”x 4.5” rectangles

Block assembly:
To assemble the first block, gather all of the cut pieces from one of the fat quarters along with the following background pieces:
- (4) 4.5” x 6.5” rectangles
- (1) 4.5” x 4.5” square
- (2) 5” x 5” squares, and
- (12) 2.5” x 2.5” squares
We will first be assembling an elongated snowball unit. Take the (4) 4.5” x 6.5” rectangles from the background fabric and (16) 2.5”x 2.5” squares from the fat quarter. Draw a line corner to corner on the wrong side of the (16) 2.5” x 2.5” squares. Place two squares on the corners of one side of the background rectangles, right sides together and sew directly on the drawn line.

Trim 1/4” away from the seam and press. (I frequently press all of my seams open, as I've found it increases accuracy and decreases bulk at the seams, but please feel free to press the seams as desired).
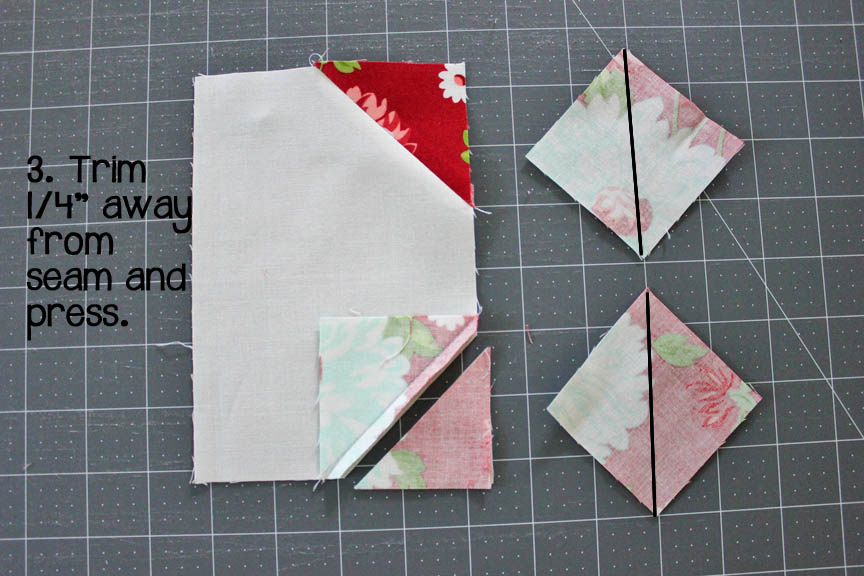
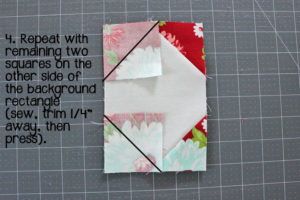
Repeat with two more squares on the other side of the background rectangles. You should now have four elongated snowball units made from this fat quarter print. Set these snowball units to the side.

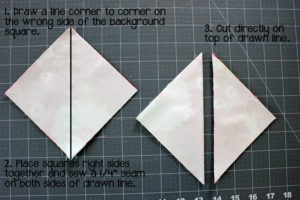
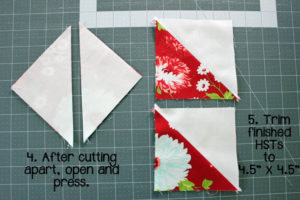
Next, we'll make four half square triangle (HST) units from the 5” x 5” squares. Gather (2) 5” x 5” squares from the background fabric and the (2) 5” x 5” squares from the fat quarter. Draw a line corner to corner on the wrong side of the two background fabric squares. Place each of the background fabric squares on top of a fat quarter squares with right sides together. On each of the 5” x 5” pairs, sew two lines 1/4” away from either side of the drawn line. Cut from corner to corner on the drawn line to separate into HST units. Press seams open. Trim the four HST units to 4.5” x 4.5” and set to the side.
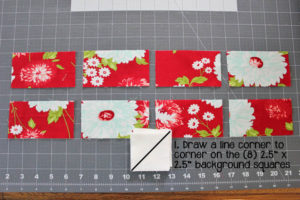
The last unit to construct before assembling our block is half of a flying geese unit. Gather the (8) 2.5” x 4.5” rectangles from the fat quarter and (8) of the 2.5” x 2.5” squares from the background fabric. Draw a line corner to corner on the wrong side of the (8) 2.5” x 2.5” background squares.
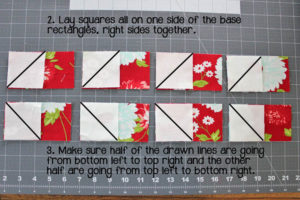
Lay the background squares all on one side of the base rectangles, right sides together. Make sure that half of your drawn lines are going from bottom left to top right and that the other half are going from top left to bottom right, as shown in the image below.
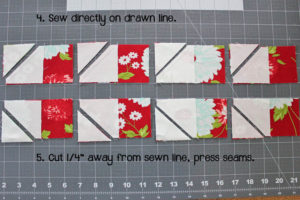
Sew directly on the line, trim 1/4” away from line to reduce bulk and press seam open.

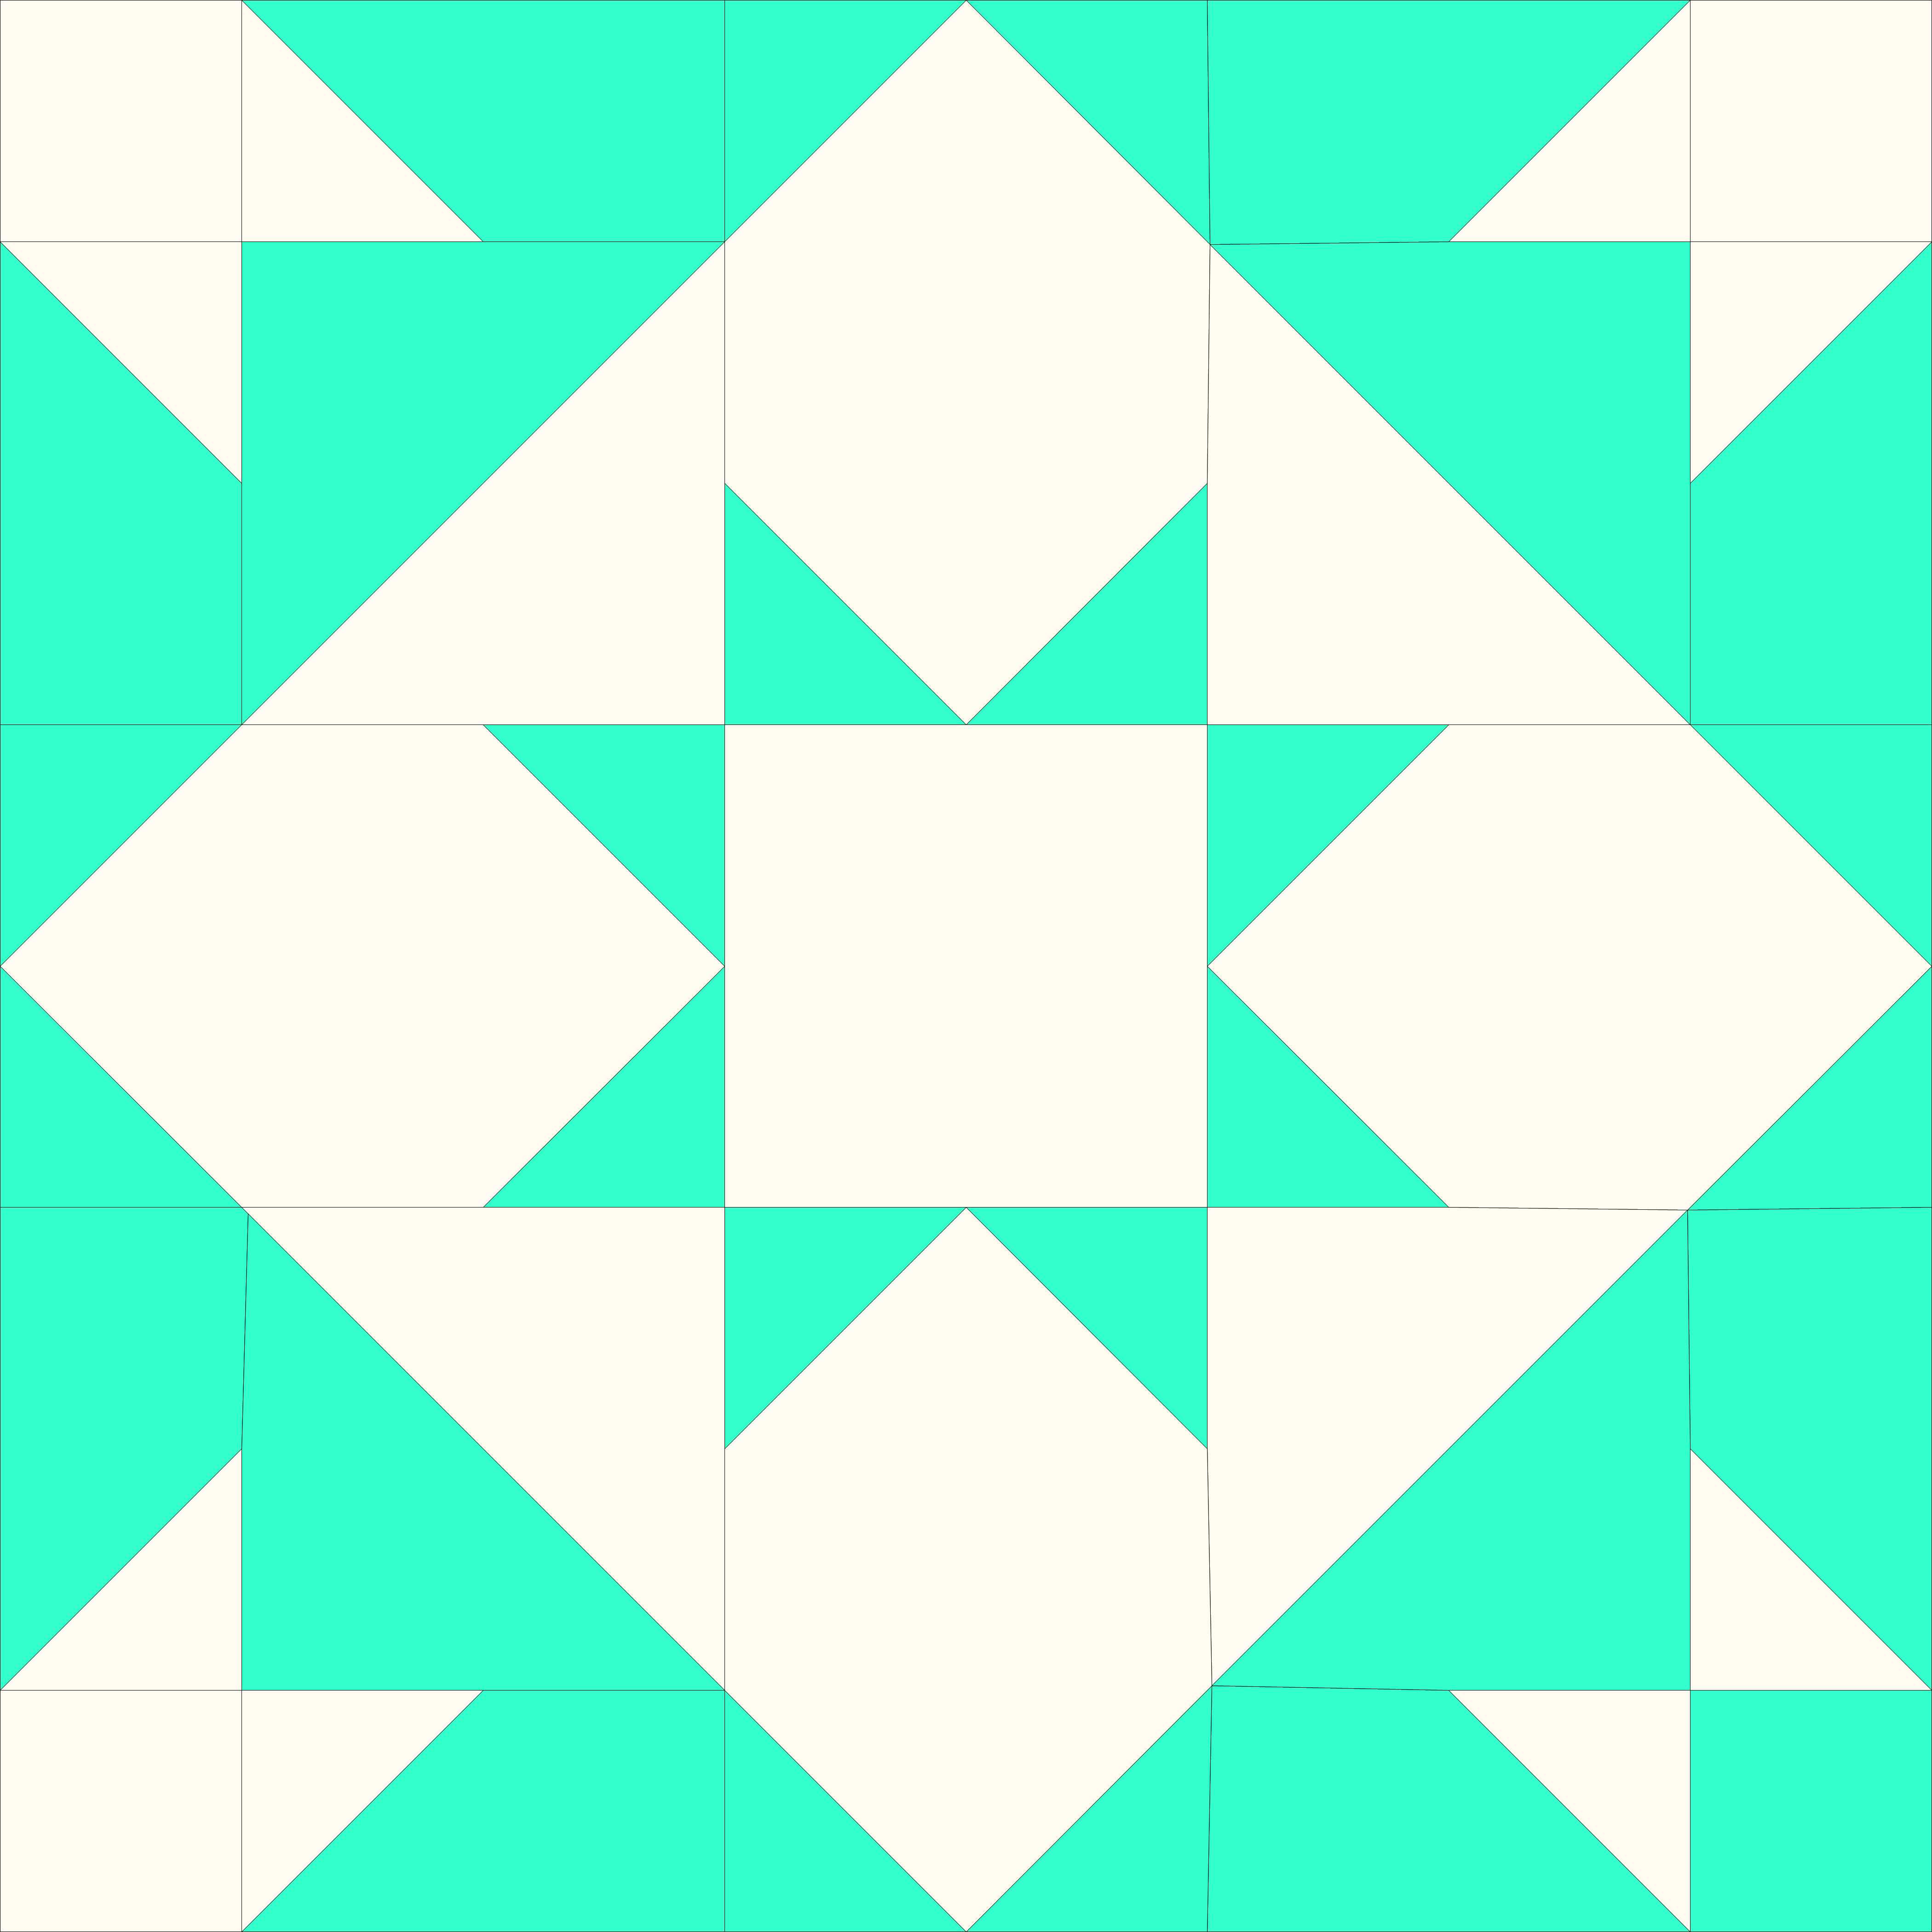
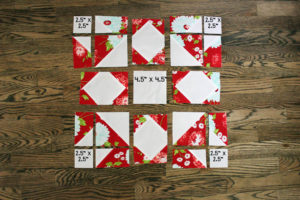
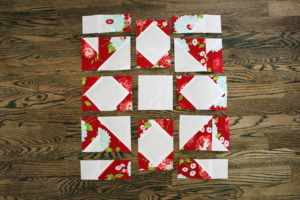
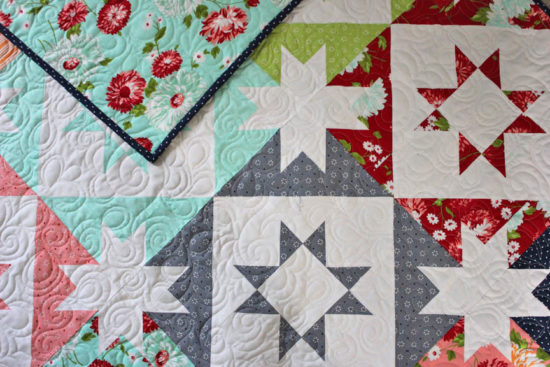
Gather all of the units just sewn, along with (4) 2.5” x 2.5” squares and (1) 4.5” x 4.5” square. Lay out all of the pieces according to the image below.
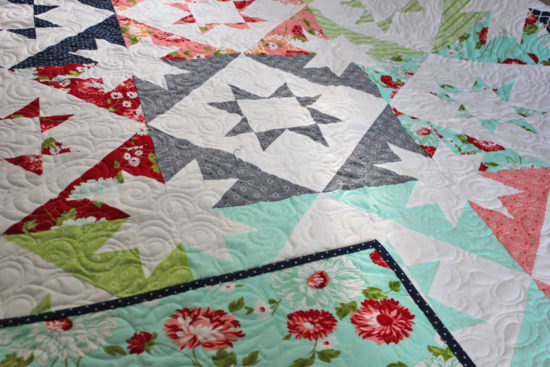
To assemble the block, we'll start by sewing the corner units together as shown in the images below, then sewing each of the rows together, pressing seams open (or as desired) as you go.
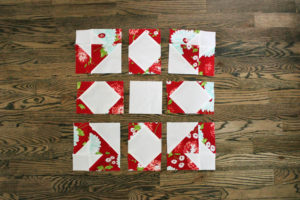
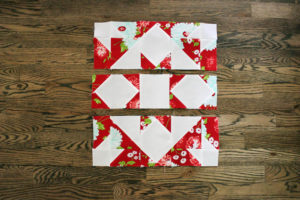
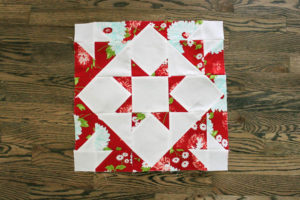
The first block is now complete. It should measure 16.5” x 16.5.” Repeat the process with the other 19 fat quarters to yield 20 blocks total. As a side note: When I start on a new project with multiples of the same block, I'll often sew one block together completely to make sure that I'm doing things correctly and that I understand the process. Once I have that first block together correctly, I like to chain piece the rest of the blocks to speed up the process. The units that make up these blocks would work great for chain piecing, so keep that in mind after you have your first block assembled.
Arrange blocks as desired with four blocks across and five blocks down. Sew four blocks together to make up each of the rows, then sew the five rows together.

With a 5 yard cut of backing fabric, the backing will need to be pieced with a vertical seam. Cut the backing into two pieces, each 2.5 yards long, trim the selvages, and sew the two pieces together along the selvage edges to create one large backing piece. (You can get by with 4 yards and a horizontal seam for the backing if you don't need extra inches to pattern match the two pieces and 4" extra on each side for a long arm quilter.) Quilt and bind as desired.
![]()
This quilt finishes at 64" x 80".
Thank you for following along with my Sky Full of Stars quilt tutorial. I had such a fun time designing and making this quilt. Please share your quilt with me on instagram by tagging me @centerstreetquilts, as I would love to see your version! You can follow along with more of my quilting projects on instagram or on my new Center Street Quilts blog.
Kristina Brinkerhoff
Center Street Quilts
![]()
Posted in:
Comments