Warehouses Closed June 6-13 For Exclusive Event
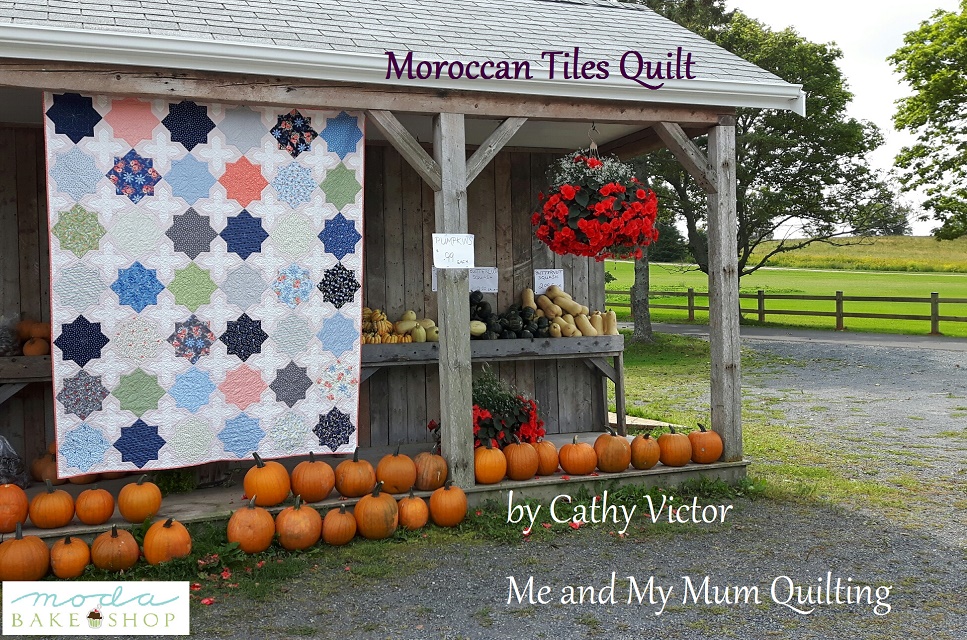
Moroccan Tiles Quilt
Moroccan Tiles Quilt
Published:
Oct 5 2017 - 23:00
![]()
Hi, It's Cathy Victor from MeAndMyMumQuilting. I wanted to design a quilt that could showcase the beautiful prints in a Layer Cake without cutting it into itty bitty pieces. A secondary block creates an added design element resulting in a quilt that reminds me of exotic tiles... I am so pleased to share my "Moroccan Tiles" tutorial with you.
This quilt/project finishes at 79" x 89".
![]()

1 x Layer Cake® {47510 LC Bloomsbury by Franny & Jane}
2 x Charm Packs {47510 PP Bloomsbury by Franny & Jane}
4 yards background fabric {9900 30 Bella Solids -Baby Pink}
2 yards accent fabric {9900 200 Bella Solids - Off White}
6 yards backing fabric {47510 12 Bloomsbury}
.75 yard binding fabric {47515 17 Bloomsbury}
![]()
Here are a few things that I recommend to help you create this quilt:
- A design wall or space to lay out the quilt is a must. The blocks must be laid out before assembling into rows.
- A sharp rotary cutter
- a 6" x 24" ruler
- a square ruler at least 10" x 10"
- a small ruler for marking lines
- It's always a good idea to start a new quilt with a new sewing machine needle too.
Please read through the instructions before you begin cutting.
- All seams are scant 1/4", unless you are sewing on a drawn line.
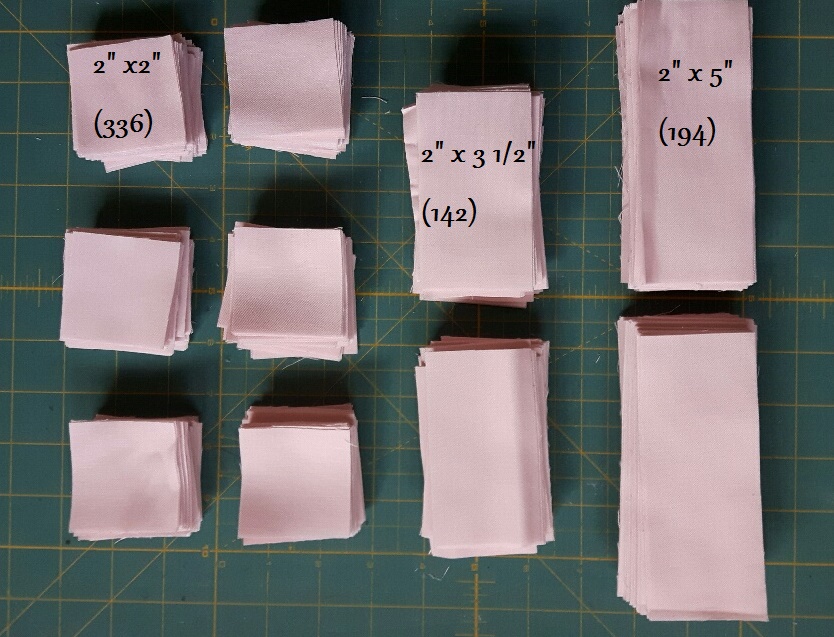
From the 2 yds of Accent fabric (white):
- Cut (12) 3 1/2" strips. Sub-cut into (142) 3 1/2" squares.
- Cut (4) 5" strips. Sub-cut into (26) 5" squares.

From the 4 yds of Background (pink), cut (57) 2" x WOF strips.
- Sub-cut into (194) 2" x 5" &
- (142) 2" x 3 1/2" &
- (336) 2" x 2"
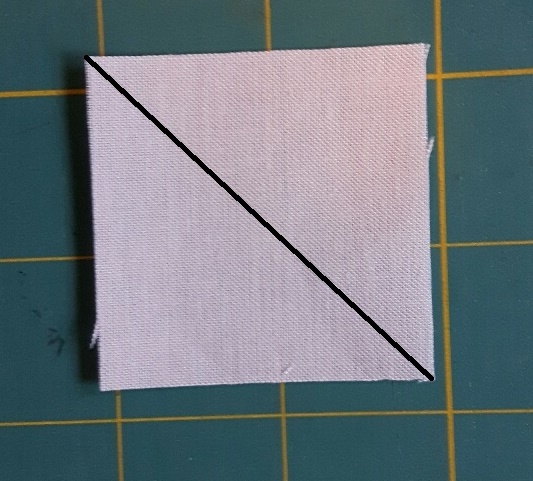
With a small ruler, mark a diagonal line on all of the 2" squares. (You can do these in small batches, or while binge watching your favorite show. I was able to do mine during 2 episodes of Grey's Anatomy!)
We are now ready to snowball some corners. For this step you only have to do 2 opposite corners. Take a 2" BG square and line it up in one corner of a 3 1/2"accent square.
Sew on the line. Repeat for the rest of the 3 1/2"accent squares.
Place a 2" BG square to the opposite corner of the units you just completed. Repeat until all the 3 1/2" units have opposite corners snowballed. Yield: (142) 3 1/2" squares.

Cut the excess fabric away from the corners leaving a 1/4" seam. Press the corners from left to right(or right to left) so that one corner is pressed towards the centre and the other is pressed towards the corner. (see the photo below) Set aside (22). The rest (120) will be sewn into 4-patch (Cross) blocks.

4-patch(Cross) blocks:
Start by sewing them into pairs. I rotate the blocks until the corners are nesting, with the seams going in opposite directions. I chose to feed the units into my sewing machine the same way every time. Press towards the right. (I kept the pieces in the same position so that the seams would nest throughout the block assembly.)

Next we can sew the pairs into 4-patch (Cross) blocks. All the seams should nest.
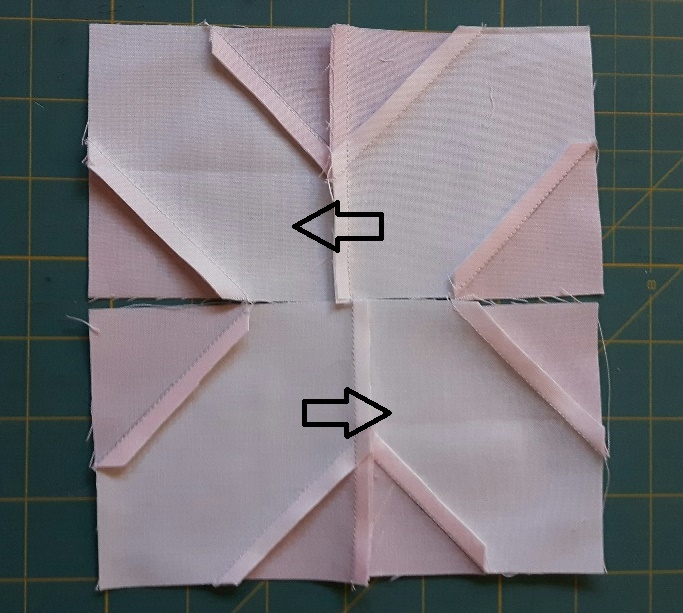
You can "spin" the seams by placing your thumbs close to the centre and tugging gently in the direction you wish the seams to lay. Press (and starch if you wish).
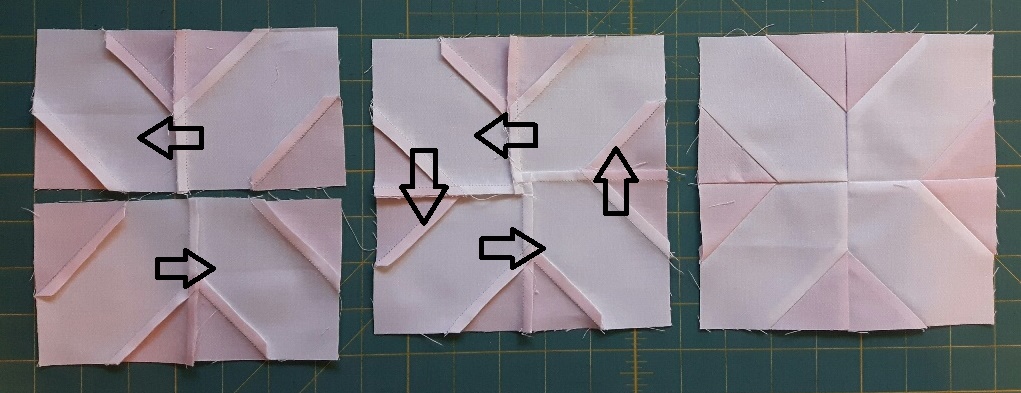
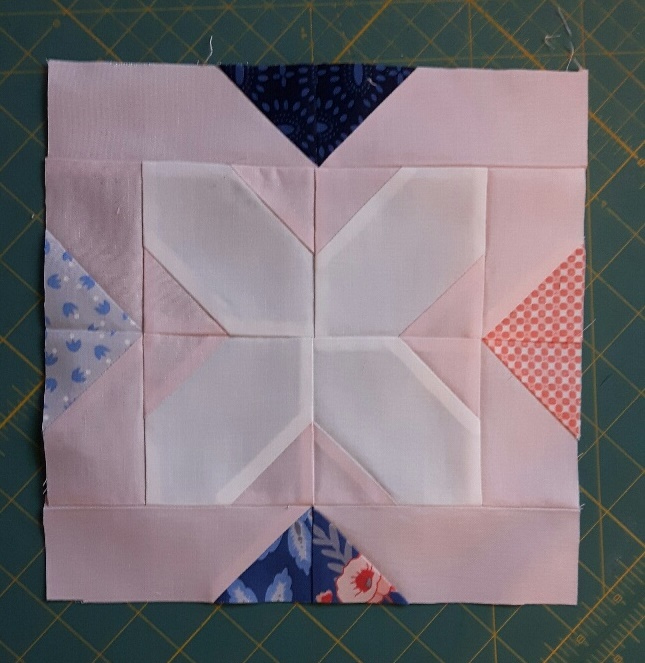
The block should measure 6 1/2" square. Yield: 30 Cross blocks.
Border Partial Units
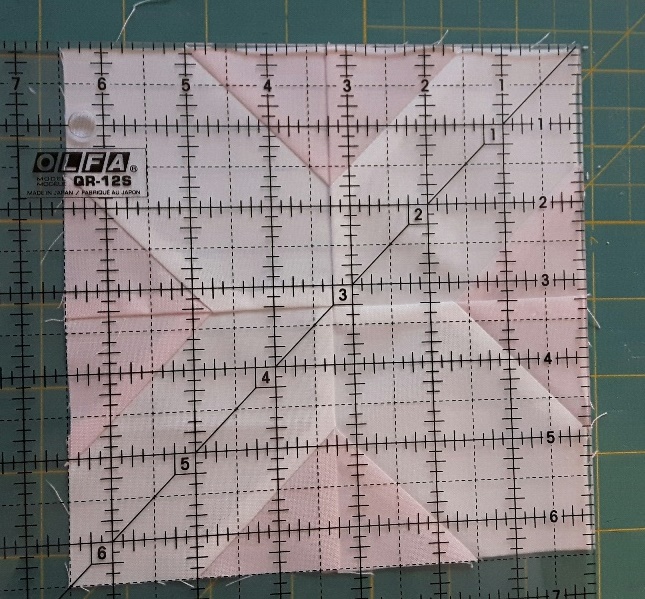
Take the remaining 2" BG squares and snowball 2 opposite corners of the 5" accent squares.

Just like you did in the steps above, press both seams in the same direction( left to right) Yield: (26) 5" squares.

Cut all (26) of these 5" squares in half on the diagonal. Yield: 52 pieced triangles.
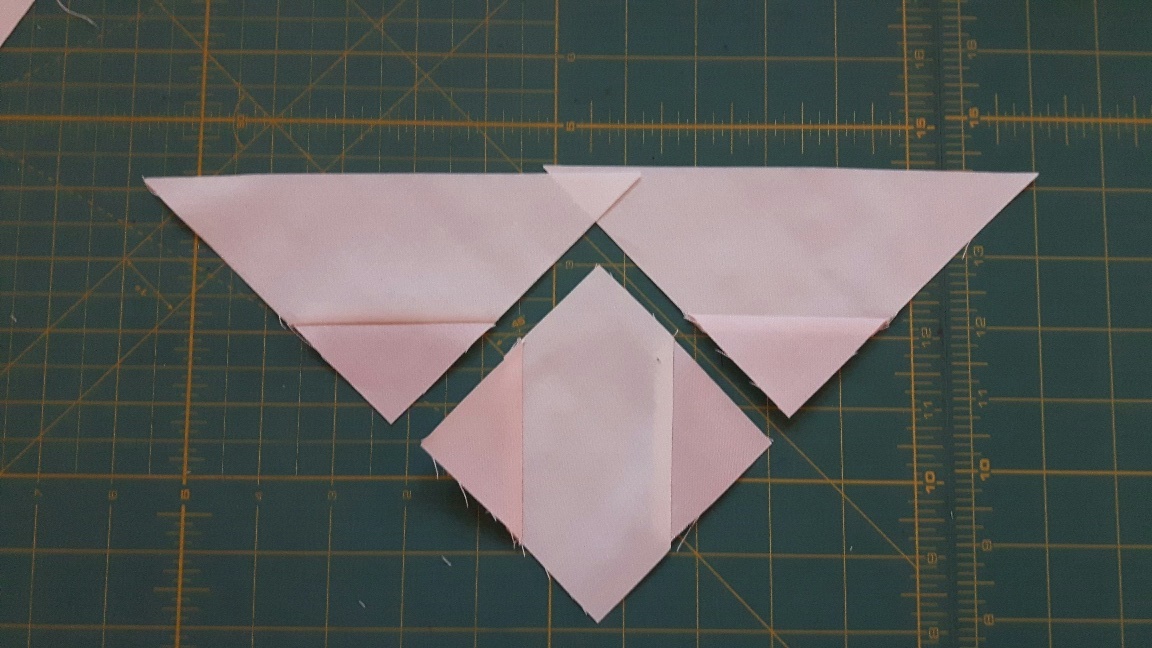
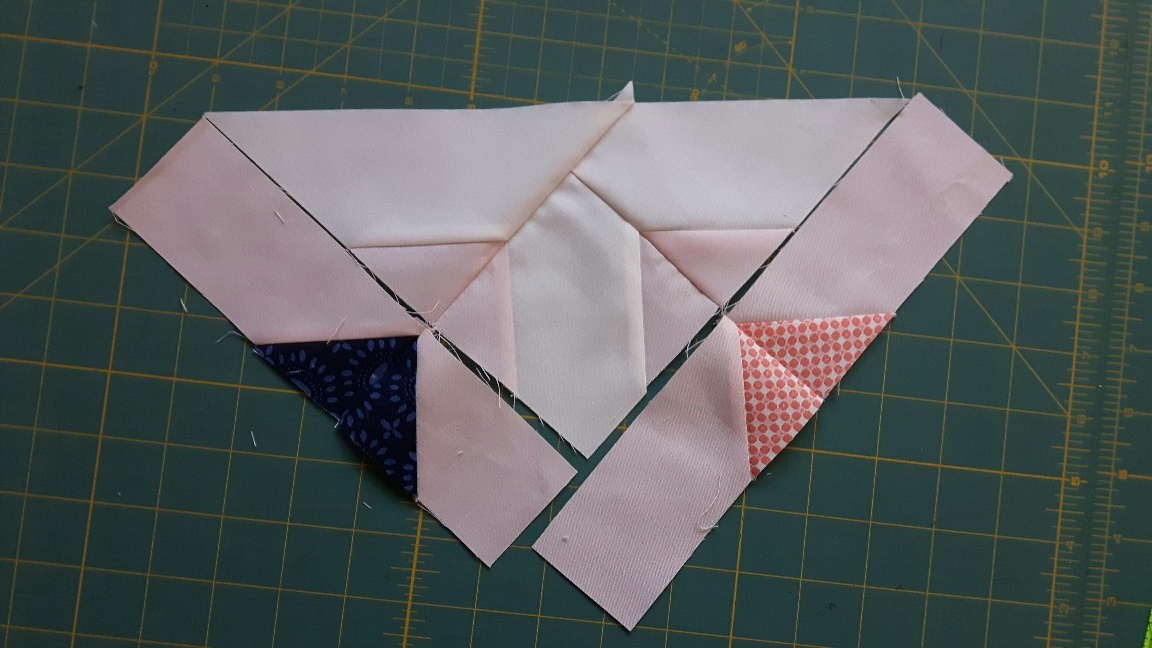
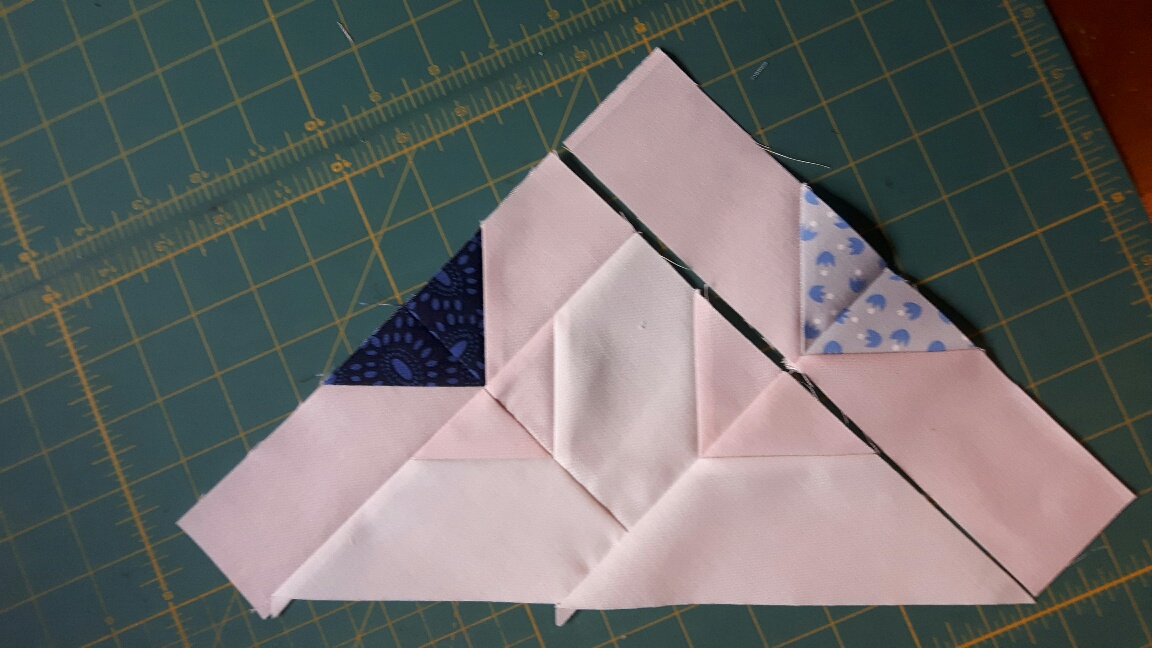
Corner Units
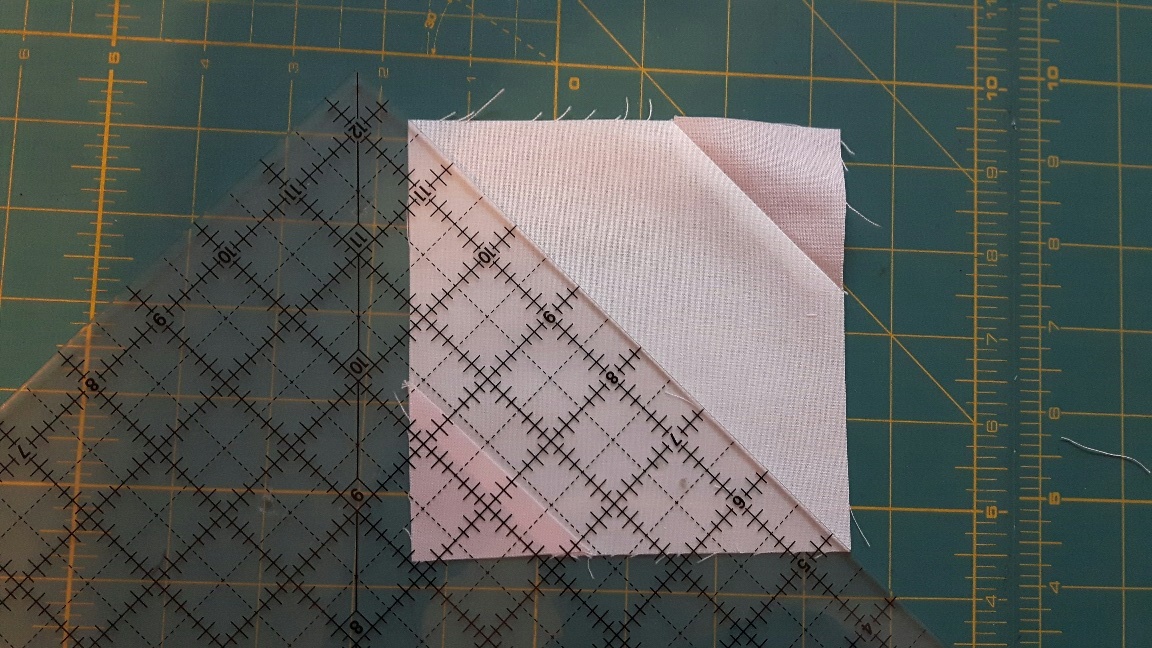
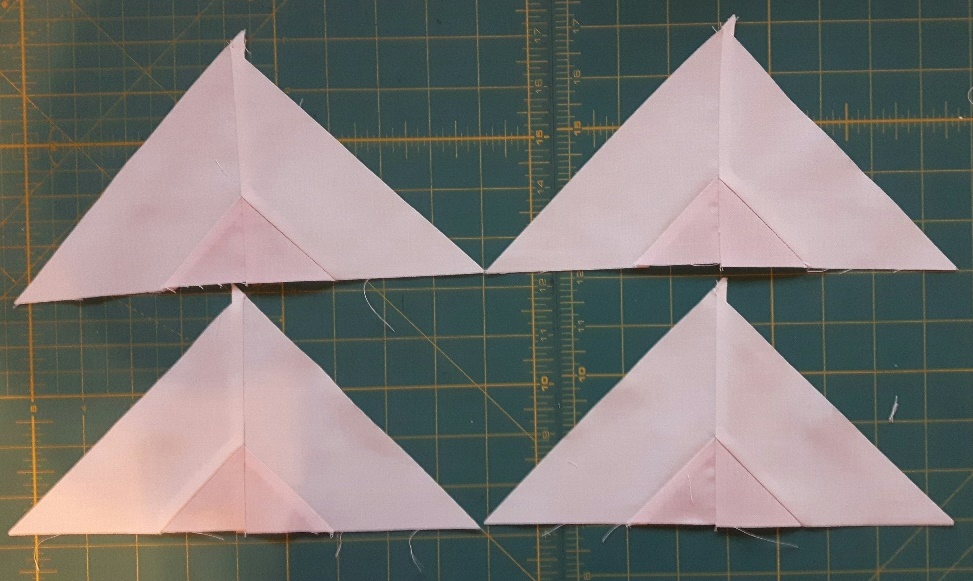
Rotate (8) triangles, and sew together 2 halves like in the photo below.

Make 4. Set Aside.
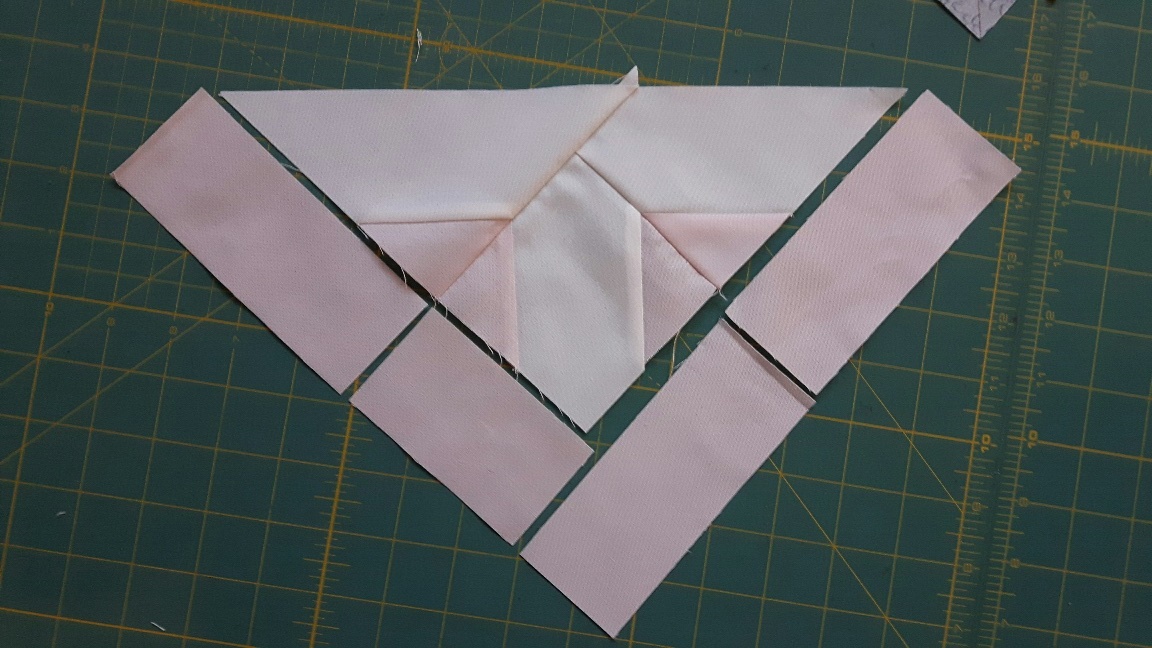
Partial Border triangles
With the remaining (44) pieced triangles and the (22) snowballed BG units, make (22) Partial Border Triangle units as shown below.
Position a triangle unit to the right side of the snowballed unit. The seams should nest (rotate the SB unit if it doesn't). Sew and press towards the triangle unit.
Trim away the tip that extends past the rest.
Next position the other triangle unit on top. Seams should nest and the tip will extend 1/4" past the end.

Press towards the triangle unit. Yield: 22 Partial Border Triangles. Set aside.
Layer Cake
All of the LC squares are to be trimmed to 9 1/2" square. Yield (42) 9 1/2" squares.

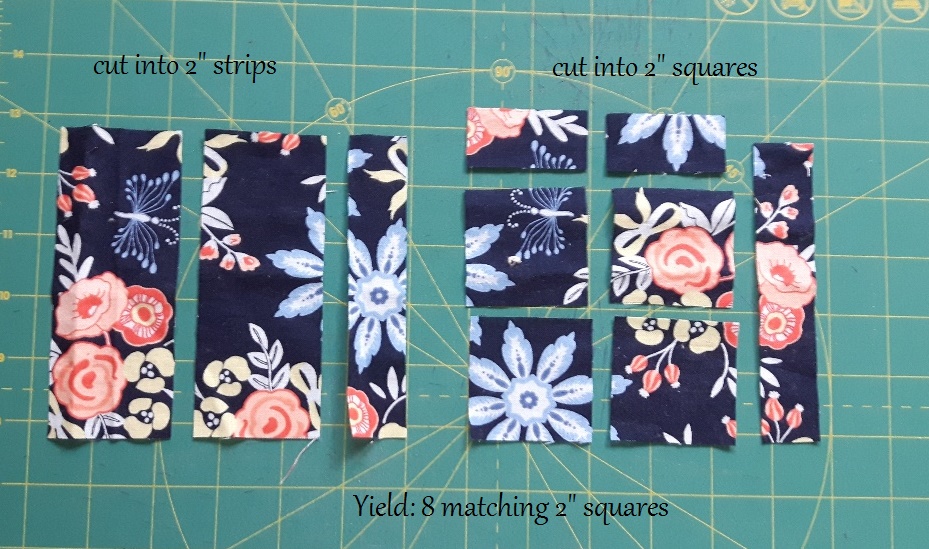
Charm squares: (2 packs)
Cut each Charm square into (4) 2" squares. Yield: (8) matching 2" squares for each LC square. Sort these into matching piles to make things easier. Draw a diagonal line on ALL the 2" charm squares.
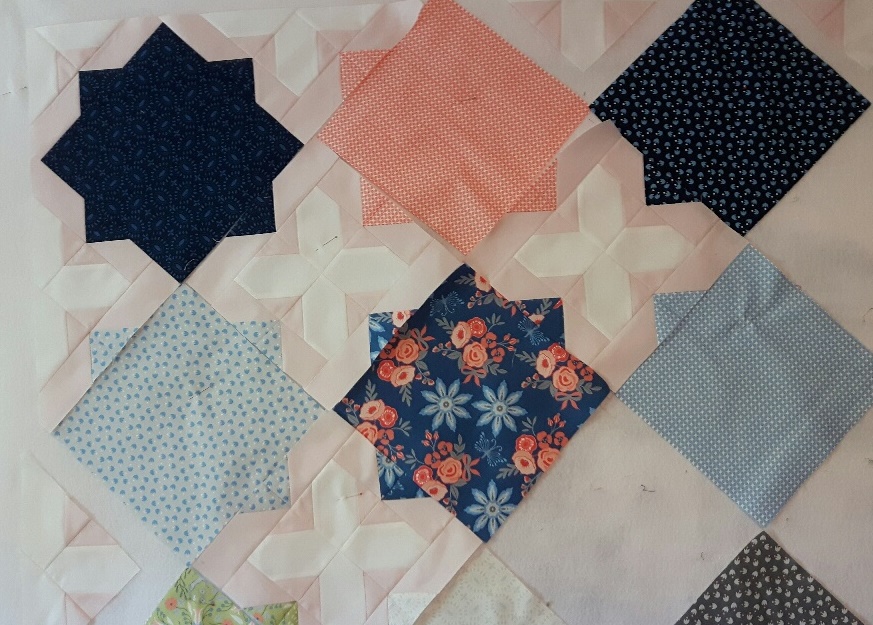
Quilt Layout
This is where having a design wall will be extremely useful.... Layout all 42 LC squares into a pleasing layout like the photo below. The LC squares are positioned on point with a blank space left for the other units. Once you are happy with the arrangement you are ready to proceed. DO NOT remove the squares from the design wall unless you are working on that particular square. (It may be helpful to take a quick photo just in case you need to reference back to it.)

For the purpose of this tutorial I will zoom in on the upper left corner.
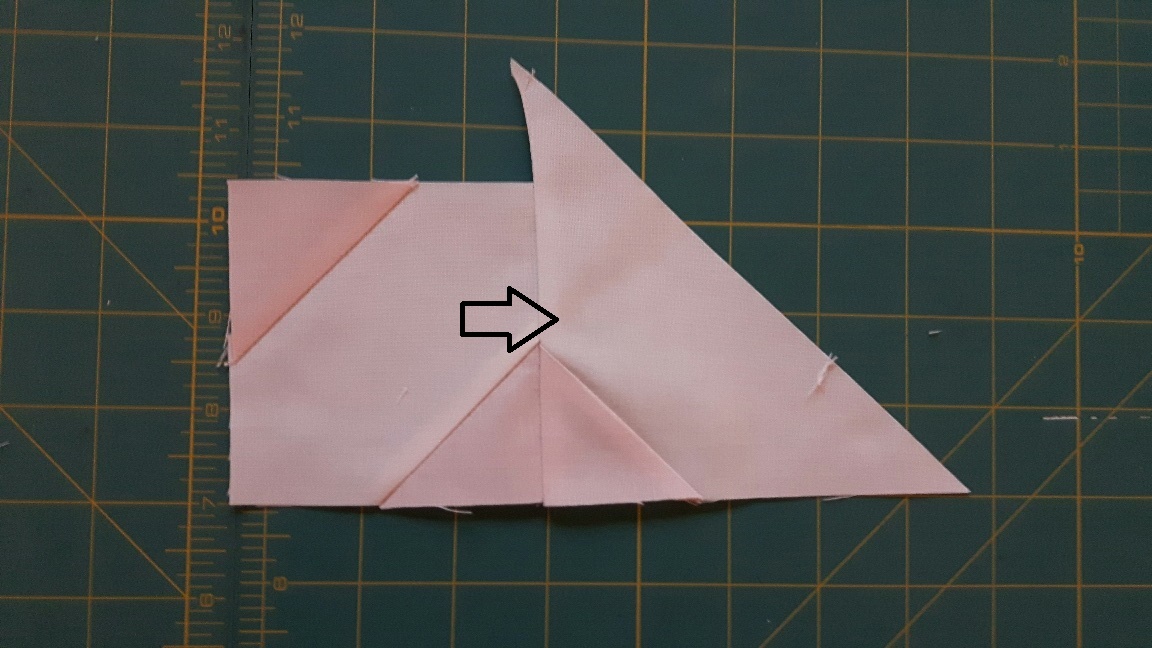
Let's make a finished BG unit. You need (1) Cross Block, (4) 2" x 3 1/2" BG, (4) 2" x 5" BG and (2) of the matching 2" squares for the surrounding LC squares.

The 2" x 3 1/2" BG rectangles go on opposite sides of the cross block, the 2" x 5" BG rectangles are placed on the remaining sides.
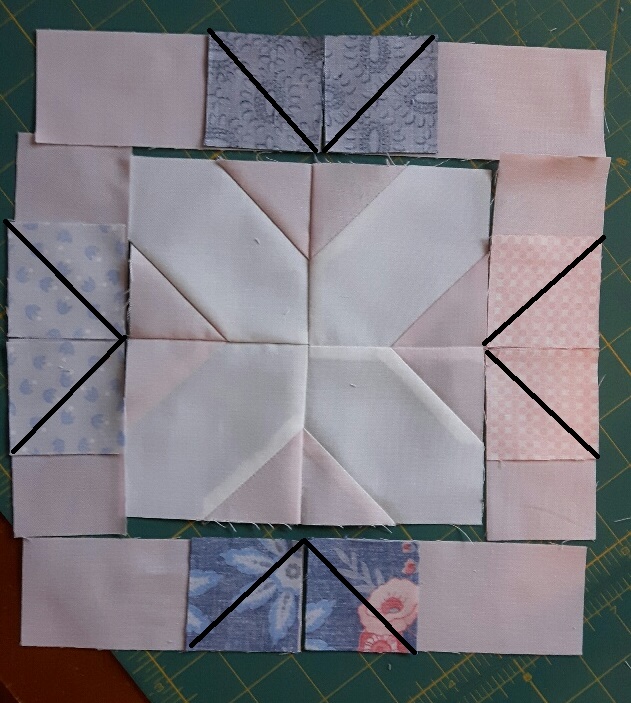
Place the 2" charm squares on the 2" x 3 1/2" BG rectangles so that the drawn lines meet and form a "V".
Repeat for the 2" charm squares and 2" x 5" BG rectangles. Sew on the drawn lines. Be sure to check that the matching 2" squares are in opposite directions before sewing. **** See the note at the bottom of the post in case you have not sewn these on correctly. Don't panic it is easy to fix.)****

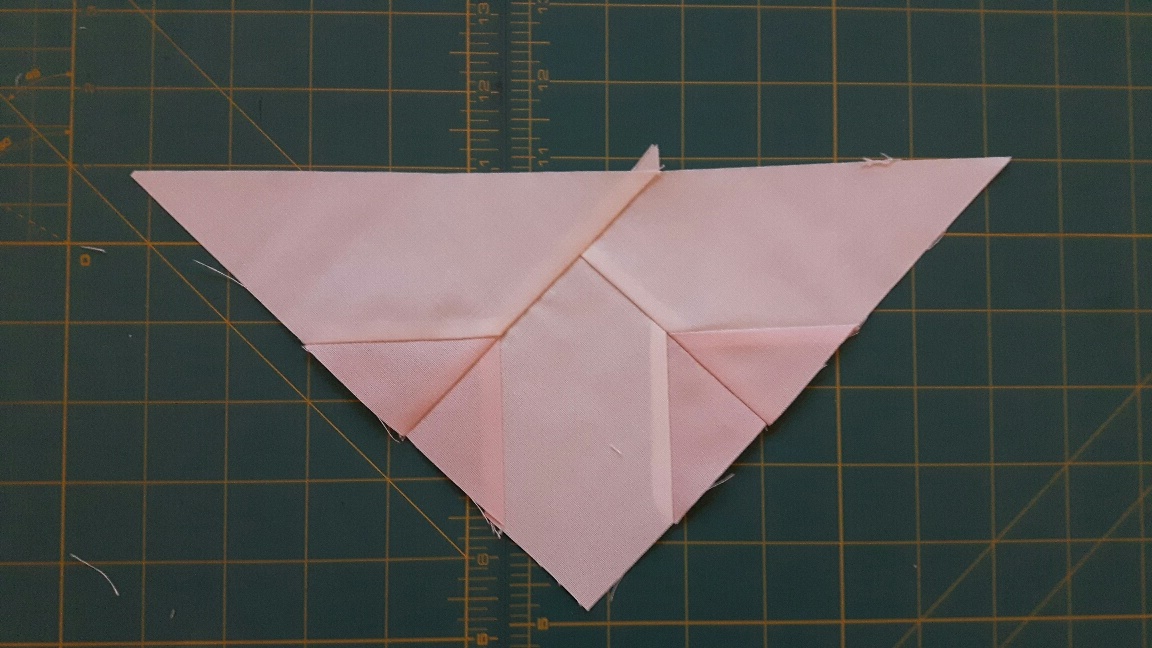
Trim 1/4" away from the sew line, towards the corner (DO NOT cut the side that has the BG rectangle showing) Press the matching set in opposite directions, so they will nest nicely. Sew the matching units together so they form an inset triangle. Sew the shorter sides on opposite sides of the cross block FIRST, then after checking placement on the design wall, sew the correct long strips to the cross blocks.
When the cross blocks are completed correctly the inset points will match up with the LC squares on your design wall. See the photo below.

Completed Corner Units
For the corner units you will need: (1) pieced corner unit, (2) 2" x 5" BG rectangles and (2) 2" charm squares that match the LC in the corner.
Place the (2) charm squares on the 2" x 5" BG rectangles, so that they form a "V" Sew on the drawn line. (Be sure they are going in opposite directions before trimming 1/4" away from the sewn line.) Press in opposite directions and sew together, nesting the seams so that they from an inset triangle. Attach this strip to the pieced corner unit. Press towards the triangle.
You can now attach the Completed Corner Unit to the corner LC square. Press towards the LC square.

Completed Border Units
Now that you are familiar with the cross block assembly and the corner block assembly, we can move on to the Completed Border Units.
For each Completed Border Unit you will need: (1) Partial Border Unit, (3) 2" x 5" BG rectangle, (1) 2" x 3 1/2" BG rectangle and (2) of the 2" charm squares for the matching LC squares.
Notice the placement of the BG rectangles. The strip set with the shorter rectangle will be sewn to the unit FIRST, then the longest strip set goes on last. Once you have the placement correct, place the 2" charm squares on the BG rectangles so that they form a "V".
Sew on the drawn line, making sure they are going in opposite directions. Trim 1/4" away from the sewn line and Press in opposite directions. Sew matching units together so that they form an inset triangle.
Attach the short side to the appropriate side of the Partial Border triangle. Press towards the triangle. Attach the remaining strip set to the adjacent side and press towards the triangle.

Repeat the process to complete the Completed Border unit needed for the opposite end of the 2 row.
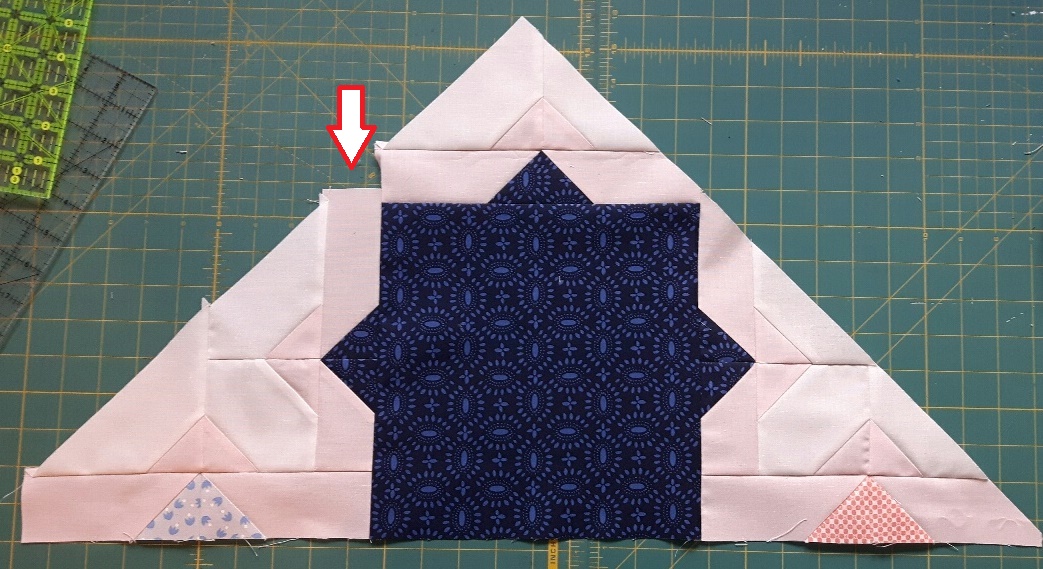
You now have enough units to complete the corner (Row#1).
See the notch where the arrow is pointing? This is supposed to look like that. I have made the corner units a bit oversized so they can be squared up later. The edge on the right has been trimmed. just so you can see the difference. I would recommend trimming after the quilt is completely assembled, But it is your choice.... Trimming instructions can be found near the end of the post after the quilt assembly.
Procced with the assembly of the rows. Making the Cross blocks, Completed Border Units and Corners by matching the placement and color positions of the 2" charm squares (on the BG rectangles) with the LC squares.
Here are the first few rows of my quilt .
I pressed towards the LC squares when sewing my units into rows. You may press your sewn rows in any direction. I recommend using pins when sewing so that all the seams nest nicely.)
Continue piecing your cross blocks and pieced borders, always paying attention to where the 2" squares need to be placed to match their Layer cake blocks. Once you have completed sewing all your rows, you can begin sewing the rows together. I found it helpful to use lots of pins to keep things lined up nicely.
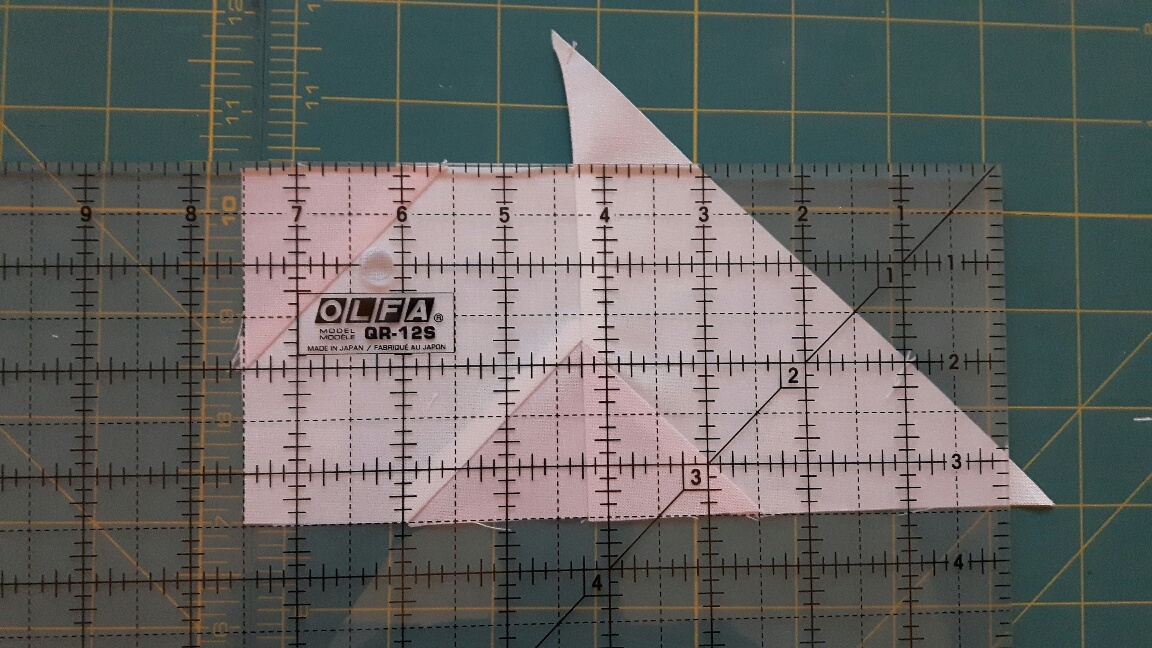
Once the quilt top is quilted, you will need to trim off the excess fabric, leaving 1/4" from the points like in the photo below. (align the 1/4" line on your ruler with the points and trim leaving 1/4" extending past the points- Sorry the photo doesn't show the 1/4" of excess very well)

Binding
Cut 8-9 strips of binding to your desired width ( usually between 2"-2 1/2"). Bind the quilt using your preferred binding method.
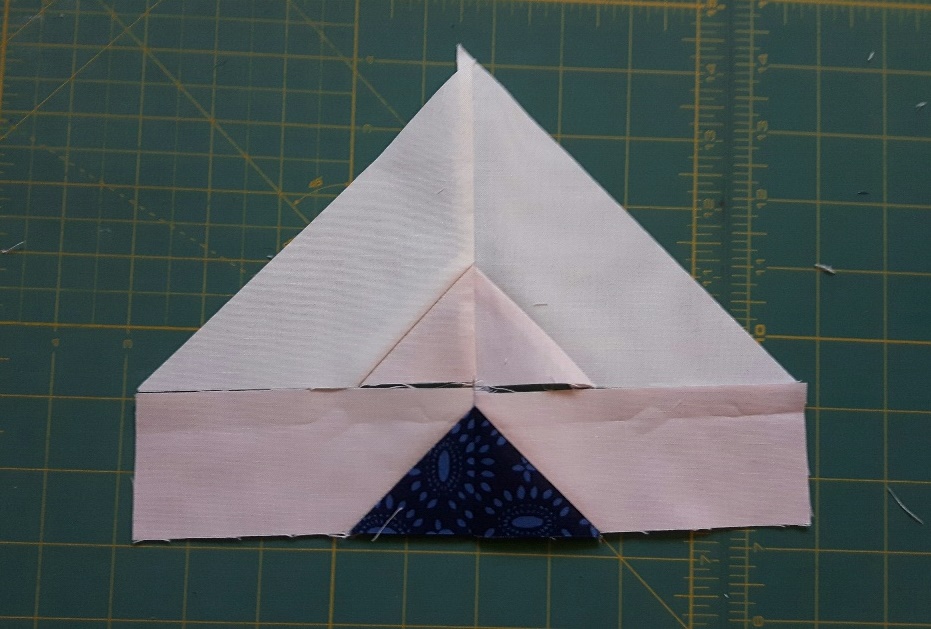
Fixing a unit that has been sewn improperly
I know that there are a lot of triangles to sew onto rectangles and it is not hard to get them out of place. What happens if you forget to sew them on in opposite directions? They will look something like the photo below.

Don't panic. this is an easy fix. First carefully remove the triangle from the back ground piece.
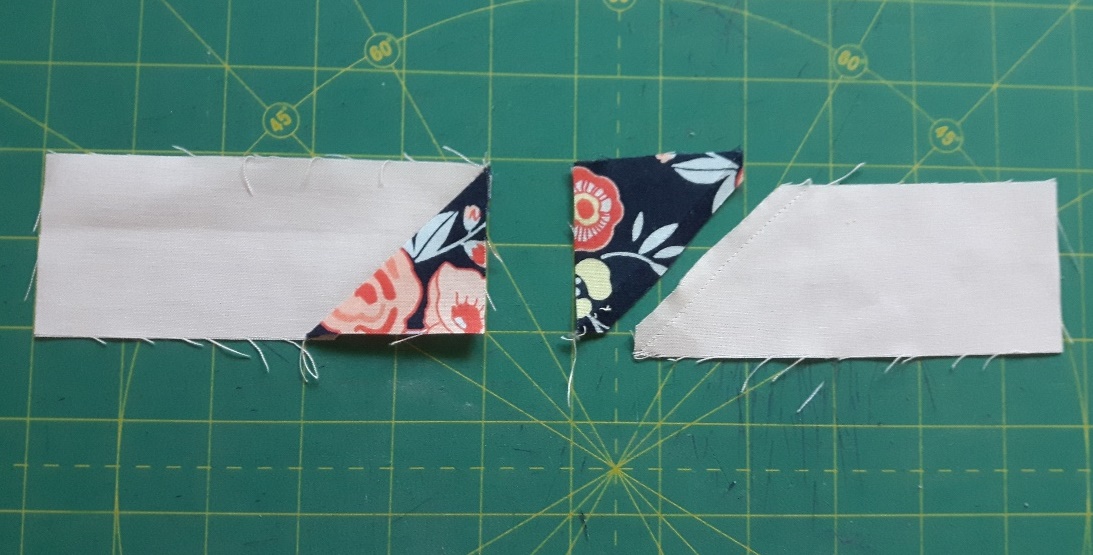
Flip the Background so it is opposite the unit you are pairing it with. If you used a solid you are good to go. If you used a print. you just have to match it to another rectangle (right sides together) and using the wrong piece as a template cut away the corner so it will fit the triangle you just removed.
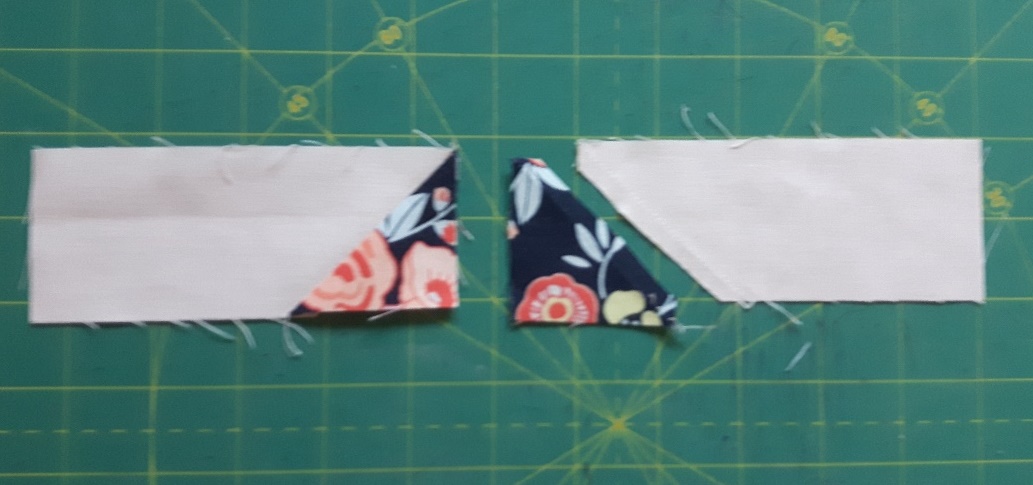
Sew the triangle back on to the rectangle piece assuring that the angle is now correct. You have fixed your pieces so that they are opposite, and are good to proceed.

![]()
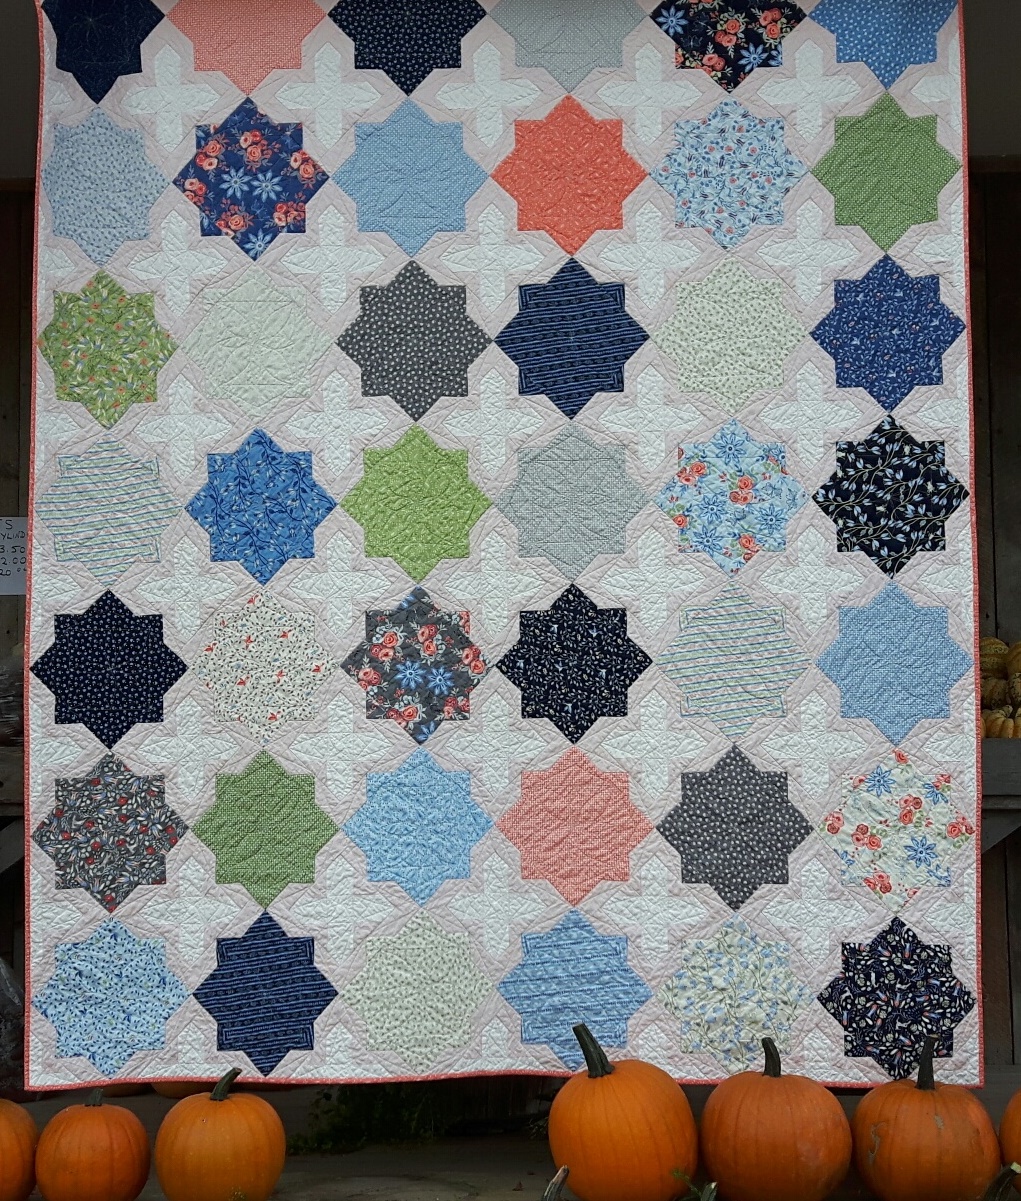
This Quilt finishes at 79" x 89".
I hope you have enjoyed my Moroccan Tiles Quilt tutorial. I think it would look amazing in rich Autumn colors, or batiks, really the possibilities are endless. Me and my Mum will be making some holiday inspired versions in the coming months so be sure to check back to see our progress ( meandmymumquilting.blogspot.ca/)
Cathy Victor
{meandmymumquilting}
![]()
Posted in:
Comments