Welcome to Moda Fabrics!
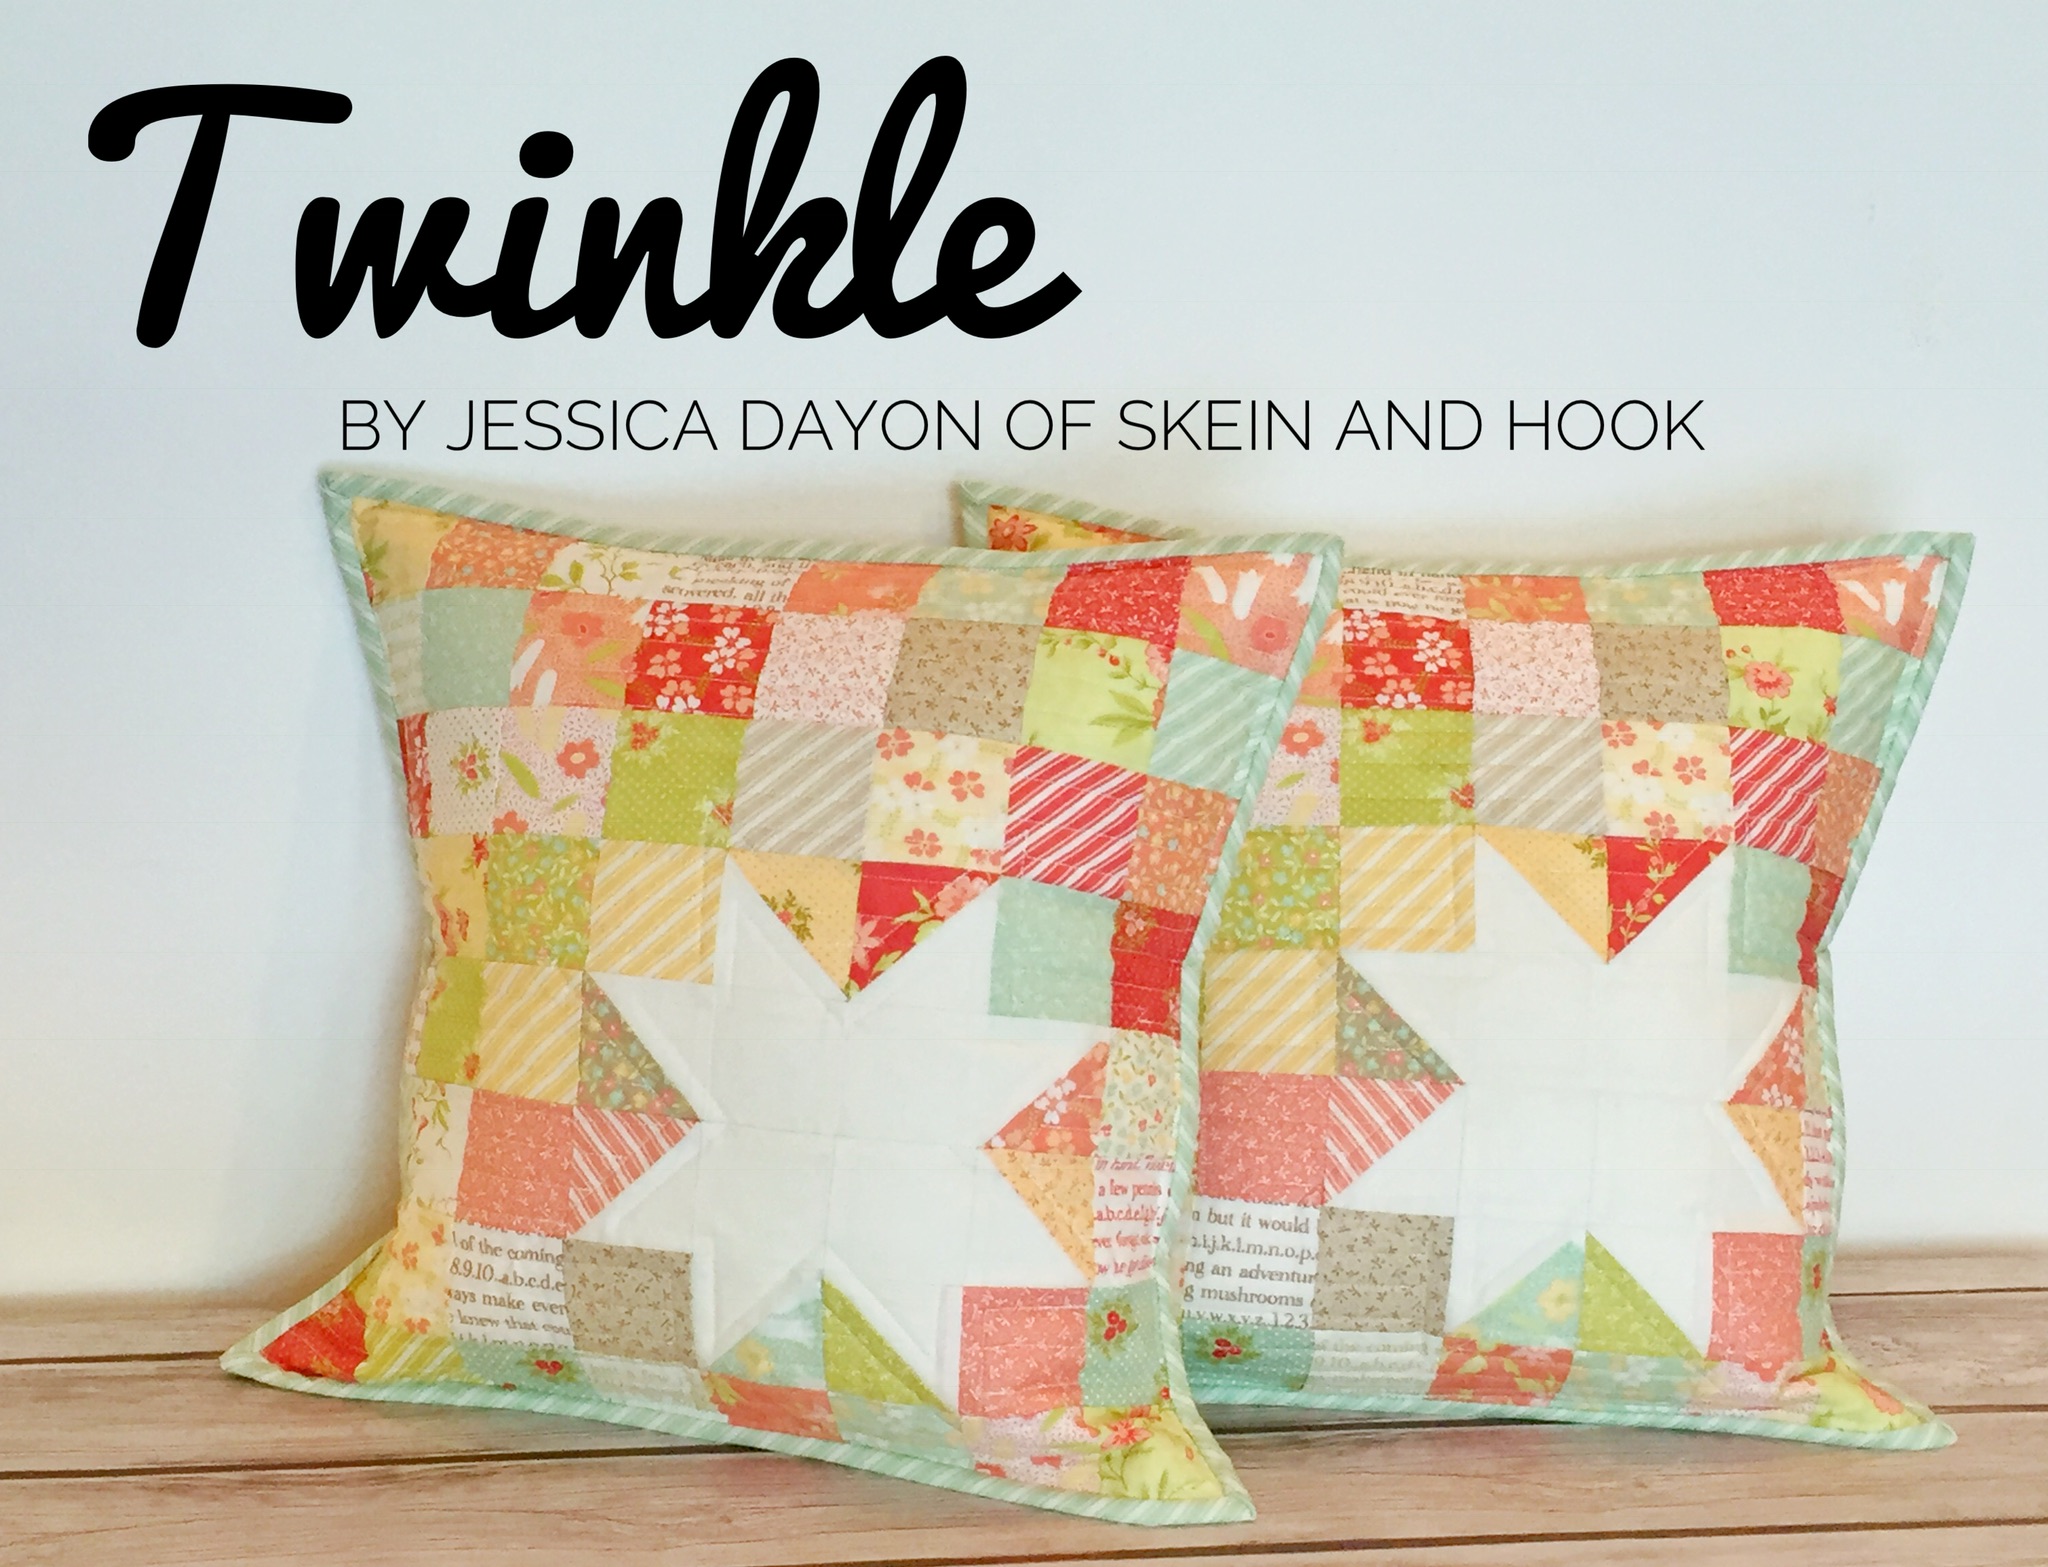
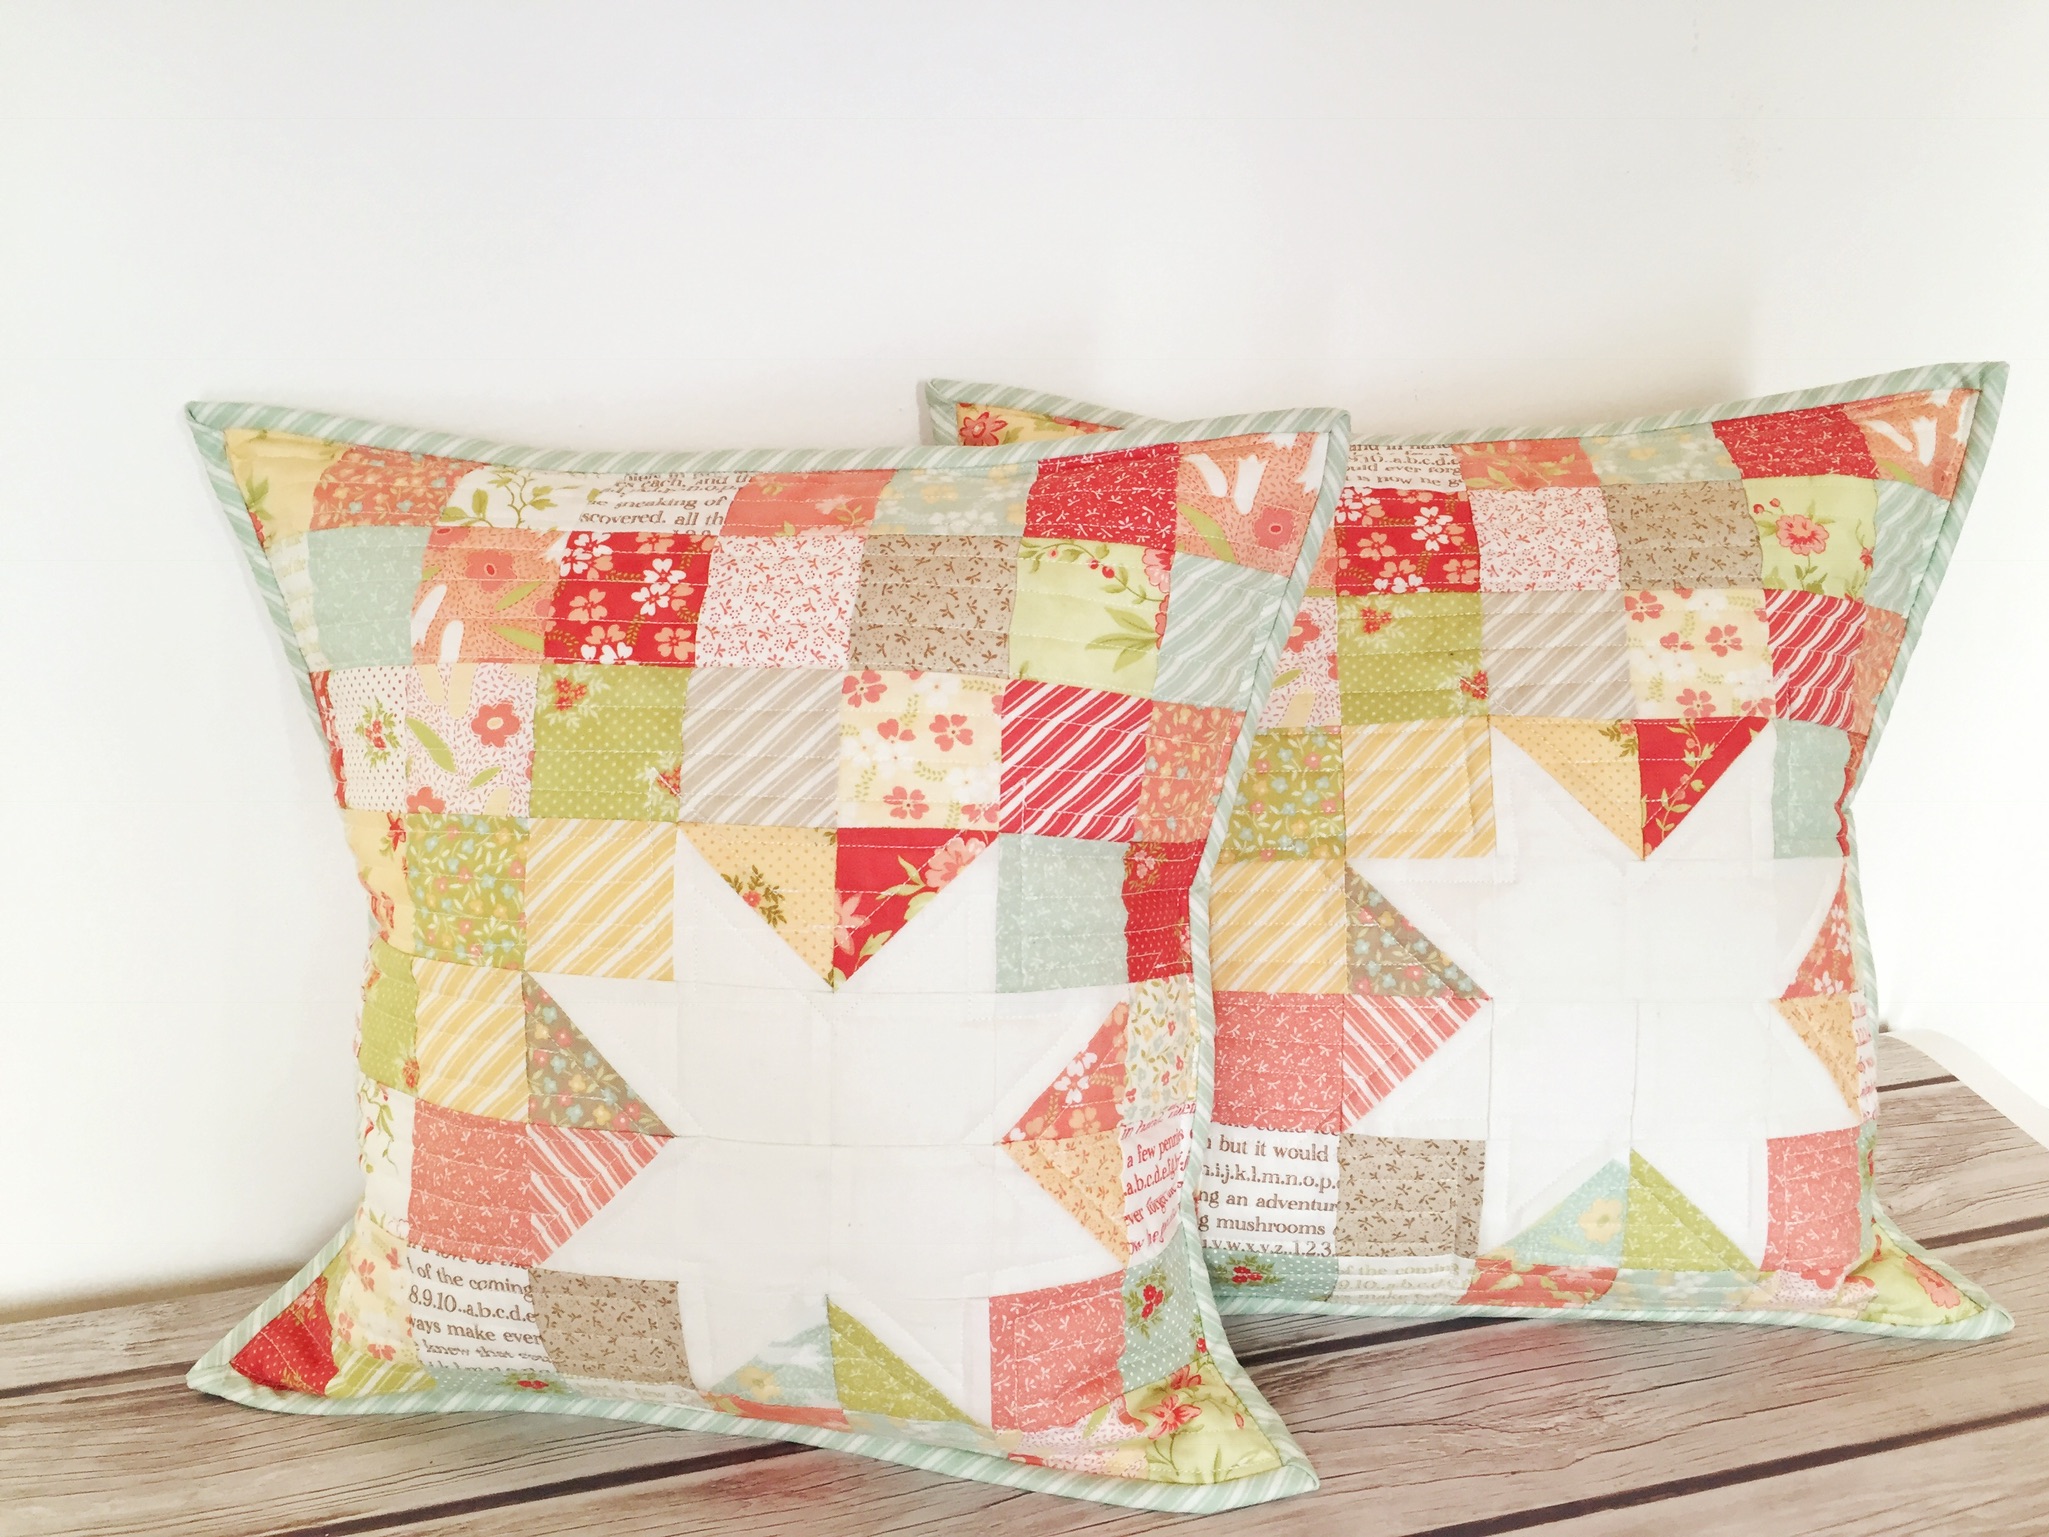
Twinkle Pillow
Twinkle Pillow
Published:
Mar 18 2018 - 23:00
![]()
Hi Everyone! I'm Jessica Dayon. You can follow me on Instagram @jessicadayon. I'm excited to be back in the Moda Bake Shop with another recipe for you! This time, we are cooking up two throw pillows! I have really been enjoying making pillows lately. They are a really nice way to add a seasonal touch to a room and they are so quick to make!
Each pillow finishes at 16" x 16".
![]()
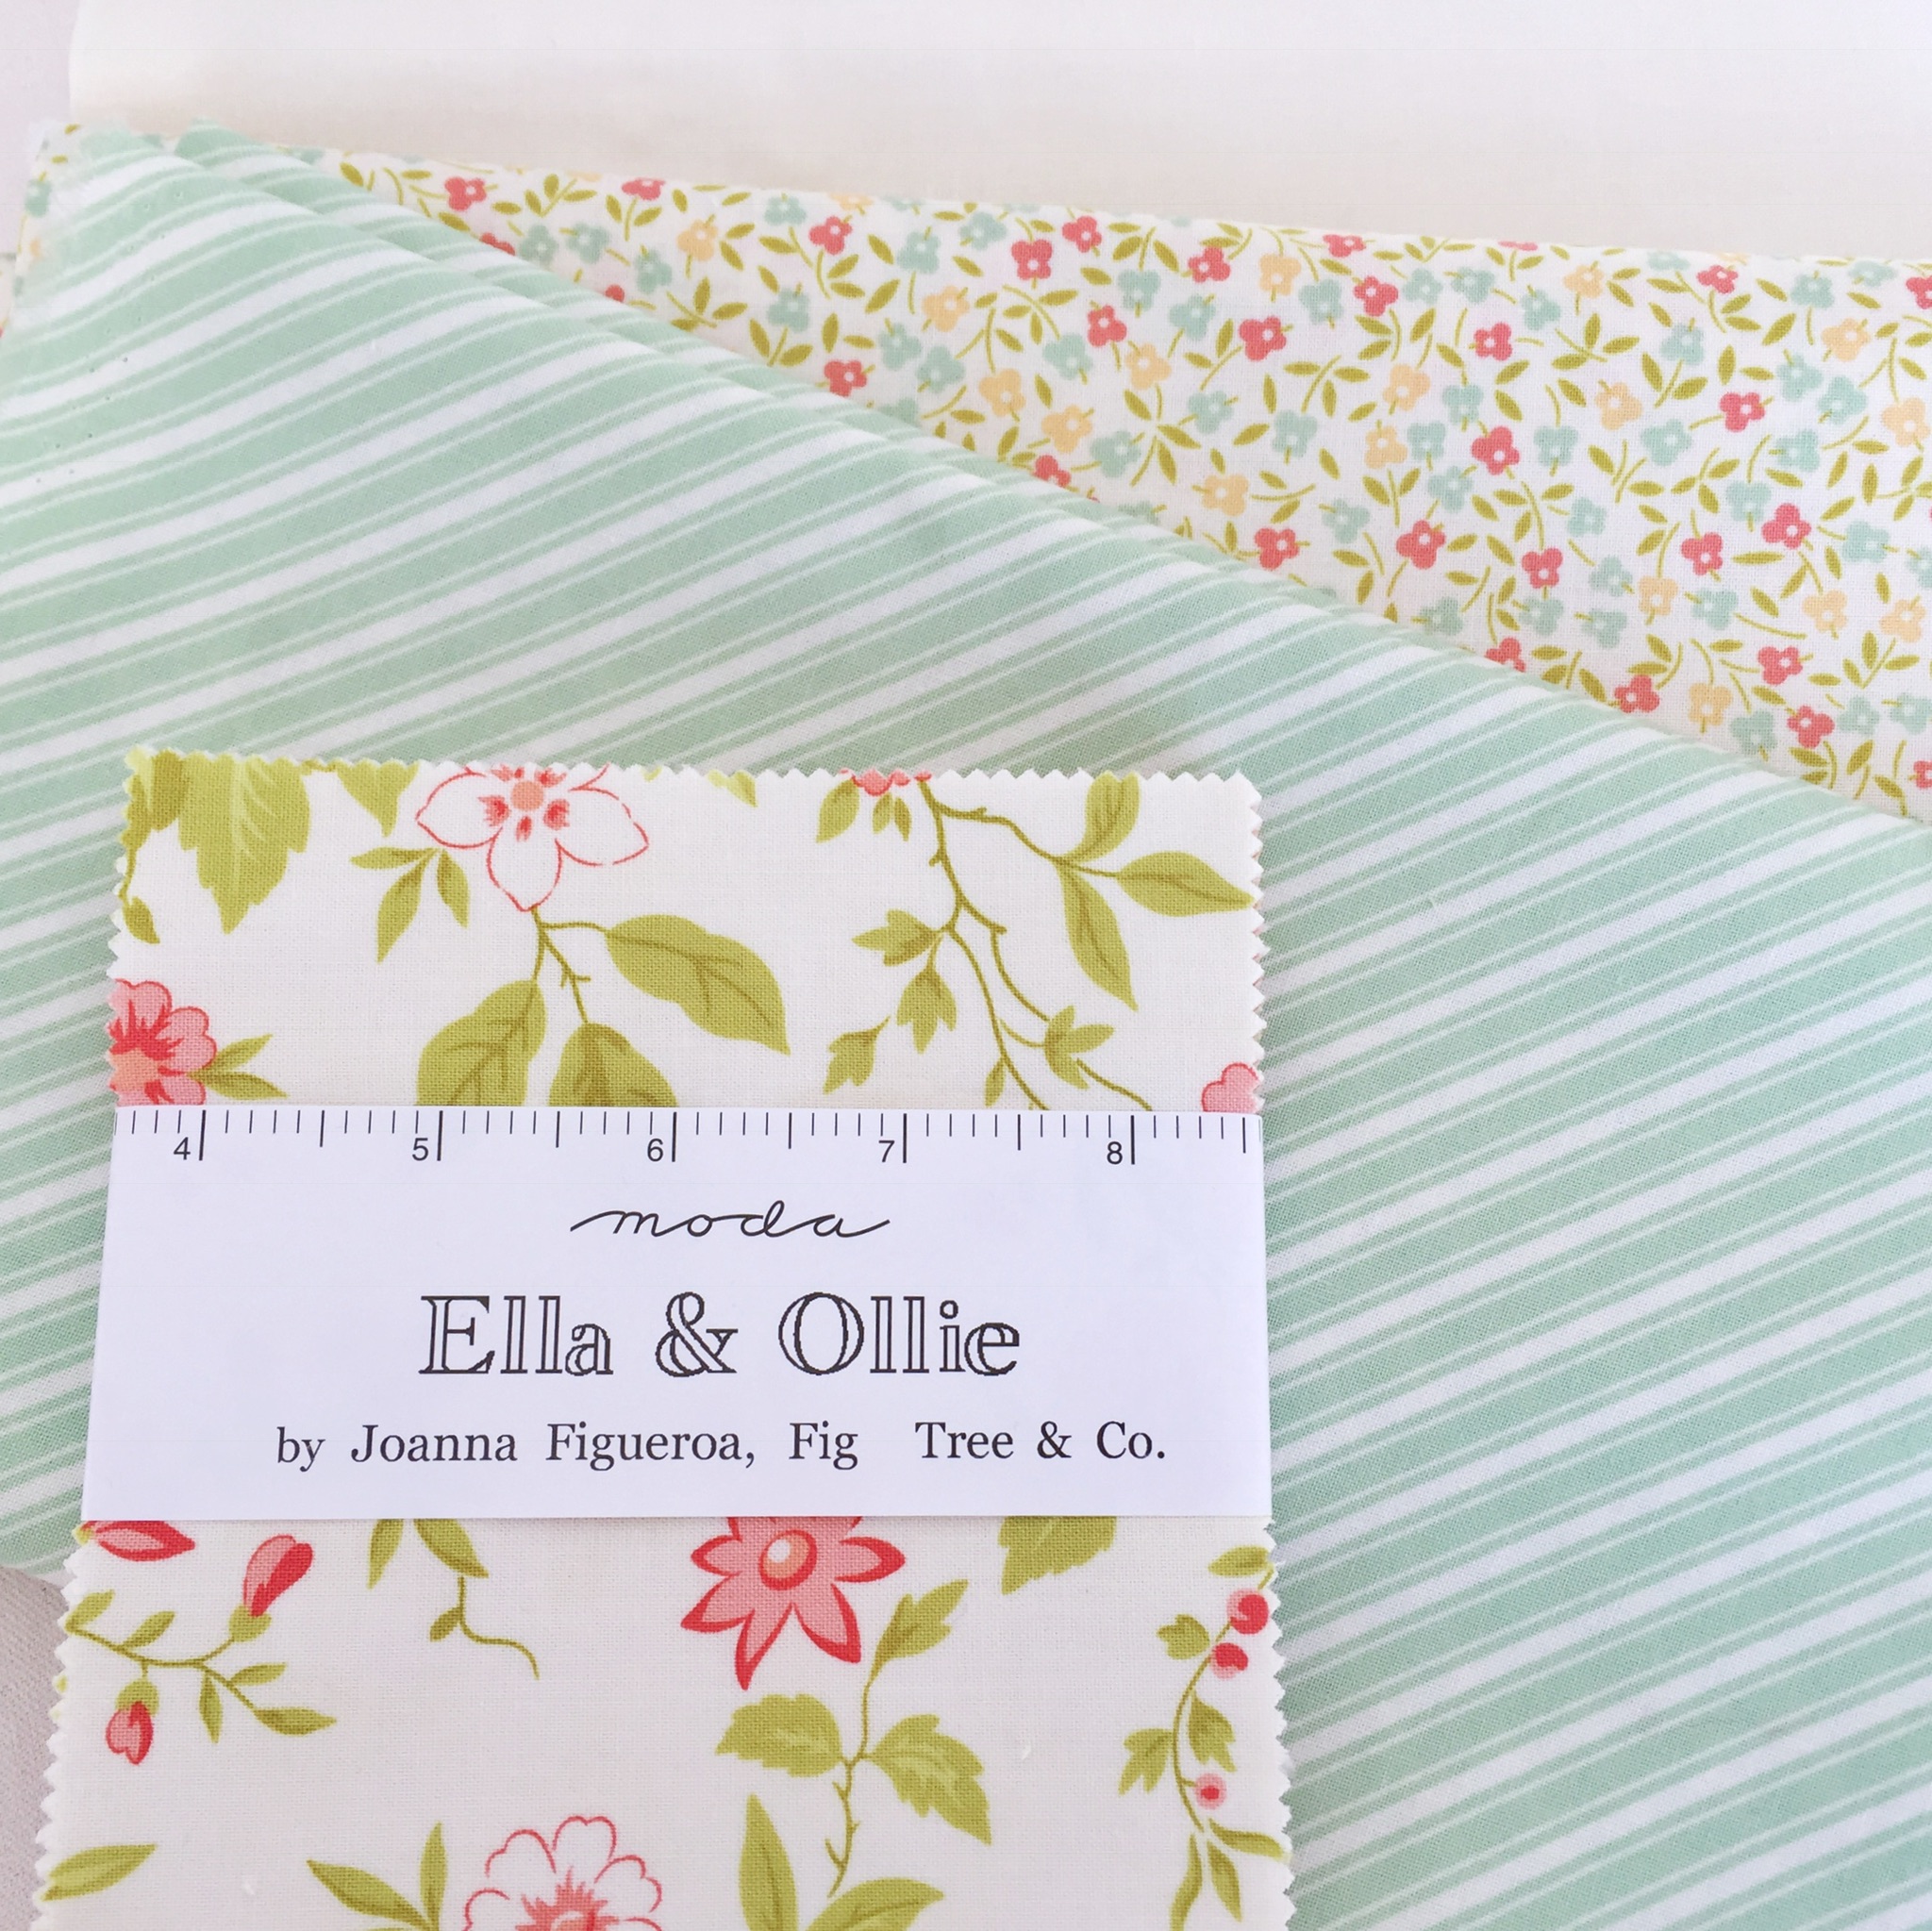
1 Charm Pack of Ella & Ollie by Joanna Figueroa {SKU 20300PP}
3/4 yard Ella Ollie Milk fabric {SKU 20308 16}
3/4 yard backing fabric {SKU 20303 16}
1 fat quarter binding fabric {SKU 20306 14}
2 squares of batting- each 18" x 18"
2- 16" pillow forms
![]()
Open your charm pack and choose 8 squares to set aside that will be used to make the stars. Cut the rest of the charm pack into 2.5" squares.
Separate by fabric into stacks of 4 so that you can see all of fabrics to choose from. Set aside.

To make you half square triangles (HST) for the stars, cut the 8 charm squares you set aside earlier into 3.5" squares. Also, cut 8 3.5" squares from the solid Milk fabric. On the back of the print square, draw a line down the middle.
Sew 1/4" on each side of that line. If you would like, you can draw a line 1/4" on each side of the middle line first to guide you while sewing and then sew on top of those outside lines.
Use you ruler and cut right on top of the center line.
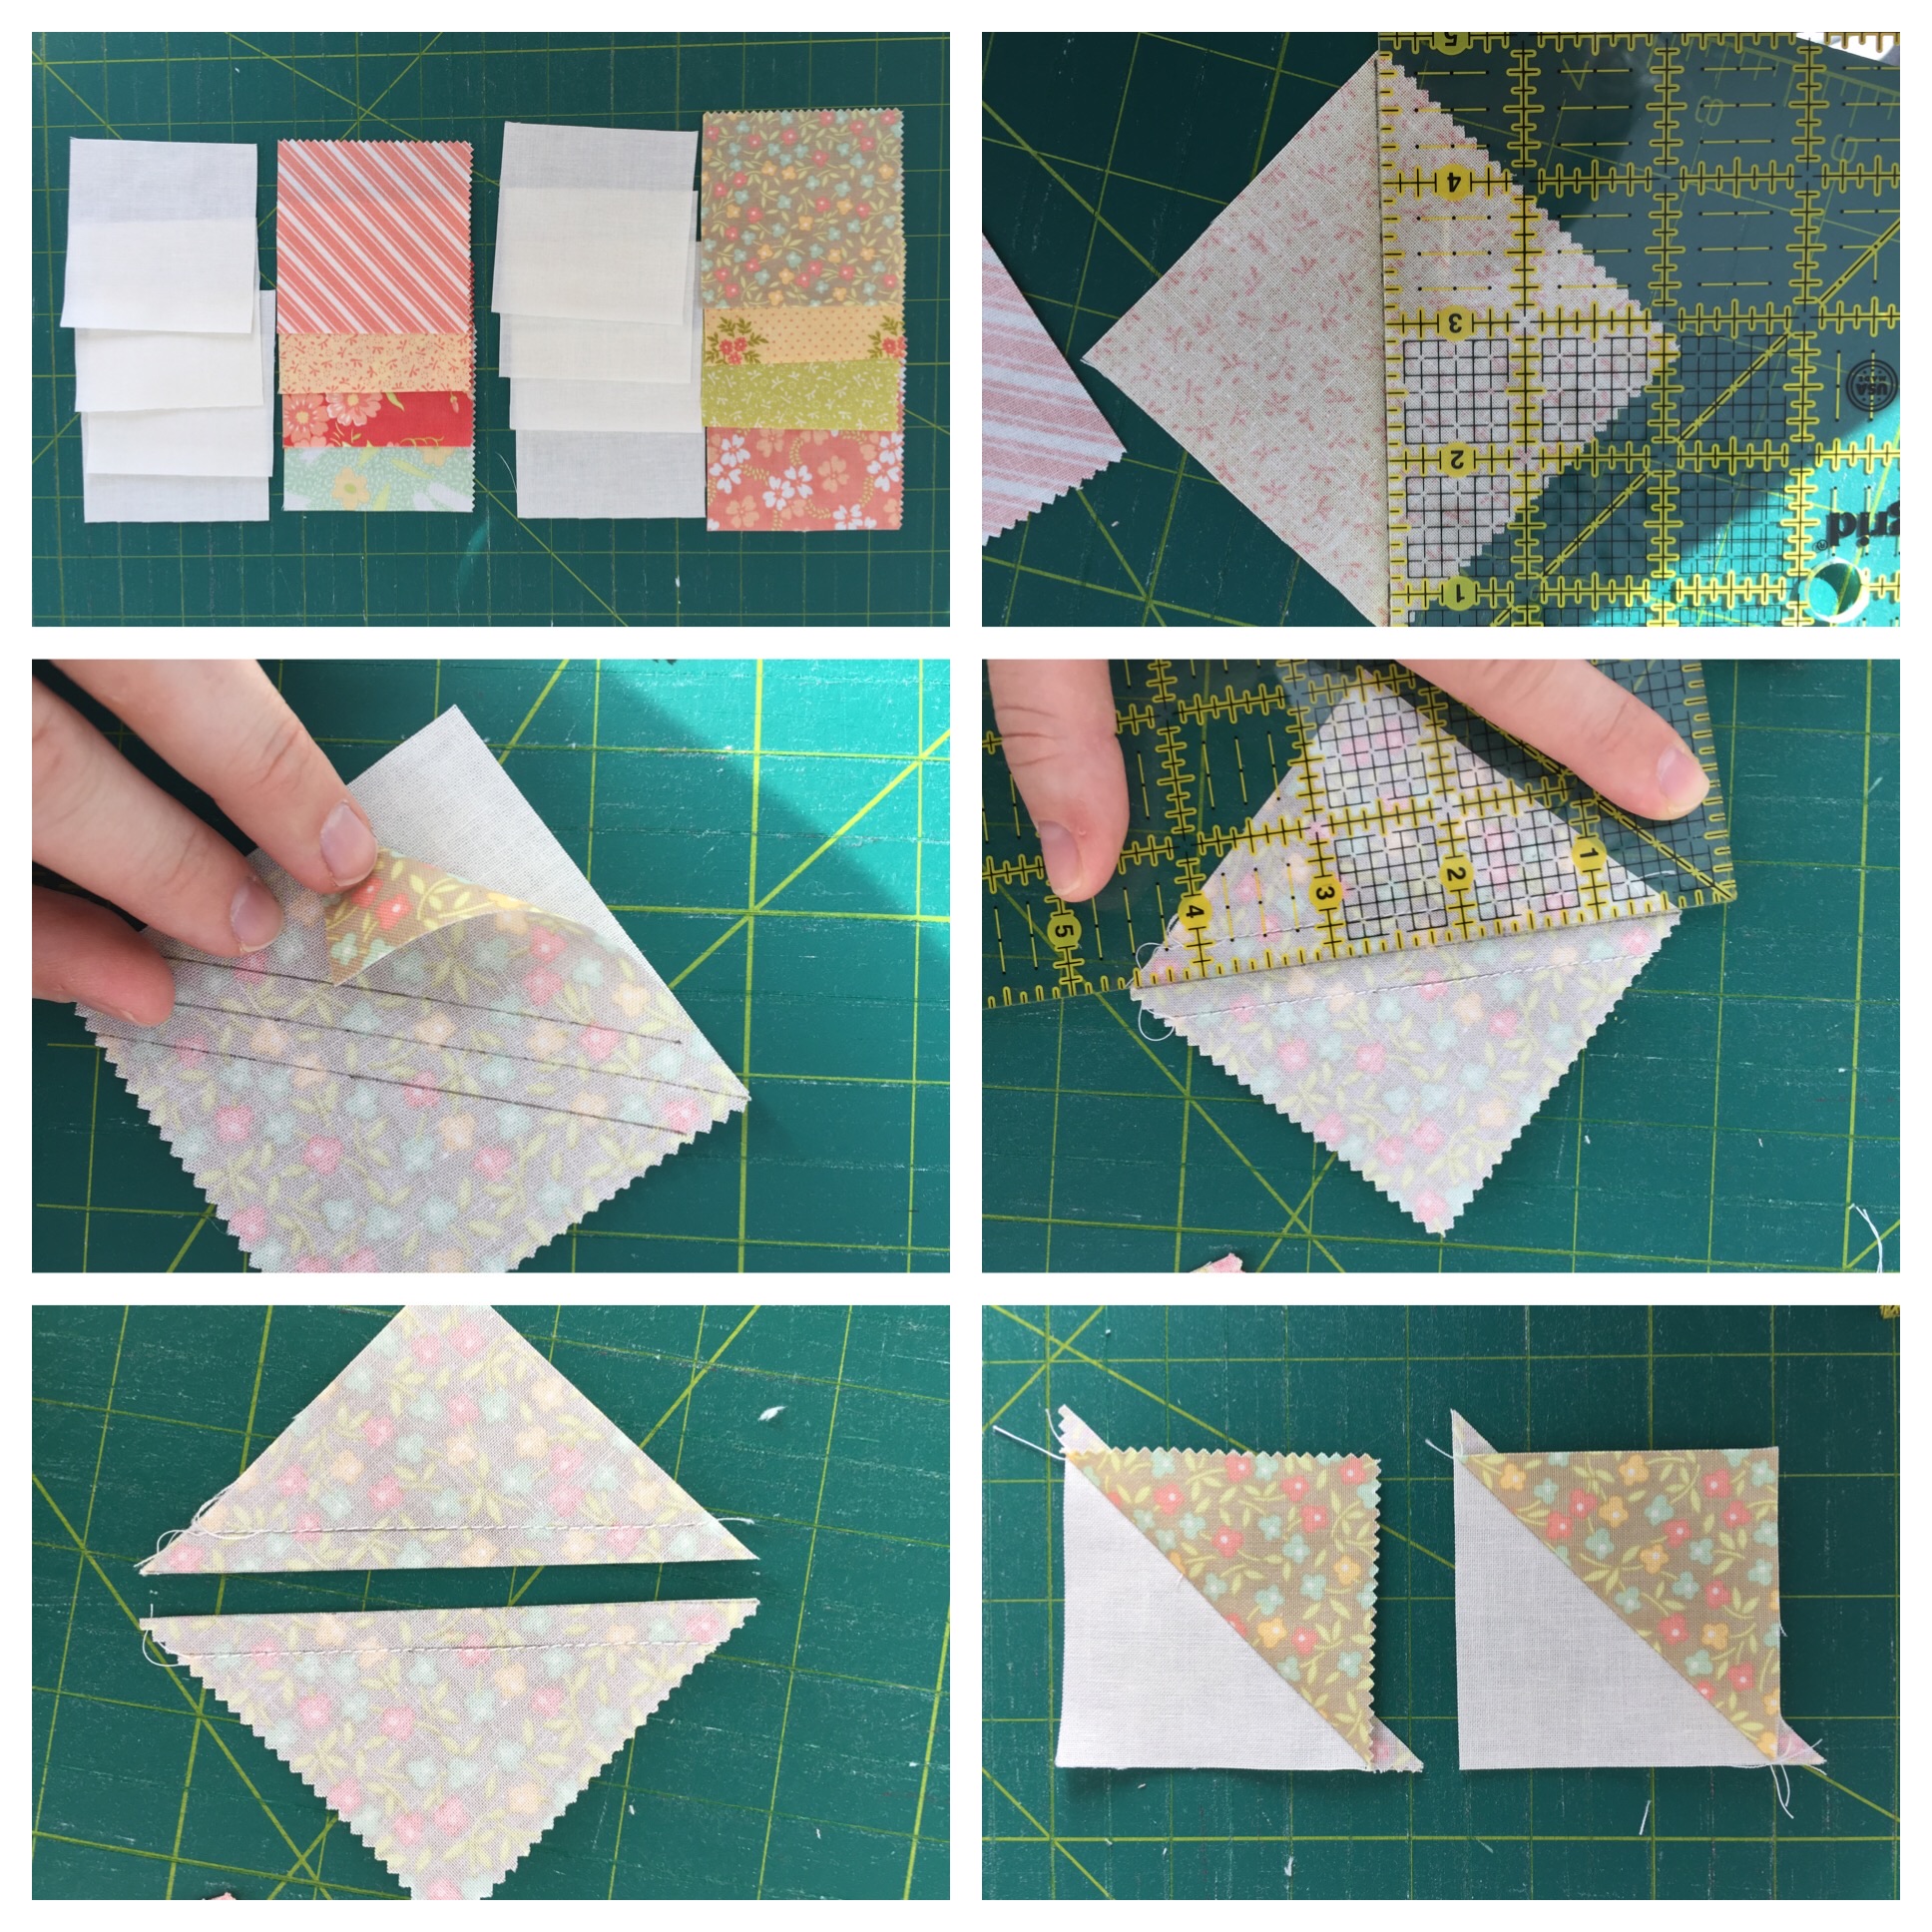
Press. Trim to 2.5". You'll have 2 of each print (one for a star point in each pillow).
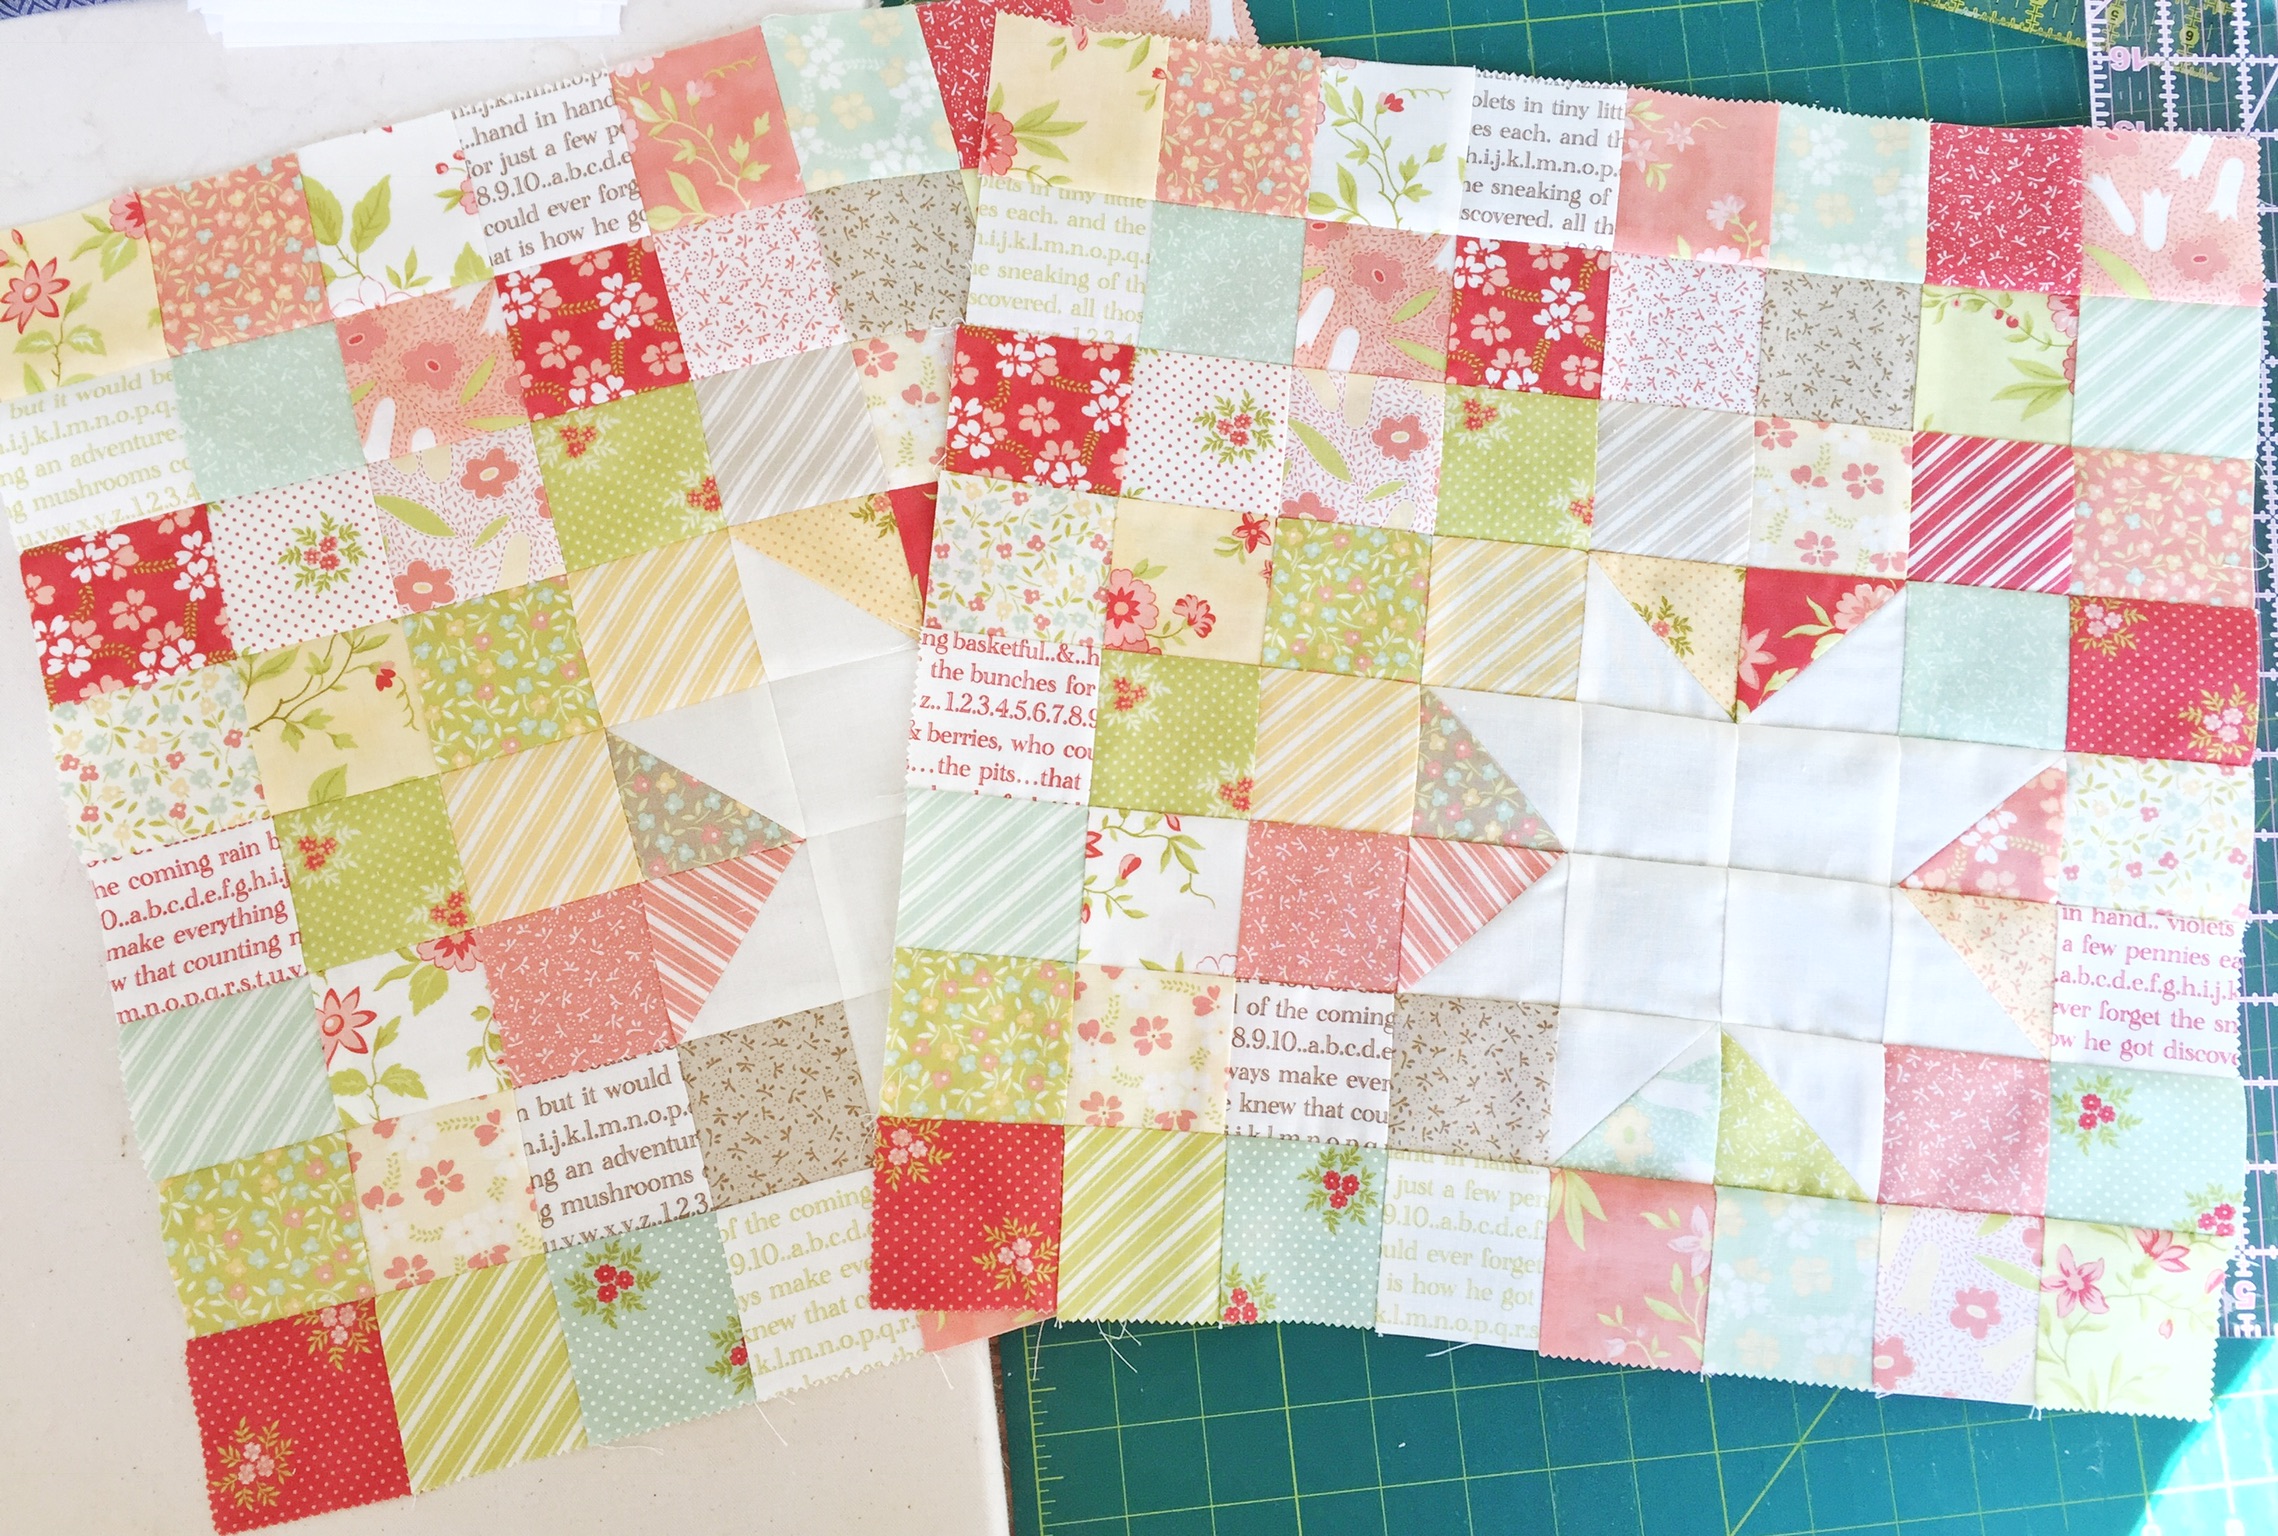
Next, lay out the squares for your pillow top. I usually start with a random layout. I take a square from each pile and lay them out and then, once I can see them all laid out together, I move the squares around, switching them out as needed, until I love the arrangement. The pillow is 8 squares by 8 squares with the star in the lower right. Follow the layout below.

Here I am making two identical pillows. So I laid out the squares for one pillow and then laid the identical squares right on top of each for the second pillow.
Sew your squares into rows. Press your seams of row one to the left. Press the seams of row two to the right. Continue alternating seam directions of the rows so that you can nest your seams when sewing the rows together. Sew your rows together to make the pillow top. Press.
Cut the solid milk fabric into 2- 18" square pieces. Lay that on your work surface with the wrong side up. Lay the batting directly on top of that, smoothing it out nicely. Center your pillow top on the batting, smoothing it out. Pin the layers together.
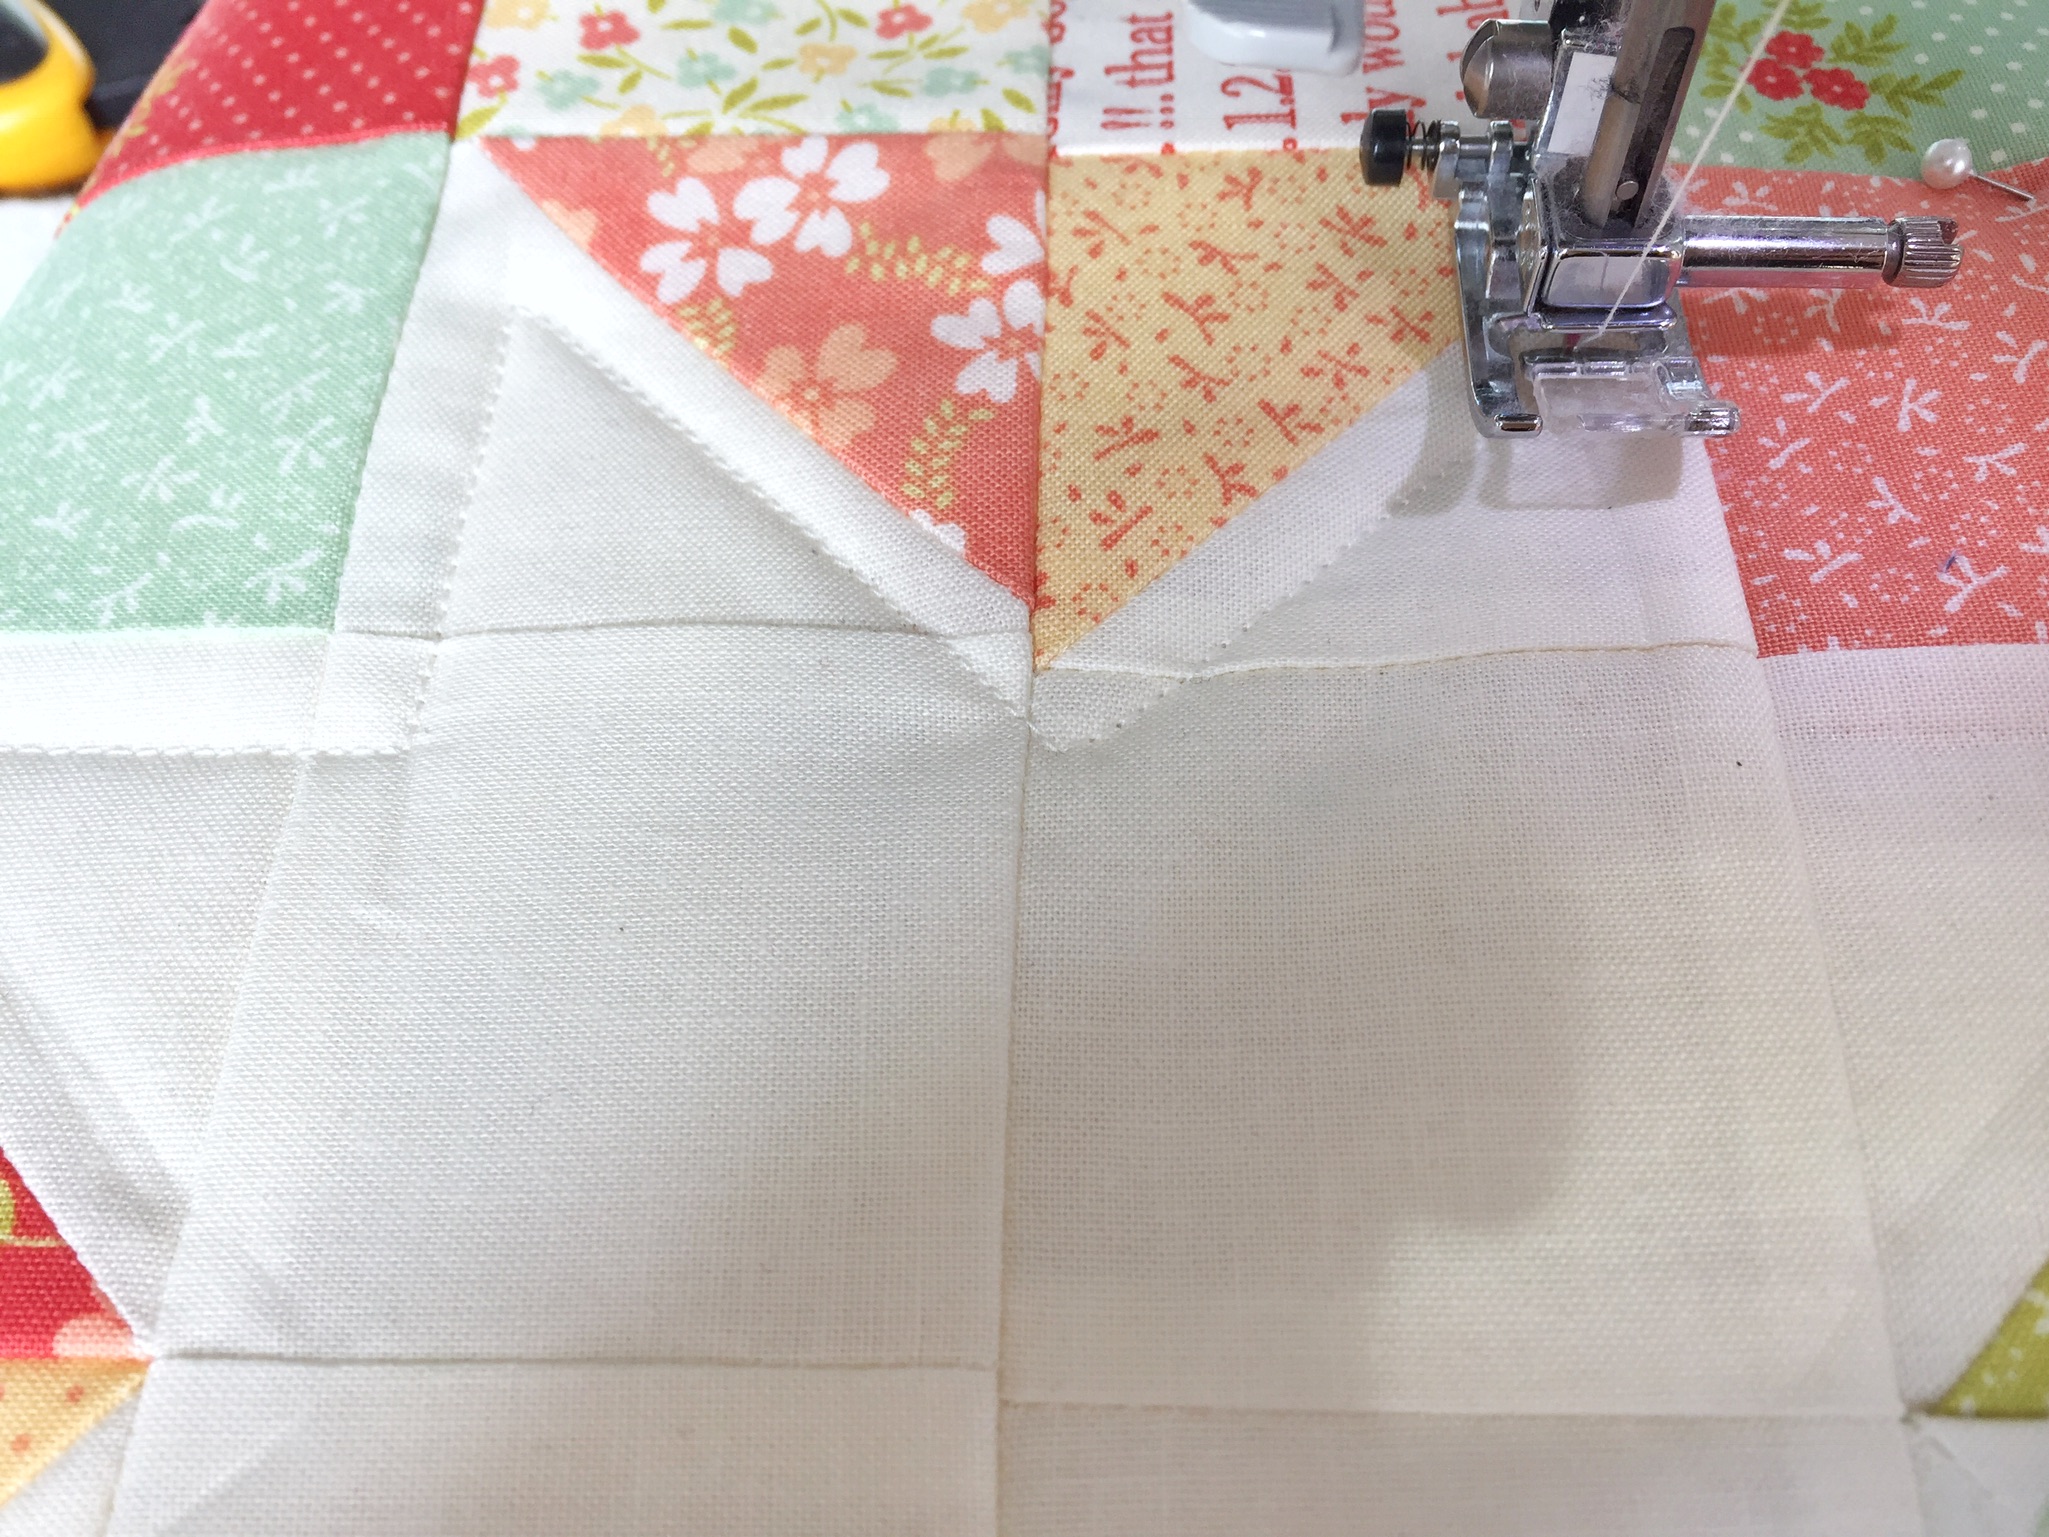
We are going to quilt this now! I wanted to highlight the star so I quilted 1/4" inside of the star and 1/4" outside of the star. Then I did straight line quilting for the rest of the pillow.
First, use your marking tool of choice to mark your pillow top. I use a Hera marker. I used a square ruler and marked 1/4", all the way around, inside the star.
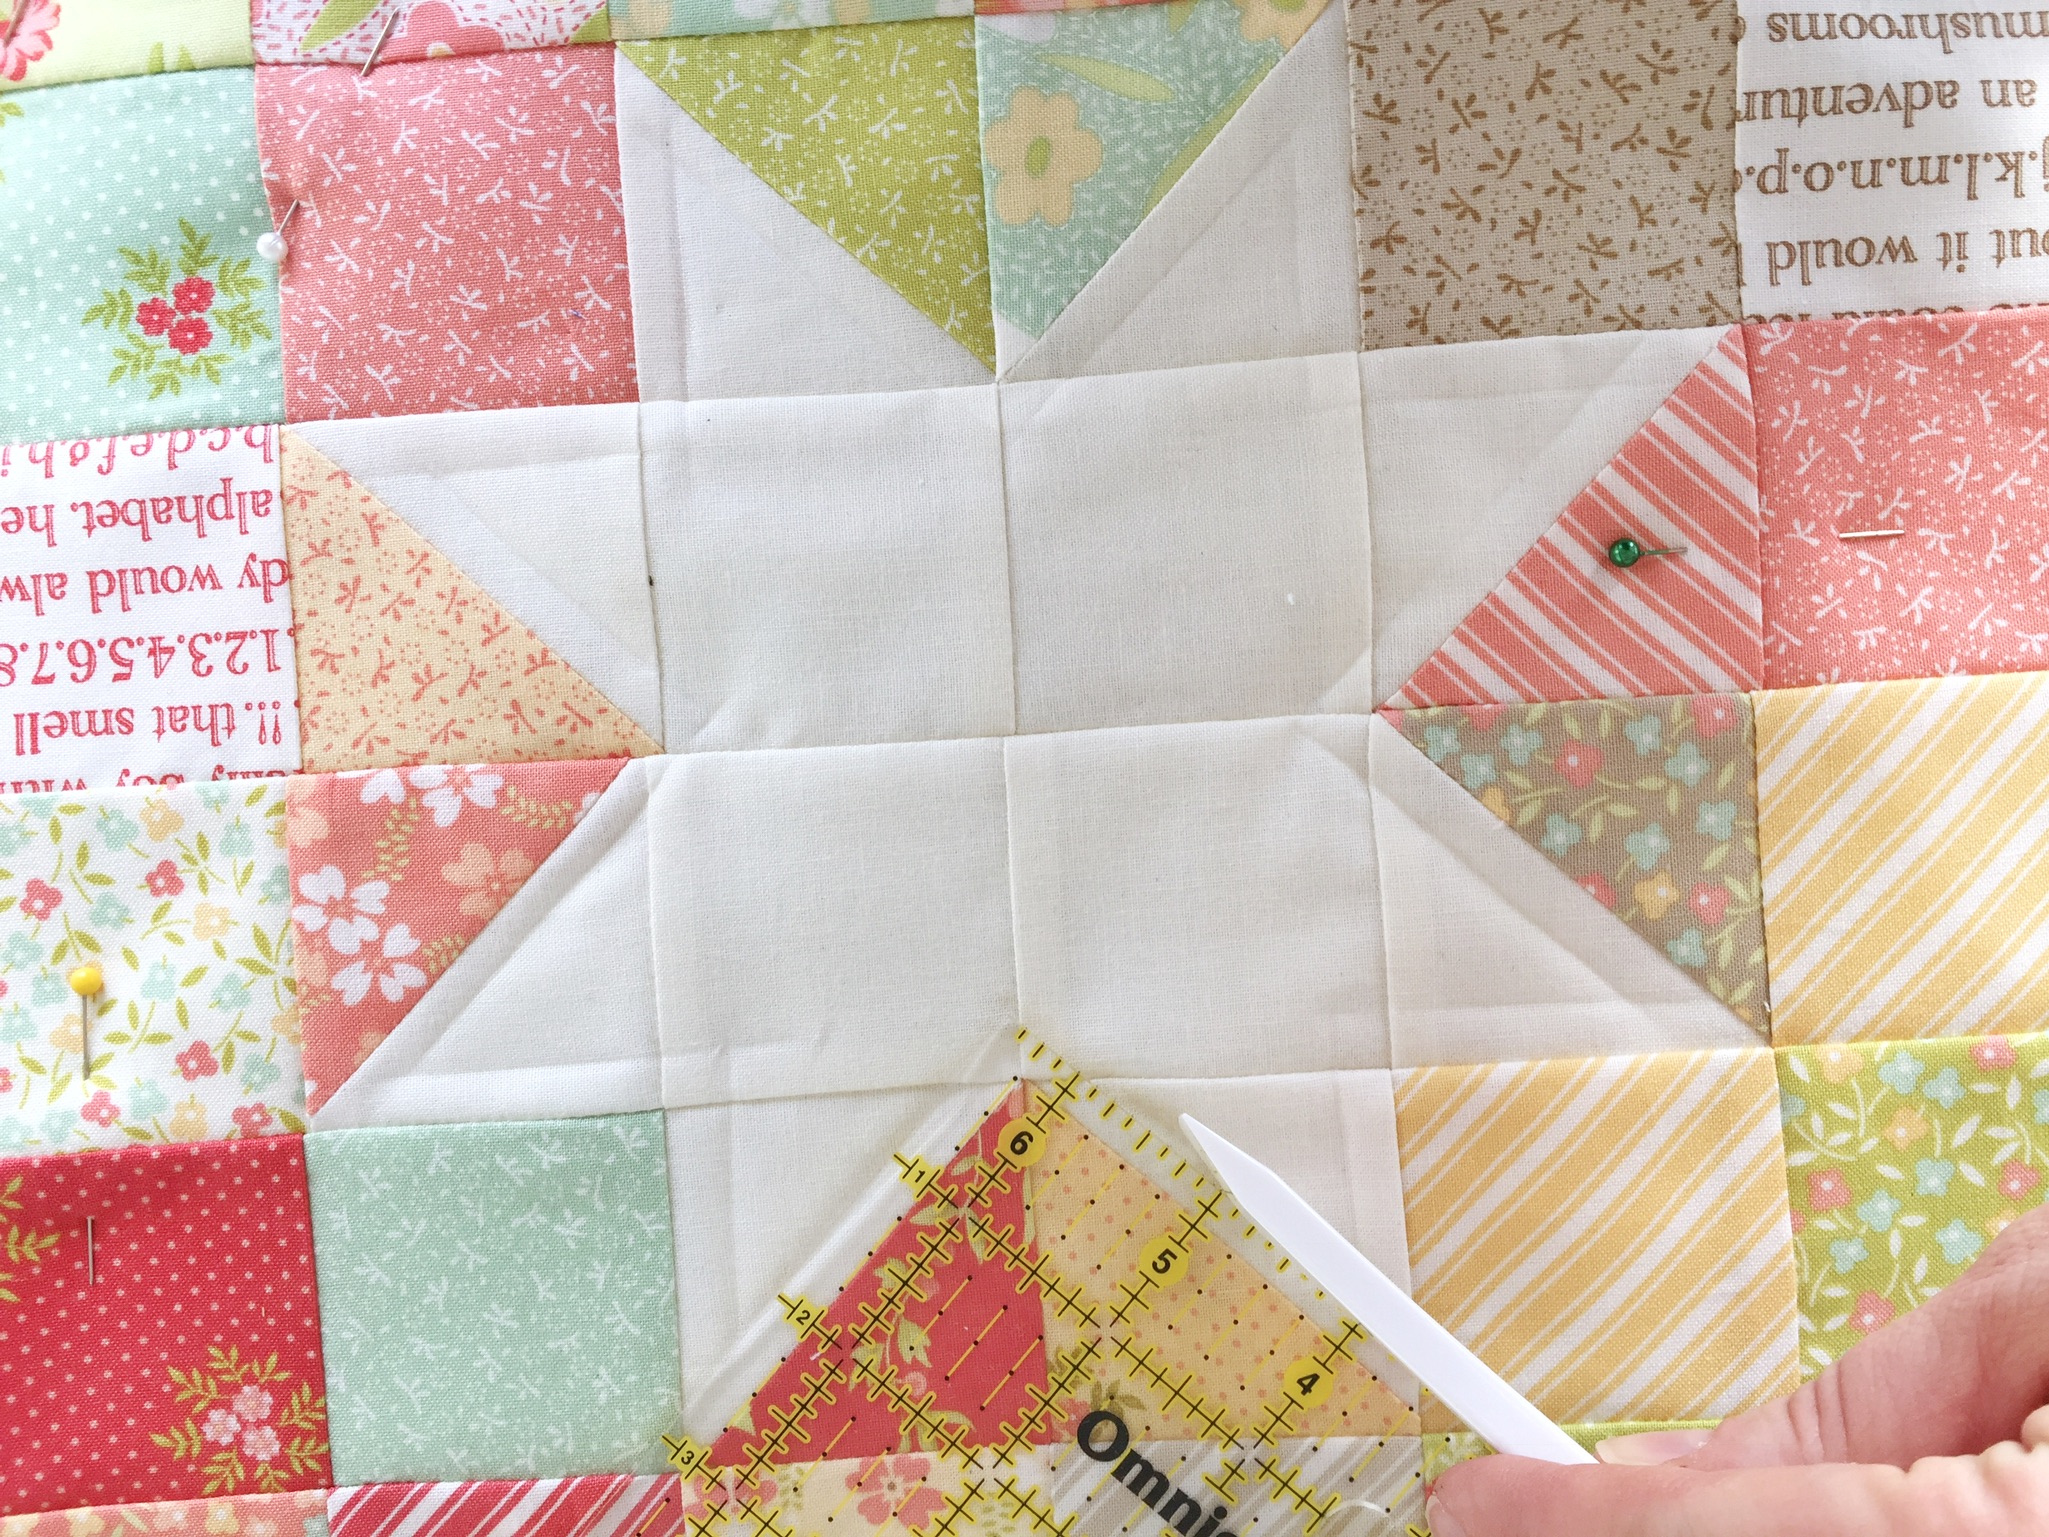
Sew on the line you marked (I backstitched a few times at the beginning and end). Start on a straight away, not a point.
After you finish, move your needle up, pull up a long tail, and cut your threads.
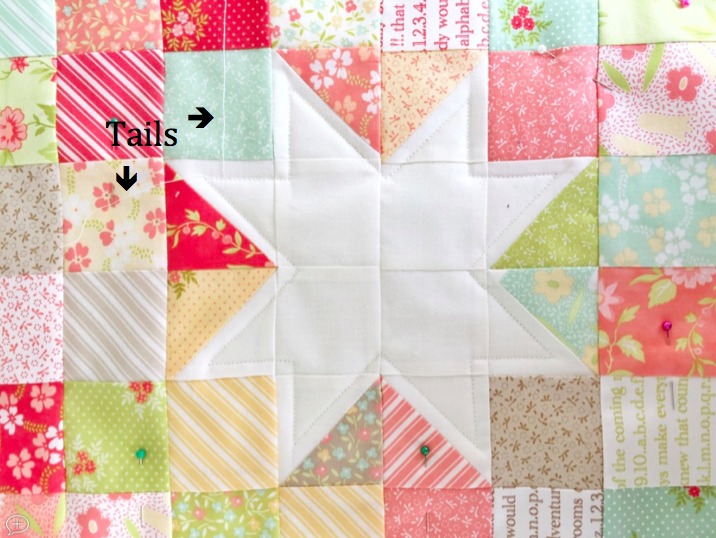
Thread the top thread into a needle and pull it to the back, right next to the back thread. Repeat with the other top thread. Flip the pillow over, straighten out the threads (1). Take two threads right next to each other, tie a knot right down to the backing fabric (2). Thread your needle with their tails (3), enter you needle into the backing right next to the know you just tied (4). Make sure your needle is in the quilt sandwich and not poking through the front. Pull you needle out through the backing a few inches from where you started (5). Hold the tails taunt and cut the tails right at the backing, careful not to cut the backing. Repeat with the other two tails. Now your tails are completely hidden and secure (6). Each step is shown in the picture below.

Mark 1/4" outside your star, all the way around. Quilt along the line you marked. Hide your tails just as you did before.

To start straight line quilting, use your ruler and mark about 1/4" down from the top of the pillow. Sew along that line, start sewing in the batting, sew across the line, finish sewing in the batting.

Each of the subsequent lines are spaced at 1/2". Continue marking and sewing lines at that spacing.

As you continue quilting the pillow, you will get to the point where your line intersects the star, mark across the star with your marker but you will not be sewing into the star. Sew right up to and on the outer star line but not through. When you reach the line, backstitch a few times to secure. Move your needle up. Pull up a long tail (just as we did before). Cut the threads, leaving a long tail. Begin sewing along your marked line again, but on the other side of the star, make sure you leave a long tail at the beginning of the line as well as at the end because you will need to pull this thread to the back and hide the tails.
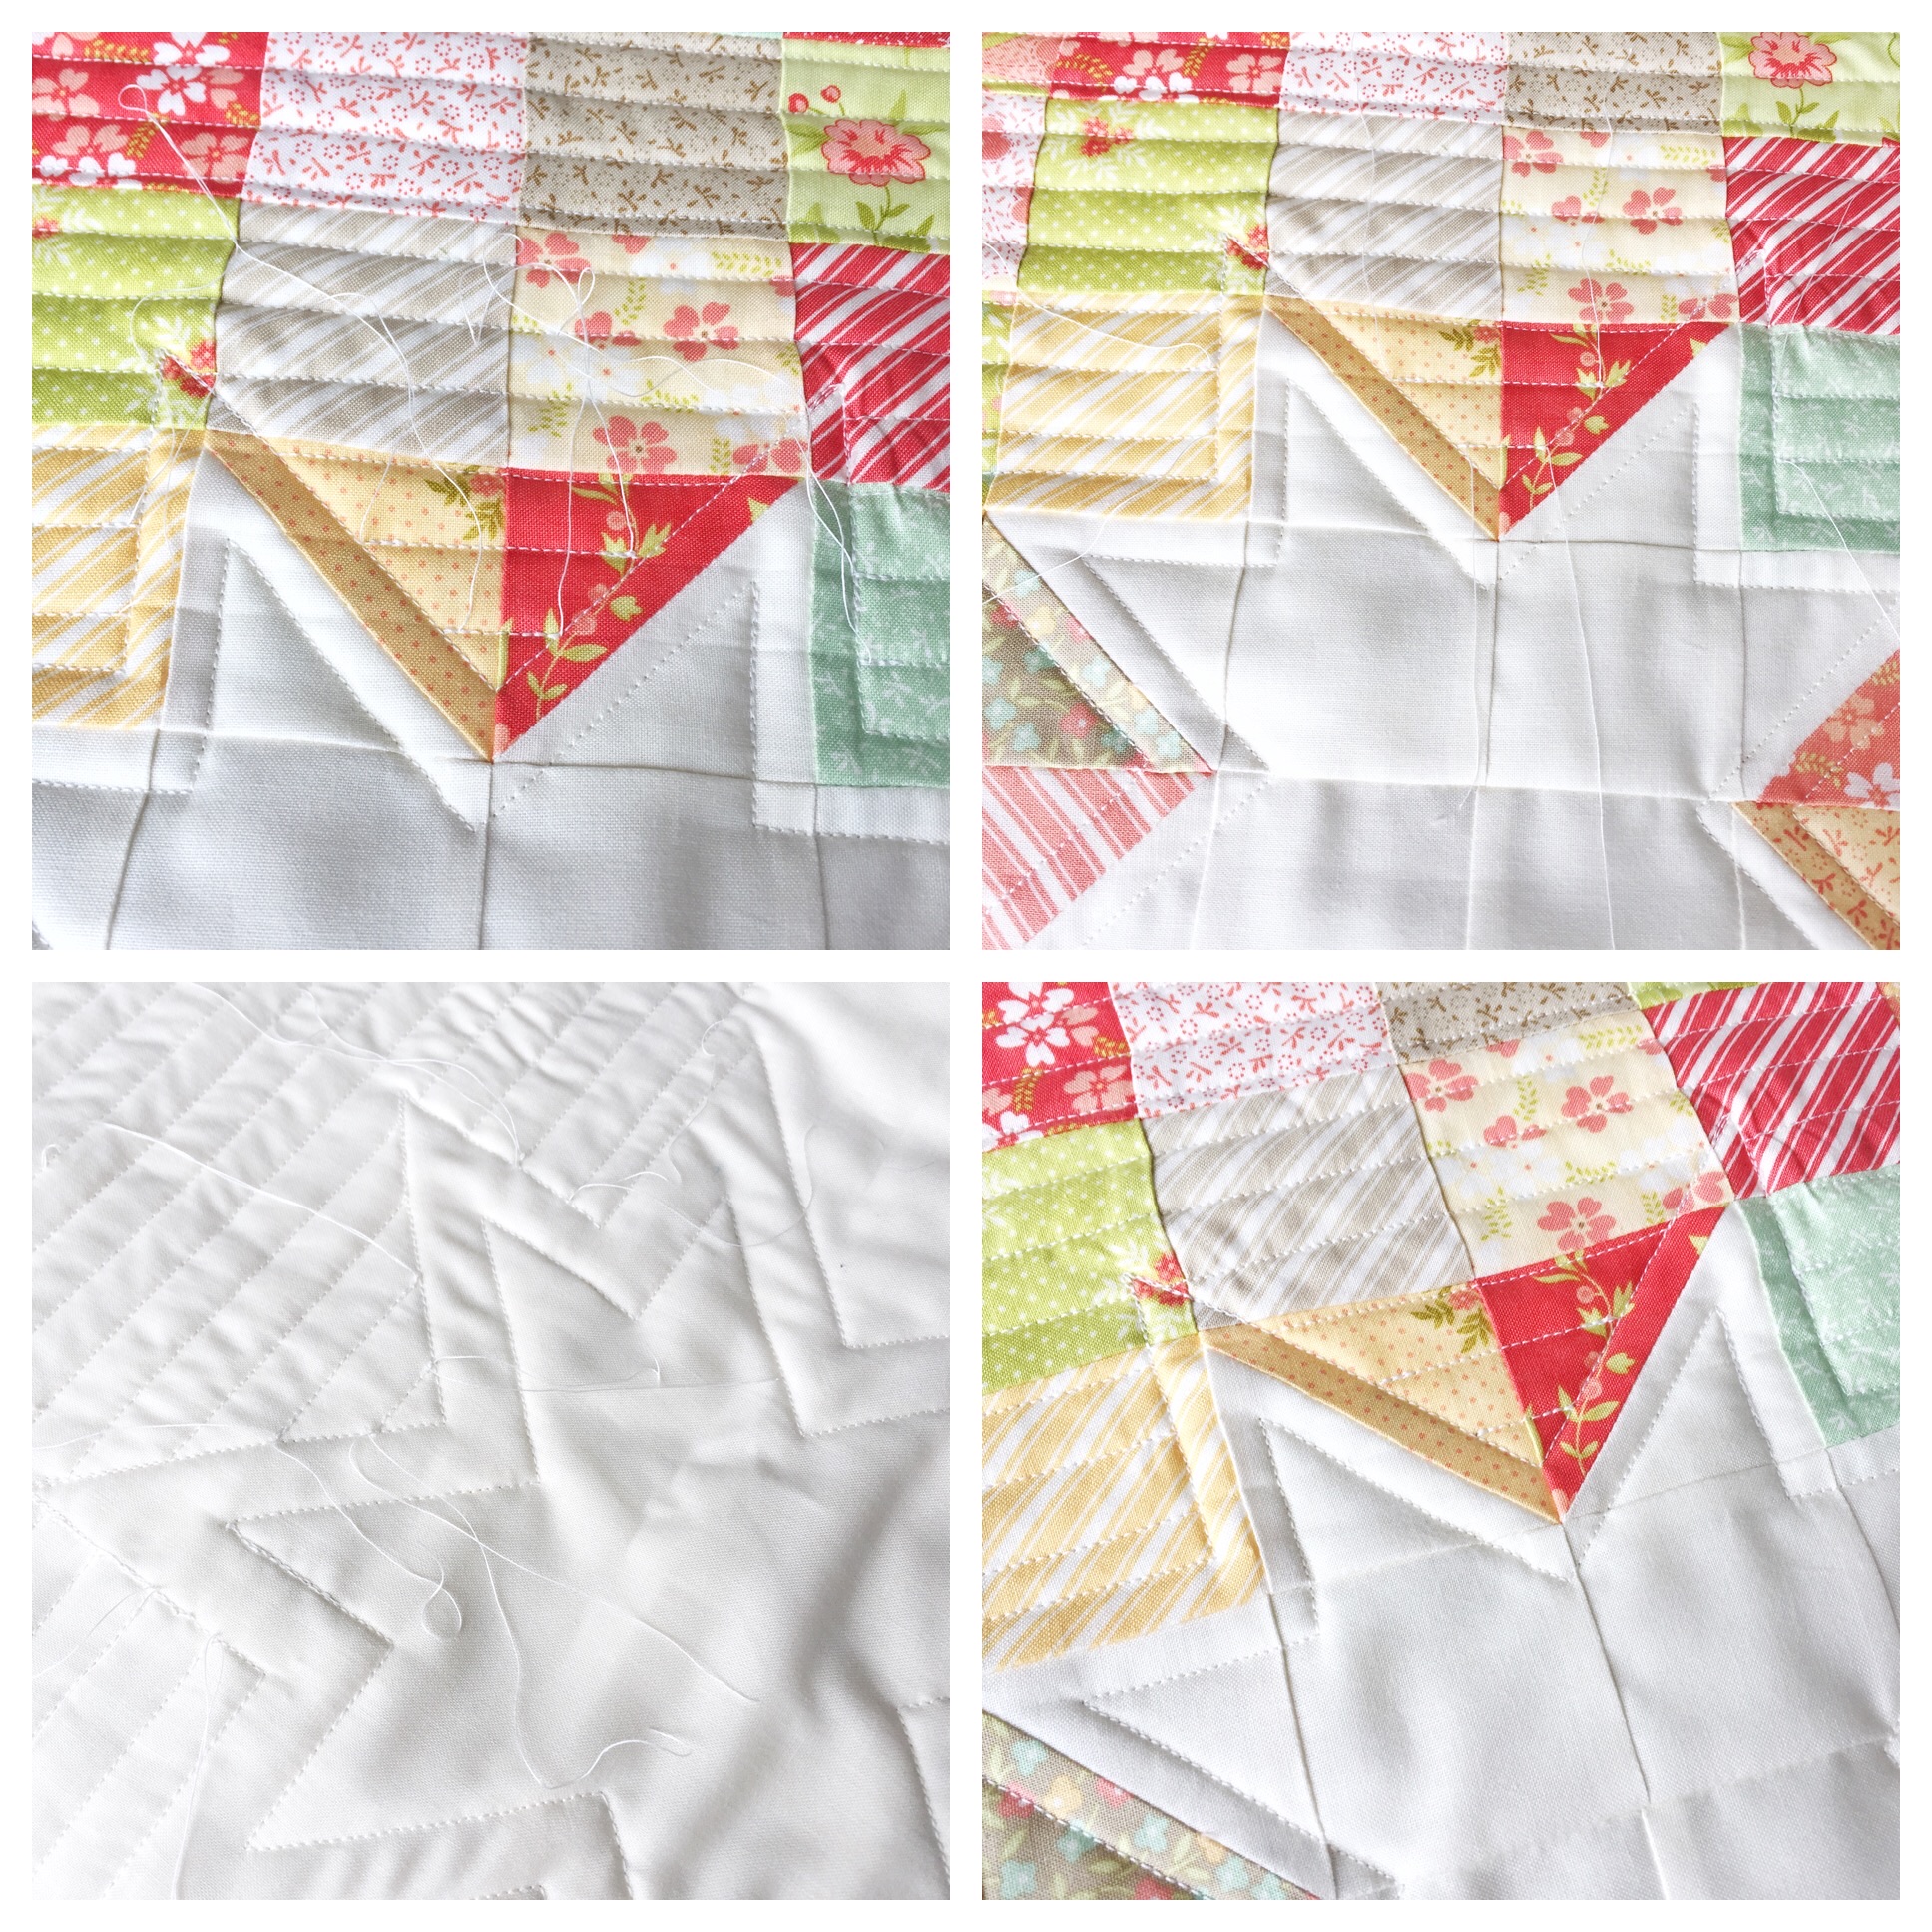
Continue doing this...at each point your line intersects the star, backstitch to secure, move your needle up, pull a long tail, cut, and repeat. You will have a ton of tails ;) but hiding them goes quick and it is so worth it! I periodically stop sewing, hide the tails (as instructed above), then continue on quilting. You need to do this because you don't want to sew over your long tails. If you do, you won't be able to hide them appropriately. I recommend after every other row, you stop, hide the tails, and then continue. And when quilting, be conscious of where your tails are so that you don't sew over them.
Repeat on the second pillow top.
Once both of your pillow tops are quilted, use a ruler to trim them to 16.5" square.
To make the envelope-style backing, cut the following-
2- 9" by 16.5"
2- 13" by 16.5"
On one of the long edges of each of the four pieces, mark 1/4" from the edge.

Fold on the first line and press. Fold that line over again and press. Sew along that to secure.

Make your binding. Cut the striped fabric into 8 2.5" strips (cutting along the 18" side of the fat quarter). Iron them in half. Make continuous binding (make 2 sets of 4 strips). Set aside for a moment.
Lay your pillow top, right side down. Line your backing up on the pillow so that it sits exactly how you want it to. Pin around to secure.

Attach your binding. (I usually tend to hand bind, so I sew my binding onto the front of the pillow. As you are sewing on your binding, you are also sewing on your backing, so be sure to the layers are together just as you pinned.)

Put in the pillow forms and you are all finished! Enjoy your pillows!
![]()
Each Twinkle Pillow finishes at 16" x 16" and this recipe makes 2.
I hope you enjoyed this tutorial and found it easy to follow. If you have any questions, I'd be happy to help! Just leave a comment below. I'd love it if you would follow along with my crafting journey on Instagram @skeinandhook! Tag me if you make a Twinkle pillow, I'd really love to see!
Jessica Dayon
{on Instagram @jessicadayon}
{blog: Jessica Dayon}
![]()
Posted in:
Comments