Welcome to Moda Fabrics!
Path B: Star Valley
Path B: Star Valley
Published:
Jun 26 2018 - 23:00

![]()
On Monday Camp Counselor Mary shared the first center block option, Dresden Peak, and today we have the second of option for you: Star Valley! Either of these choices will make a perfect center for the Choose Your Own Adventure medallion quilt. Which one are you going to choose?
NOTE: This is one post in a series of quilt-along posts. Start from the beginning with the first post {here}.
Hi! It's Kristina Brinkerhoff from Center Street Quilts and I'm excited to be presenting the second option for the center block today: Star Valley. The Star Valley block is a fun, traditionally pieced star that is easy and quick to sew together. It would make the perfect center to your Medallion Quilt, but then again, so would the Dresden Peak! Have you decided which one you'll choose yet?
The Star Valley center medallion option finishes at 20" x 20".
![]()
- 10" x WOF for the Background Fabric, plus either:
- 2 Fat Quarters (1 dark, 1 medium/light) OR 5 Layer Cake squares (10" x 10" squares) (2 dark, 3 medium/light)
A few notes about the Ingredients for each option: as you might have noticed, the fabric requirements for the Star Valley center block option are different than the Dresden Peak option. This will be the case each week as we go through the Choose Your Own Adventure QAL. We did our best to combine all of the fabric requirements to give an accurate estimate of what you'll need overall, but you will likely have a little extra fabric at the end (too much is way better than running out, right?!?). Additionally, for most of the options, you'll have sections of fat quarters or layer cake squares left over to use for another week. Feel free to use the half of a fat quarter left over from this week on next week's blocks. Or, if you want to add in more color variety, you can absolutely use more fat quarters or layer cakes than what is listed--knowing that everything will even out as you work your way through the quilt top. Be creative and know that you can definitely make changes as you go. :)
![]()
Before beginning:
- Read through the entire instructions
- Seams are all 1/4"
- Width of Fabric is abbreviated as WOF and is assumed to be 42".
Cutting Instructions
Below, you'll find the cutting instructions for both Fat Quarters and Layer Cakes. Only follow the set of instructions that corresponds to the fabric precut you are using. EVERYONE needs to cut the Background Fabric the same. :)
Cutting the Fat Quarters (follow only if you are using FQs):
From one fat quarter (dark color) cut:
- (4) 5" x 5" squares
- (4) 1.5" x 3.5" strips
- (4) 1.5" x 2.5" strips
- (4) 1.5" x 1.5" squares
- (1) 4.5" x 4.5" square (this will be the center square. You can choose to cut this square from a third fat quarter to make this center square really stand out)
From one fat quarter (medium/light color) cut:
- (4) 4.5" x 4.5" squares
- (4) 1.5" x 4.5" strips
- (4) 1.5" x 3.5" strips
- (4) 1.5" x 2.5" strips
- (4) 1.5" x 1.5" squares
Cutting the Layer Cakes (follow only if you are using Layer Cakes):
From one layer cake square (dark color) cut:
- (4) 1.5" x 3.5" strips
- (4) 1.5" x 2.5" strips
- (4) 1.5" x 1.5" squares
From one layer cake square (dark color) cut:
- (4) 5" x 5" squares
From one layer cake square (medium or light color) cut:
- (4) 4.5" x 4.5" squares
From one layer cake square (medium or light color) cut:
- (4) 1.5" x 4.5" strips
- (4) 1.5" x 3.5" strips
- (4) 1.5" x 2.5" strips
- (4) 1.5" x 1.5" squares
From one layer cake square (medium or light color) cut:
- (1) 4.5" x 4.5" square (this will be the center square of the star)
Background Fabric (EVERYONE cut this):
- Cut (1) 4.5" x WOF strip. Subcut into (8) 4.5" x 4.5" squares.
- Cut (1) 5" x WOF strip. Subcut into (4) 5" x 5" squares.
Assembling the Block
First, we will assemble the half-square triangles.

- Gather the (4) background 5" x 5" squares and draw a line diagonally corner-to-corner on the wrong side of the fabric.
- Pair a dark color 5" x 5" square right sides together with each of the background squares.
- Sew each pair of squares together using two seams, 1/4" away from either side of the drawn line.
- Cut the pairs apart on the drawn line and press the seam open.
- There should now be (8) half-square triangles. Trim the squares to 4.5" x 4.5".
Next, we will assemble the quarter log cabin blocks.
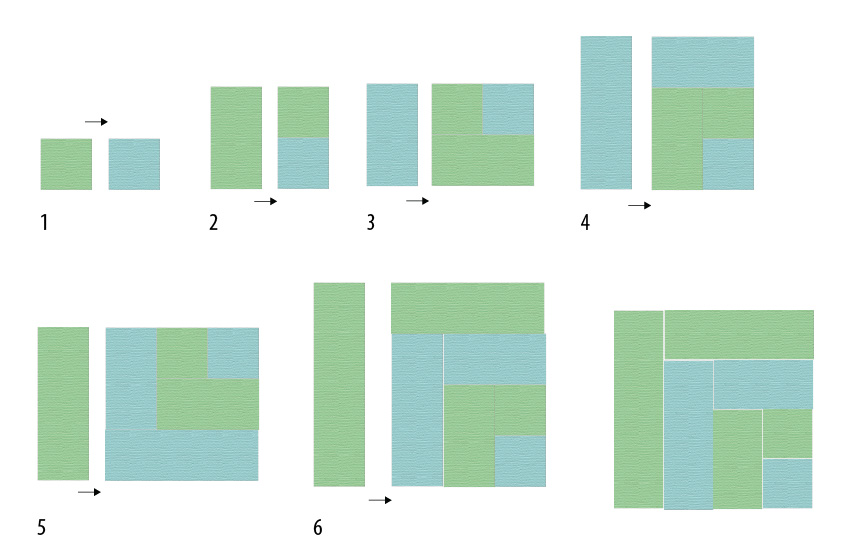
- Pair up a dark 1.5" square (blue) with a medium/light 1.5" square (green) and sew them along one edge, right sides together. Press the seam toward the dark square.
- Orient the newly sewn square units so the dark square (blue) is in the lower right corner. Take one of the medium/light 1.5" x 2.5" strips and add it to the left side of unit that was just sewn, as shown. Press the seam toward the newly sewn strip.
- Orient the sewn unit so the dark square is at the upper right corner. Take one of the dark 1.5" x 2.5" strips and sew it, right sides together, to the left side of the unit. Press the seam toward the newly sewn strip.
- With the dark square in the lower right corner, take a dark 1.5" x 3.5" strip and add it to the left side of the sewn unit. Press the seam toward the newly sewn strip.
- With the dark square in the upper right corner, add the 1.5" x 3.5" medium/light strips to the side of the unit. Press toward the newly sewn strips.
- With the dark square in the lower right corner, add the 1.5" x 4.5" medium/light strips to the side of the units. Again, press toward the newly sewn strips.
The quarter log cabin units should measure 4.5" x 4.5" each. Repeat to make 3 quarter log cabin units.
Lay out the pieces in a 5 x 5 grid as shown in the image below. Assemble each of the five rows, pressing the seams in alternating directions.
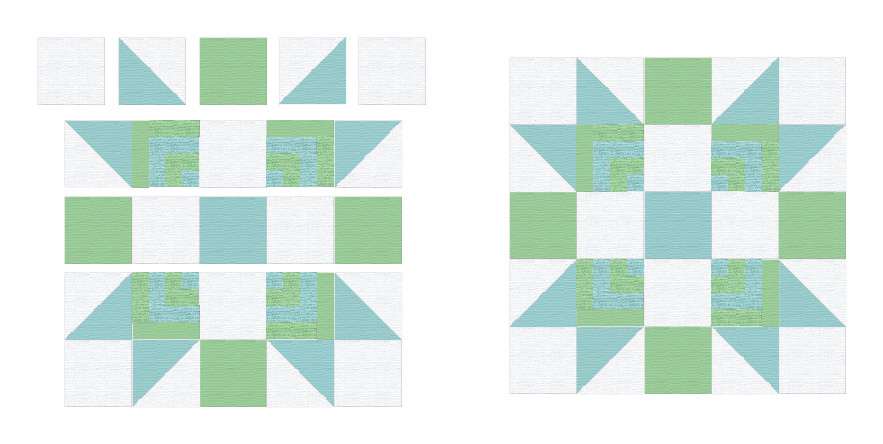
Sew the rows together, pressing the seams all in one direction.
The completed Star Valley block should measure 20.5" x 20.5" (and will finish at 20" x 20").
One note about medallion quilts: it is pretty important that each block or border measures accurately. Since you will be adding border after border to this center block, being off by a little bit can really affect the borders to come. But if accuracy isn't your forte, you don't need to fear! After each block or border, we will add in a filler border made with the background fabric. This filler border is your chance to square the quilt up or down to the right size. So if you're measuring small, make the filler border bigger. If you're measuring big, sew on the filler border then trim to size. This adjustment will help ensure that the next border fits on correctly. :)
![]()
The Star Valley block finishes at 20" x 20" (measures at 20.5" x 20.5" unfinished).

What a fun start to the Choose Your Own Adventure Quilt Along, right? The Dresden Peak and Star Valley blocks are both such great options and I'm excited to see everyone's fabric choices and progress on their own medallion quilts. Next week there will be two options for the first pieced border and I'm already itching to get going on it. :) To follow along with my medallion quilt progress, you can check out my instagram account @centerstreetquilts or Facebook page HERE. I'll be posting updates on both of those regularly. If you're also posting on social media, please use the hashtag #ChooseYourOwnAdventureQAL so we can see your progress, too. Happy sewing!
Kristina Brinkerhoff
[blog:Center Street Quilts]
[instagram: @centerstreetquilts]
![]()
Posted in:
Comments